HGrid Flows
Last Updated
02-Jun-2004
General Description
An HGrid allows a user to browse hierarchical data in tabular format on one page. HGrid flows allows
the user to manipulate the view, data, and structure of hierarchical information in an HGrid. For instance,
a user can manipulate the view by changing the sort order under a parent node. A user the may also need the
ability to manipulate the data within the hierarchy, such as update the details of an individual node. Lastly,
a user may need to redefine the hierarchical structure (i.e., move a node from one parent to another.)
Below are standard flows to use when manipulating a hierarchy of data in an HGrid:
- General Principles
- General Flows
- Manipulate Data within a Hierarchy
- Manipulate the Structure of a Hierarchy
- Manipulate the View of a Hierarchy
Guideline Attributes
Spec Version # - 3.1
Spec Contributors - Betsy Beier, Sherry Mead, Mervyn Dennehy, Craig Louis, Ivy Leung
UI Models - all models
Example Products - all products
Related Guidelines -
HGrid,
Tree,
Tables,
Object List Templates,
Object Templates,
Personalization of Tables and HGrids
Interaction and Usage Specifications
- The data within an HGrid may be view only or updatable (i.e., the columns of data may have standard web widgets such as fields, so that users can update the data inline in the HGrid.). See "Grouping Functionality in HGrid Modes" below for details.
- Actions may be performed within an HGrid by using a selection column in conjunction with a control bar, and/or by placing functional icons in individual cells.
- HGrid page titles follow the specifications for Object List templates, and consist of either the object name, such as "Employees", or the defaulted object state, such as "My Contacts".
- Users can personalize views of HGrids. For details, see the Personalization of Tables and HGrids guideline.
Grouping Functionality in HGrid Modes
In certain applications, it may be appropriate for a user to:
- manipulate the view of hierarchical information without changing data (Focus, Sort, Sort All, Compare, and Search)
- change hierarchy data:
- by adding, removing, or moving elements (Create, Insert, Delete, Duplicate, and Reorder or Move)
- by editing the properties of a parent or child node (Update Properties)
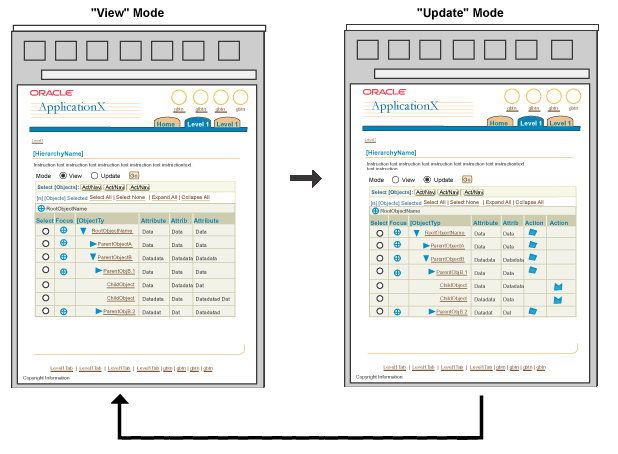
Applications may need to add other context-specific functions, in addition to these standard options. As a result, the HGrid may become overly complex if all this functionality is exposed at once. In this case, consider grouping the functionality so users can toggle between different "modes" of the HGrid. For instance, an application might separate functions between "View" and "Update" modes:
- "View" mode: Allows the user to manipulate the view of the hierarchy.
- "Update" mode: Allows the user to modify the structure of the hierarchy.
Applications may include other context-specific modes as needed. If the HGrid features two modes, insert a radio group above the HGrid. If it features three or more modes, insert a choice list. If HGrid modes are employed, it is recommended to provide either instruction text or a Tip to introduce users to the concept.
"Select" column with Control Bar vs Functional Icons in Individual Cells
- The "Select" column of an HGrid may either contain radio buttons (for single selection) or check boxes (for multiple selection.)
- It is appropriate to analyze which functions are required for manipulating the hierarchy of data; then based on those functions, to determine whether single selection is appropriate, or whether the user needs the ability to select and act on multiple items.
- Multiple Selection/Check Boxes in the "Select" Column:
- In complex hierarchies of data, it is typically not possibly to select many items at one level and perform a single function, since some actions may be valid for parents/containers but not for child nodes. Before using check boxes, make sure that all nodes (regardless of level) can perform all functions. Otherwise, users may encounter a succession of error messages.
- Single Selection/Radio Buttons in the "Select" Column:
- If a radio button is used in the "Select" column, the function in the control bar must be applicable to all levels of the hierarchy (parent and/or child.) If not, then use functional icons in a column.
- Note: It is possible to disable a radio button or check box in the "Select" column, but it then remains disabled regardless of other selections made on the page.
- Column of Row-Specific Functional Icons in an HGrid
- Functional icons are appropriate when parent/container objects can perform different functions than child objects, and vice versa. In this case, icons may vary from row to row of the HGrid.
- If an object in the table can NEVER perform the function; then do not show the icon in the cell. For example, if a child object can never be made into a parent, the Sort Children functionality is never applicable.
- If an object's type changes, and the new type allows new functionality, do not show the icon in the cell until the functionality changes. For example, if a child object can become a parent, the Sort Children functionality becomes applicable when the child becomes a parent, and the icon should then be displayed.
- If an object can perform a function, but the function is not available because of the object's current state, the icon should be disabled.
Typical Templates Used within the Flows
- HGrid on an Object List Template
- Object List Template
- Object Template:
- 1 Step Template/Process
- 2 Step Template/Process
- 3(+) Step Template/Process
- Multiple Non-Linear Template/Process (Using Side Navigation or SubTab)
Individual Flows
The common initiation point or start point for each HGrid flow is a object list page with an HGrid.
Functionality associated with a hiearchy may be extremely complex. A user may need to manipulate the view of the
hierarchy, manipulate the data within the hierarchy, or manipulate the structure of the hierarchy. In cases where
an application requires all of the above functionality, it may be appropriate to use HGrid "Modes", and group the functionality
within a "View Mode" and an "Update Mode".
Ignore this flow if the hierarchy's re-structuring controls are always visible and modes are not necessary.(i.e., there is no Update Mode).
- Hierarchy Page (View Mode)
- Start at the Hierarchy Object (View Mode) page.
- Click the "Update Hierarchy" radio button, then click the "Go" button.
- Hierarchy Update Mode Page
- Hierarchy page appears with the same hierarchy, but with different functionality. Columns that are considered non-essential should not be shown in Update Mode.
- Update the structure of the hierarchy using action/navigation buttons and their corresponding drill-down pages. Changes are saved when user selects Apply/Cancel on drill-down pages.
- Click the "View" radio button, and then click "Go" to return to the Hierarchy Object page.
HGrid with View and Update Modes
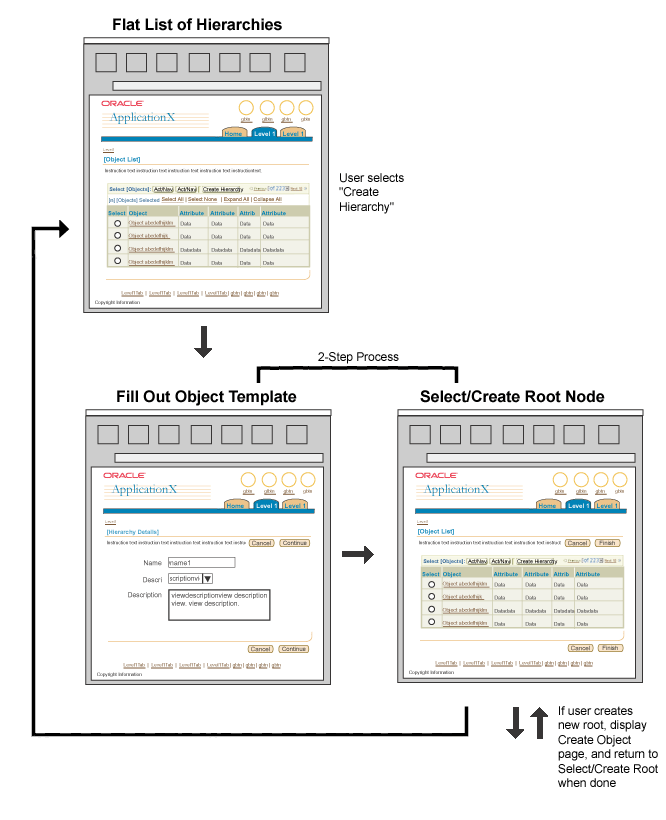
Some applications may require a user to create different sets of hierarchies. To create a hierarchy, the user needs to define a root node, then create or insert nodes until done.
- Object List (Flat List) of Hierarchies
- The flow starts at an Object
List (flat table) of hierarchies, or the page from which the
hierarchy is launched.
- Click the "Create Hierarchy" global table button.
- 2 Step Process Template
- Step 1: Hierarchy Detail Properties
- Fill out base information regarding the hierarchy (if required by the application).
- Step 2: Select/Create a Root Node
- Select an existing object/container from a flat table, OR
- Create a new object/container via a global table button, then return to select newly created root.
- Click "Finish" to return to the list of hierarchies.
Create Hierarchy Flow
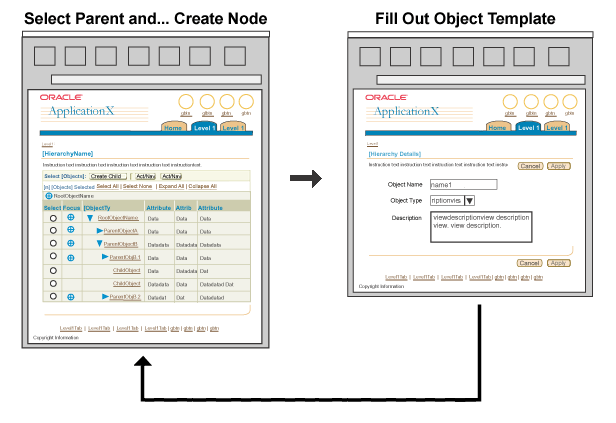
Create a Node flow allows a users to create a new object and assign it to an appropriate location within a hierarchy.
Flow Option 1: Select the Node Location in the Hierarchy, Then Define the Node
Using the control bar functions, the user selects a parent node, then creates a child object to "live" within that parent.
If a child can appear in a hierarchy only once, the "Select" column should contain radio buttons. If a child can appear under multiple parents, the "Select" column should contain check boxes.
- Hierarchy Page
- Select the parent node(s) where children will be added.
Note: Users select a parent before creating a child because some applications (e.g., iLearning) restrict the types of child objects that can be added to a given parent object type.
- Click the "Create {ObjectName/Child}" control bar button. If the number of object types in the hierarchy is small, "/Child" can be omitted.
- Create Object Template
- The object (node definition) template is displayed with an Object Type choice list at the top of the page.
- If the object type needs to be selected before the user can create the object, use an object type choice list, then a "Go" button (if using Partial Page Rendering [PPR] technology; the "Go" button should not appear.) The rest of the page will change based on the object type.
- Fill out the template, then click the "Apply" button.
- Hierarchy Page
- The hierarchy is displayed with the parent(s) expanded to show the newly created child.
Create Node Flow: Option 1
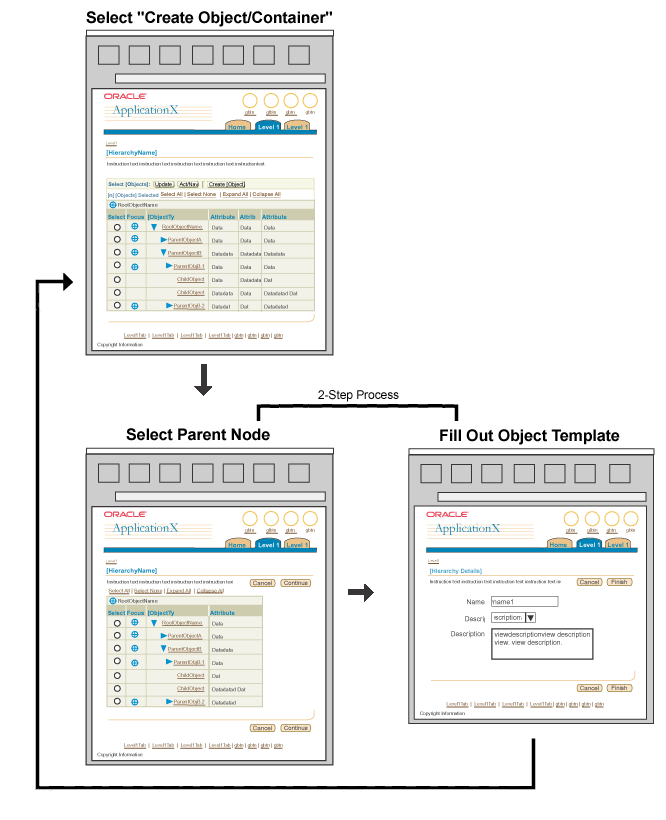
Flow Option 2: Two-step process: 1) Select parent; 2)Create child, then Finish.
Option 2 may be used if objects can appear in the hierarchy in only one location and check boxes appear in the Select
column.
- Hierarchy Page
- Click the global table "Create [Object|Container]" button.
- Step 1: Select Parent
- The hierarchy is displayed in an HGrid with radio buttons in the "Select" column. The number of columns of the HGrid should be reduced to only what is relevant for selecting a parent.
- The user navigates to and select the desired parent node (i.e., the newly created object's location in the hierarchy), then clicks "Continue".
Note: Users select a parent before creating a child because some applications (e.g., iLearning) restrict the types of child objects that can be added to a given parent object type.
- Step 2: Create Object
- The user completes the necessary elements needed to create an object.
- If there are several steps to creating the object, use a train for the entire process. The first step of the train would be to select a parent.
- If the object type needs to be selected before the user can create the object, use an object type choice list, then a "Go" button (if using Partial Page Rendering [PPR] technology; the "Go" button should not appear.) The rest of the page will change based on the object type.
- The user selects "Finish."
- Hierarchy Page
- The hierarchy is displayed with the parent node expanded to show the newly created child node(s).
Create Node Flow: Option 2
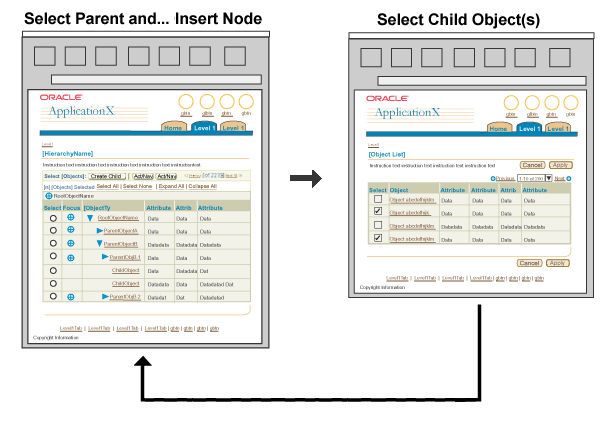
Insert Node flow allows a user to either select a node from an existing object list
or import a node from an external object list and place it in the appropriate location
in the hierarchy.
Flow Option 1:
Selecting Where the Node will Be Placed in the Hierarchy; Then Defining Node
- Hierarchy Page
- Select a parent node to add children to.
Note: Users select a parent before creating a child because some applications (e.g., iLearning) restrict the types of child objects that can be added to a given parent object type.
- Click the "Insert [Child/ObjectName]" button. If the number of object types in the hierarchy is small, "Child" can be replaced with "[Object Name]".
- Insert Object: Object List Template (Flat Table of Objects)
- An Object List page is displayed
- If the object type needs to be selected before the user can create the object, use an object type choice list, then a "Go" button (if using Partial Page Rendering [PPR] technology; the "Go" button should not appear.) The rest of the page will change based on the object type.
- Select object(s), then click Apply.
- Hierarchy Page
- The hierarchy page is displayed with the parent node expanded to show the newly inserted child object(s).
Insert Node Flow: Option 1
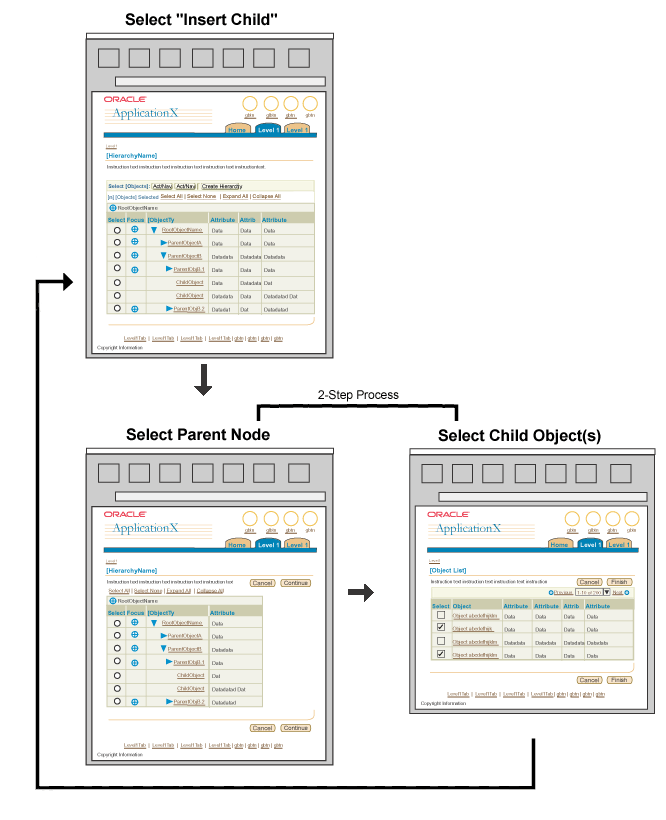
Option 2: Two-step process: Select parent; then Select|import children.
Option 2 may be used if objects can appear in the hierarchy in only one location and
check boxes appear in the Select column.
- Hierarchy Page
- Click the global table "Insert [Child/ObjectName]" button. If the number of object types in the hierarchy is small, "Child" can be replaced with "[Object Name]".
- Step 1: Select Parent
- A hierarchy is displayed in an HGrid with radio buttons in the Select column. The number of columns of the HGrid should be reduced to only what is relevant for selecting a parent. If a child node cannot become a parent, its radio button in the "Select" column should appear disabled.
- The user navigates to and selects the desired parent node then clicks "Continue".
- Step 2: Insert Object: Object List Template
- An Object List page is displayed.
- If the object type needs to be selected before the user can create the object, use an object type choice list, then a "Go" button (if using Partial Page Rendering [PPR] technology; the "Go" button should not appear.) The rest of the page will change based on the object type.
- Select object(s), then click Finish.
- Hierarchy Page
- The hierarchy is displayed with the parent node expanded to show the newly inserted child node(s).
Insert Node Flow: Option 2
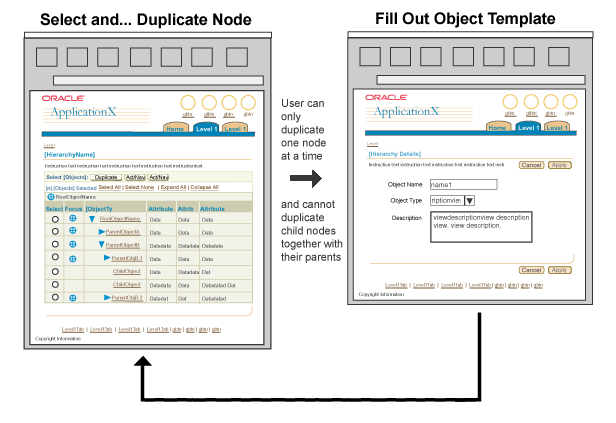
Duplicate allows a user to duplicate a node in a hierarchy. This action can be implemented with either radio buttons in the Select column or functional "Duplicate" icons in a column. There are two Duplicate flows:
- View-Only HGrids: (HGrid may contain links, label data, and icons) Only one object can be duplicated at a time. If a parent is selected, only the parent is duplicated -- not its children.
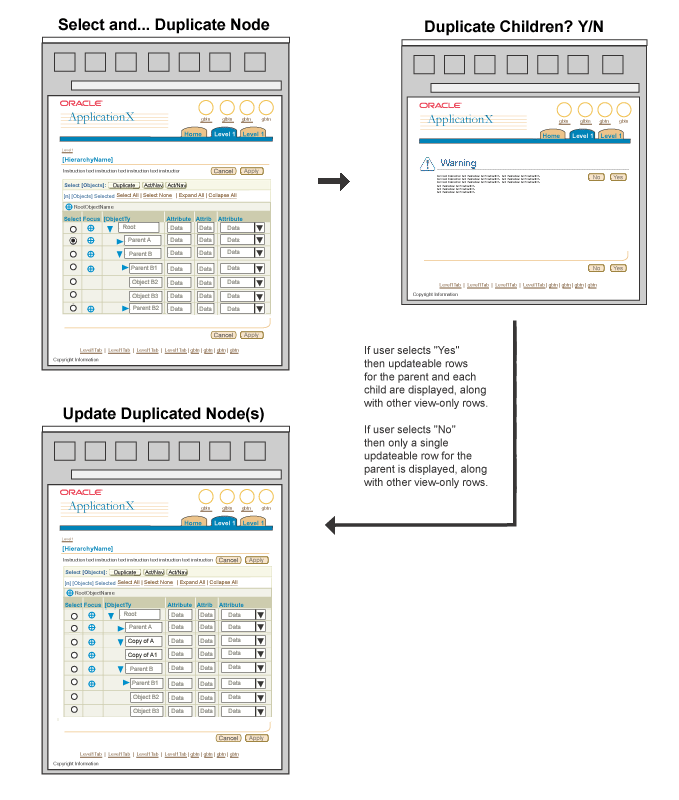
- Updateable HGrids: (HGrid contains updateable cells) Users can choose to duplicate both a parent and any of its children.
Option 1: View-only HGrid
- Hierarchy Page
- User select appropriate node and "Duplicate" control button, or clicks the node's Duplicate icon. This option should also include instruction text or a Tip explaining that only one object can be duplicated at a time.
- Object Template (duplicate of selected node)
- The user manually assigns unique values to duplicate object properties.
- The user selects the page-level Apply button.
- Hierarchy Page
- The duplicated row is displayed in the HGrid.
Duplicate Node Flow Option 1 (View-Only HGrid)
Option 2: Updateable HGrid
- Hierarchy Page
Note: Depending on the product and selected node, Duplicate Node may be a single- or multi-step process.
- User select appropriate node and "Duplicate" control button, or clicks the node's Duplicate icon.
- Warning Message Page
- If the selected node is a parent, a message page appears asking the user to choose between Duplicate Parent Only and Duplicate Branch. The user selects an option,
then clicks Apply to return to the HGrid.
- Hierarchy Page (with newly duplicated node(s))
- An updateable row containing an exact duplicate of the node,
including any child nodes, appears in the HGrid of the Hierarchy Page.
- If Duplicate Node creates a new object and all objects must be unique, unique default values should be generated for object properties that must be unique. For example, Object Name could default to "Copy of [Source Object Name]".
- The user updates the duplicated row(s) and selects the page-level Apply button.
Duplicate Node Flow Option 2 (Updateable HGrid)
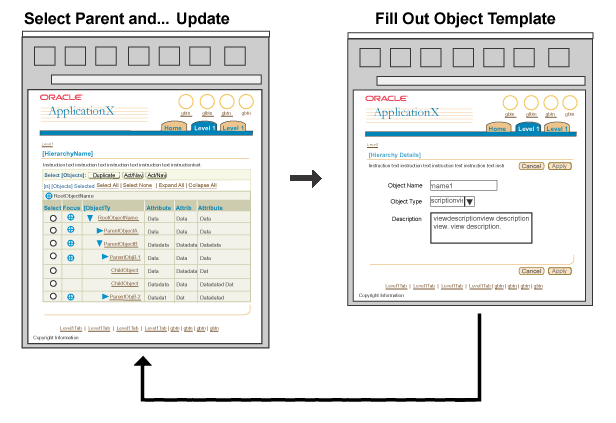
A user may need to update the properties of a node (child and/or parent as appropriate). If all nodes (parent and child) can be updated, there can be a control bar with a "Select" column with radio buttons. If only certain nodes can be updated, it may be more applicable to use a functional Update icon in an "Update" column of the HGrid.
- Hierarchy Page
- User selects a node and click a "Update" control bar button.
- If functional icons per row are used, the user would click a row-level "Update" icon.
- Object Template
- The Object Properties or Details page is displayed.
- The user updates the properties, then clicks the page level "Apply" button.
- Hierarchy Page
- The user is returned to the hierarchy with the newly update node in view.
Update Node Properties Flow
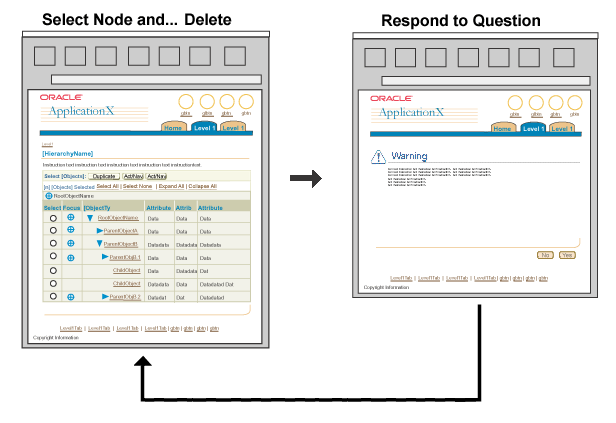
A user may need to be able to delete one or several nodes (parent or children nodes.) Delete functionality may be used in a control bar with check boxes in the select column if both children and parent nodes can be deleted.
- Hierarchy Page
- Select and... Delete or click the row-level Delete icon.
- Warning Message Page
- If the selected node is a child/leaf (has no contents/children),
optionally display a Warning message page:
- Text should read: "Are you sure you want to delete [NodeName]?", and page level buttons should read: "No" and "Yes".
- If "Yes" is selected, then return to the Hierarchy page with the node removed from the HGrid.
- If the selected node is a container/parent (node contains children), display a Warning message page:
- A radio group of alternatives for dealing with the contents/child nodes of the selected parent object may be displayed. If so, the page level buttons are "Cancel" and "Apply". The radio button options may include:
- Delete [container/parentName] plus all contents/children.
- Delete [container/parentName] and move children under [OtherparentName]. (Note: A field and possibly an LOV would be associated with this move.)
- Delete [container/parentName] and promote all children under [ParentObjectName].
- If, based on context, it is not possible to delete the container/parent without first moving or deleting the child objects, display a warning page with the following message:
- "Node cannot be deleted until all its contents/children are moved or deleted."
Delete Node Flow
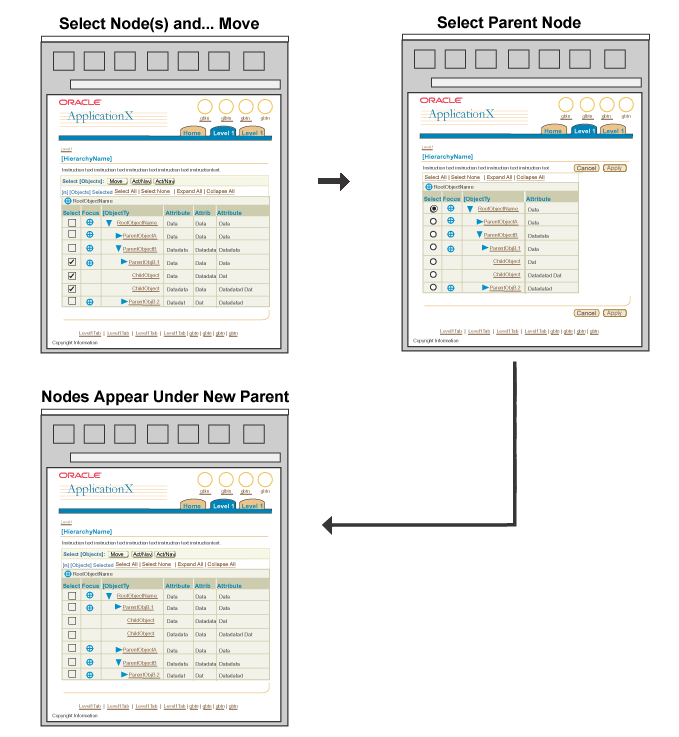
Move allows a user to move a node to a different location within the hierarchical structure. (In usability testing, users conceptually saw similarities to the "Reorder" functionality. Move and reorder should not be used in the same HGrid. See Reorder Nodes below for details.)
Flow Option 1: Select Node(s) and Select New Parent
- Hierarchy Page
- User selects node(s) and... "Move" table control bar button.
- Move [Object Type] Template
- An HGrid with radio buttons in the "Select" column is displayed. The radio button in the "Select" column of nodes that cannot be parents of the selected node are disabled.
- User navigates to and selects a new parent.
- Hierarchy Page
- User returns to hierarchy page with newly moved node in view.
Move Node Flow Option 1
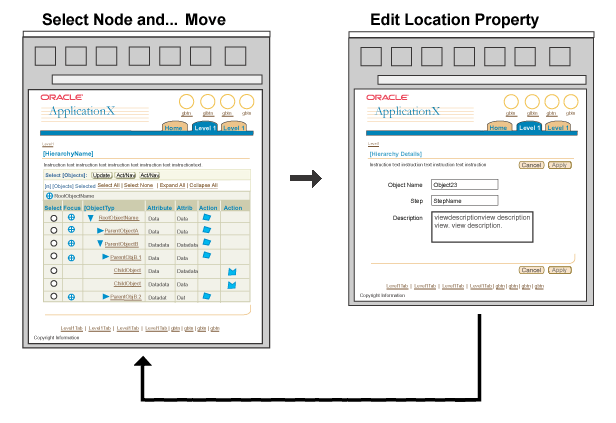
Flow Option 2: Select Node and Edit Location/Step Property
- Hierarchy Page
- User selects a node and... "Move" table control bar button, or Move icon.
- Move [Objects] Template
- Move the node by changing its hierarchy location or step property.
For example, Activity Based Management calculation steps have a step number property. Users of the existing product reorder nodes by editing the step number property.
- Hierarchy Page
- User returns to hierarchy page with the moved node in view.
Move Node Flow Option 2
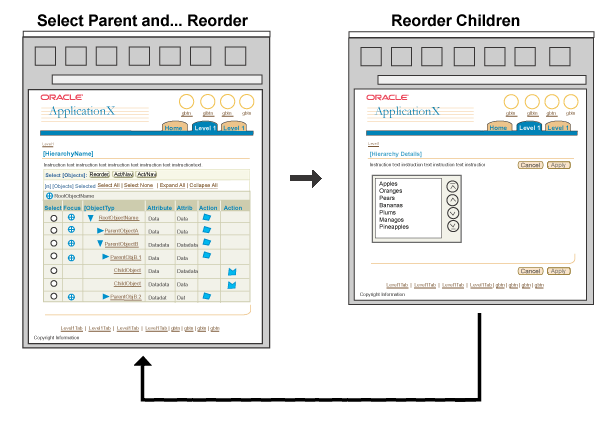
Reorder allows a user to reorder (in any order) nodes within a parent/container. A column of functional Reorder icons associated with each parent/container object should be used.
Note: In usability testing, when users were asked to reorder, most users choose to Move Nodes instead. This can possibly be a more cumbersome flow, but still accomplishes the task. Reorder functionality should only be used when absolutely necessary, and not used in conjunction with Move Nodes.
- Hierarchy Page
- User selects parent node(s) and... "Reorder" table control bar button, or select Reorder icon. (Note: Reorder functionality should be placed only on parent objects)
- Reorder [Objects] Template
- Reorder the children using the Shuttle/Reorder
control.
- Hierarchy Page
- User returns to hierarchy page with newly reordered child nodes in view.
Reorder Node Flow
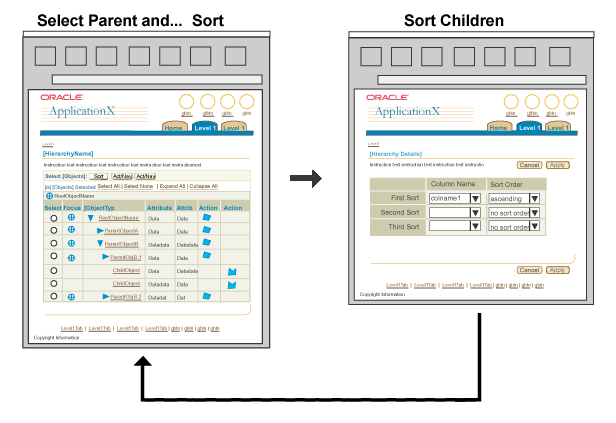
"Sort" functionality sorts child objects within a selected parent/container object. Typically a functional "Sort" icon is placed in a "Sort" column associated only to the parent/container objects.
- Hierarchy Page
- User selects the functional Sort icon associated with a parent/container object.
- Sort Contents of [Container/ParentName] Page
- A page with a standard BLAF Sort table (from the Personalization of Tables and HGrids) appears.
- Specify desired sorts, then click the page level "Apply" button.
- Hierarchy Page
- User is returned to the hierarchy page with the appropriate branch sorted.
Sort Nodes Flow
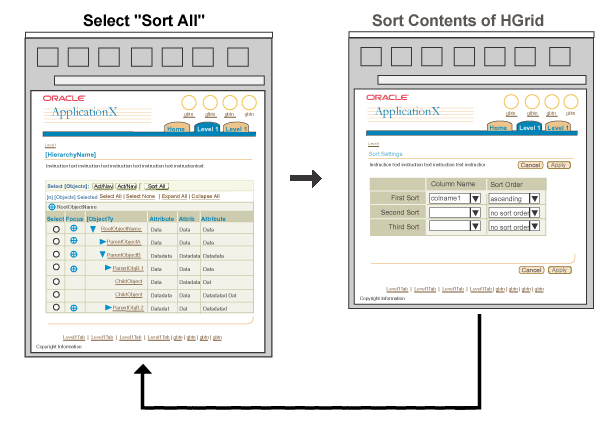
"Sort All" allows the user to set one sort method that will be applied at each level in the hierarchy.
- Hierarchy Page
- User selects the global table "Sort All" button.
- Sort Contents of [Container/ParentName] Page
- A page with a standard BLAF Sort table (from the Personalization of Tables and HGrids) appears.
- Specify desired sorts, then click the page level "Apply" button.
- Hierarchy Page
- User is returned to the hierarchy page with the sort method applied at each level in the hierarchy.
Sort All Nodes Flow
Users can resize column widths in an HGrid in the same way that they can resize columns in a table. Column resize can be provided as a standalone feature, or as part of the HGrid personalization process. In both cases, column resize can be performed in one of two ways, depending on browser capabilities and accessibility requirements:
- Using drag and drop within the HGrid
- Navigating to a separate properties page (for both column width and column order).
For details on column resize behavior and constraints, see Resizing Columns in the Tables guideline. For details on HGrid personalization, see Personalization of Views (Tables and HGrids).
Users can reorder columns in an HGrid, in the same ways that they can reorder columns in a table. Column reorder can be provided as a standalone feature, or as part of the extensive HGrid personalization process. In both cases, column reorder can be performed in one of two ways, depending on browser capabilities and accessibility requirements:
- Using drag and drop within the HGrid
- Navigating to a separate properties page (for both column order and column width)
Note: Users cannot change the position of an HGrid's selection column or its primary object column. In most languages, primary objects always appear either in the left-most column position, or immediately to the right of the selection column. In BiDi languages the primary object column and selection column appear on the right.
For details on table column reorder, see Reordering
Columns in the Tables guideline. For details on HGrid personalization,
see Personalization of
Views (Tables and HGrids).
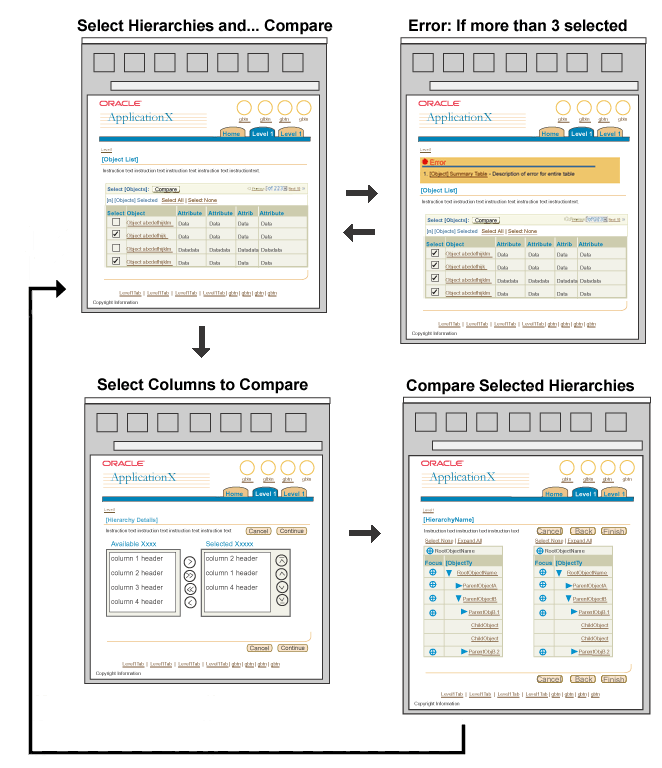
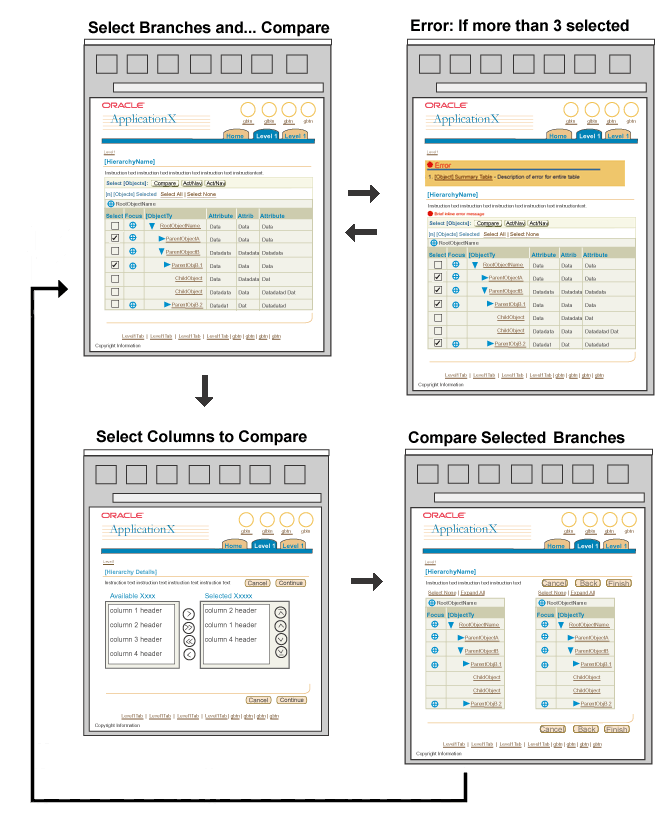
It may be required to display multiple hierarchies, views of a hierarchy, or branches of a hierarchy, side-by-side on a single page. Users may compare up to three hierarchies, views of a hierarchy, or branches of a hierarchy at one time. To avoid user error, provide a Tip above the HGrid or flat list of Hierarchies that explains the limits. The tip text should be specific to the elements being compared, as follows:
- "You can compare up to three {hierarchies|branches} at a time."
It is recommended that users be allowed to expand/collapse, focus/defocus, and view object details, but not edit the hierarchy or its contents while performing a comparison.
Compare Hierarchies:
If hierarchies are objects that reside in object lists:
- Object List (Flat List) of Hierarchies
- Start at the list of hierarchies.
- Check two or three checkboxes in the "Select" column and click the "Compare" button in the control bar.
- If a user selects more than 3 hierarchies to compare, display an Error message box and a table-level inline error message. The message text should be:
- Message Box: "You cannot compare more than three hierarchies at a time."
- Inline Message: "Select only two or three hierarchies to compare"
- 2 Step Process:
- Step 1: Select Columns to Compare
- Step 2: Compare Hierarchies
- The resulting page will contain one HGrid per selected hierarchy.
- The user selects "Finish" to return to the Object List of Hierarchies
Compare Hierarchies Flow
Compare Branches:
Display two or three branches of single hierarchy in separate HGrids:
- Start at the HGrid.
- Check two or three checkboxes in the "Select" column and click the "Compare" button in the control bar.
- If a user selects more than 3 branches to compare, display an Error message box and a table-level inline error message. The message text should be:
- Message Box: "You cannot compare more than three branches of a hierarchy at a time."
- Inline Message: "Select only two or three hierarchy branches to compare."
- Select columns (properties) to compare using the BLAF
show/hide columns shuttle.
- The resulting page will contain one HGrid for each selected parent.
- The user selects "Finish" to return to the original HGrid.
Compare Branches Flow
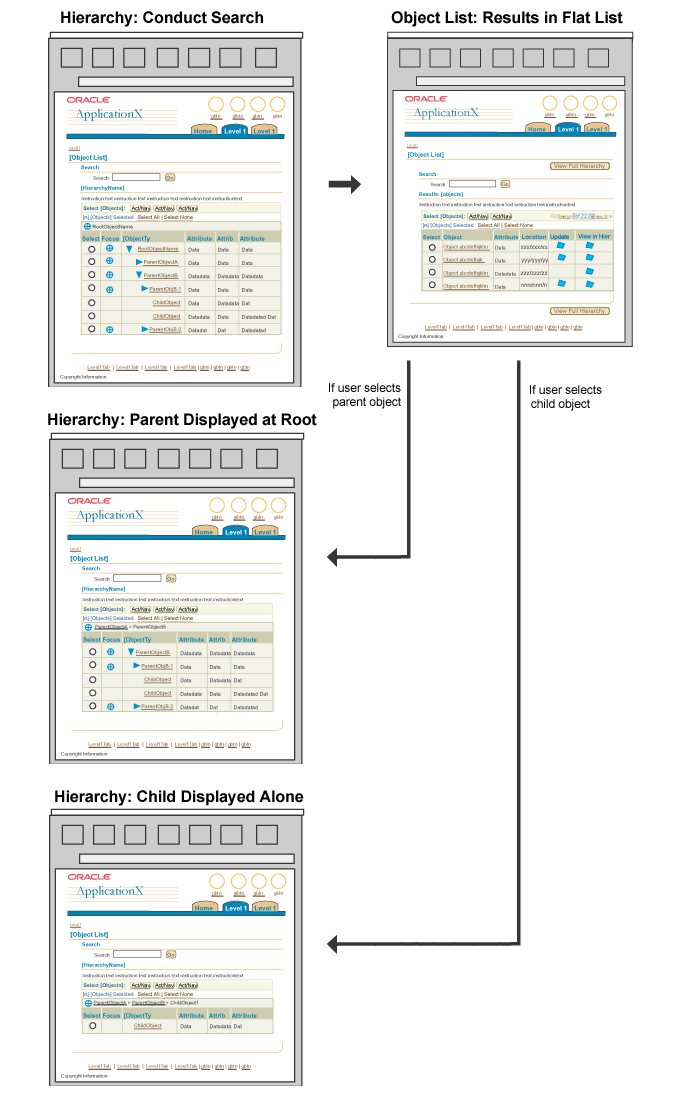
When a user conducts a search within an HGrid, the search results are displayed in a flat object list, because both parent and child elements that do not meet the search criteria are not included in the results.
The search results table includes a column of inline icons which allow the user to view the selected object within the HGrid.
- Hierarchy Page
- User enters search criteria and selects "Go".
- Object List Page
- The user views the search results and performs any of the following actions:
- Refines the search to reduce the number of matching objects.
- Selects an object link to view its details.
- Selects an object's Update icon to change object details.
- The user selects an object's "View in Hierarchy" icon to return to the HGrid. The content of the HGrid then depends on whether the object is a parent or a child.
Note: The results Object List may include a column that specifies each object's path/location within the hierarchy.
- Hierarchy Page
- User returns to hierarchy page with focus on the selected object from the previous page.
- If the object is a parent, it is displayed at the root of hierarchy.
- If the object is a child, it is displayed alone within the HGrid.
- The HGrid breadcrumbs indicate the location of the focused object, and allow the user to navigate up through the hierarchy.
HGrid Search Flow
Visual Specifications
Open/Closed Issues
Open Issues
05-Feb-2003: Use of drag and drop for column resize and reorder is currently being investigated by the UIX team.
23-Apr-2002: The following issues need to be addressed in v3.0
- Search and filter with HGrid
- Search within a branch [Filter]
- Selection in a large hierarchy
Closed Issues
28-Jan-2003: User personalization of HGrid views is now documented in Personalization of Tables and HGrids.


