
This topic describes the steps involved in creating the model, controller, and view layers of a databound Struts application that allows users to:
When the page flow is complete, running it from the Page Flow Diagram displays the master detail web page, which looks like this:

The following diagram shows a simple view of the steps you need to take in the Model, Controller, and View layers to create this page flow:
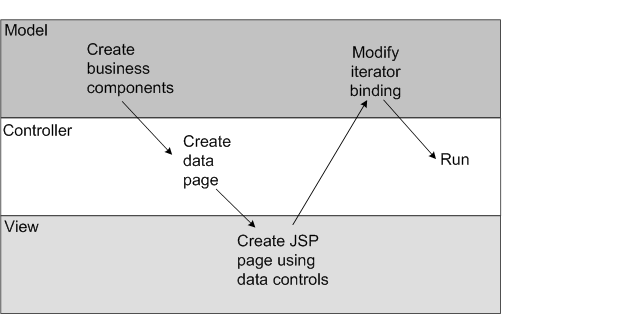
Following is a more detailed discussion of the high-level steps you need to take in the Model, Controller, and View layers to create this page flow:
Model Layer
Create Business Components
The steps described in End-To-End Solutions for Struts, JSP, and Oracle ADF prepare the model layer for this end-to-end solution. That topic describes the information and steps common to all of the end-to-end solutions that use Struts, JSP, and Oracle ADF Business Components.
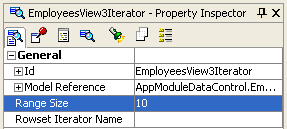
Edit range iterator binding for detail view
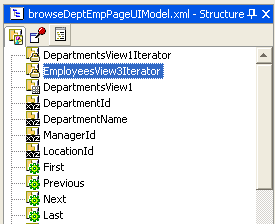
The default range size for an iterator binding in JDeveloper is 10. To change the range size, you use the Structure Window to find the iterator and the Property Inspector to modify the range size.
Controller Layer (Design Time)
Create a data page
This scenario uses a single data page. The data page represents a combination of an Oracle ADF action subclass, forward, and web page. The page flow diagram is simplified to show a single element instead of three. Oracle ADF provides the data page to prepare the binding context for databound web pages. The data page manages the model data binding for the page. When you create the web pages, JDeveloper creates data bindings based on the business components you created in the Model layer.
You create data pages using the the Page Flow Diagram and the
Component Palette. The Page Flow Diagram is a graphical modeler that
allows you to visually represent the action mapping elements of the
struts-config.xml file and build a page flow quickly. The Component
Palette provides visual access to the components available for a
databound Struts application.
View Layer
Create a databound JSP page using data controls
The content of the JSP pages determines what the user sees on the
application web pages. You display and update data on the page by
adding data bindings that define the interaction between the UI
components and the business components. The data bindings you add to
the web pages use the EL (expression language) syntax. EL
expressions such as ${bindings.EmployeesView3} give
direct access to the accessor methods of each binding's implementing
class.
The JSP page for this application uses a variety of data bindings to:
You create the JSP pages in the Visual Editor, and you add data controls to the pages by dragging them from the Data Control Palette. The display and input tables you add automatically become databound through a reference to the Oracle ADF binding objects created in the Oracle ADF binding context.
Controller Layer (Run Time)
Run application
At runtime the user's selections are set in the Request object for the page, which communicates with the data page in the Oracle ADF controller layer. The data page updates the Oracle ADF binding context with the information it receives and initiates the Struts action mapping to display the appropriate page. The web page's Oracle ADF binding expressions, when interpreted, provide the information needed to access the binding context to retrieve and render the data.
This section describes how you create the master table and its associated navigation, search, and update functionality using the Page Flow Diagram and the Visual Editor.
To create the browse data page and associated JSP page:
This step creates the following entry in the struts-config.xml
file:
  <form-beans>

    <form-bean name="DataForm" type="oracle.adf.controller.struts.forms.BindingContainerActionForm"/>

  </form-beans>

  <action-mappings>

    <action path="/browseDeptEmpPage"

      className="oracle.adf.controller.struts.actions.DataActionMapping"

      type="oracle.adf.controller.struts.actions.DataForwardAction" name="DataForm"

      parameter="unknown">

   </action>
When you add a data page, JDeveloper uses Oracle ADF subclasses for
the action className and type attributes.
In addition, it creates a form bean with the name DataForm. The data
form bean dynamically makes the attributes for any binding container
available to forms in the application web pages. For more
information about action mapping using the Oracle ADF action
subclasses, see About
the Page Flow in Databound Struts Applications.
browseDeptEmpPage.jsp
. Leave the Edit this page now? checkbox selected
when you do this.
JDeveloper creates the browseDeptEmpPage.jsp file and
opens the page in the Visual Editor.
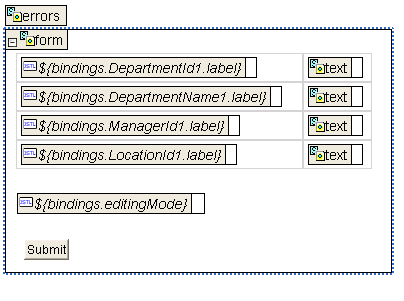
The Data Control Palette displays the business services available for the page. In this step, you are adding a read-only form that uses a view object, DepartmentsView1, to display the data from the Departments table in the HR database. The user navigates through this table to display the employees for each department in the detail table created later.
When you add the first databound form to the web page, JDeveloper
creates two Oracle ADF project files, DataBindings.cpx
and browseDeptEmpPageUI.xml, in the View.
DataBindings.cpx defines the binding container for the
application as a whole. browseDeptEmpPageUI.xml is the
model reference, which defines the data controls used by the
individual web page.
At this point, JDeveloper also updates the struts-config.xml
file to define the model reference in the associated <action>
element by adding a <set-property> element in the action
mapping:
<set-property property="modelReference"
          value="browseDeptEmpPageUIModel"/>
For more information about the Oracle ADF project files, see About the Oracle ADF Project Files. For more information about the Data Control Palette, see Inserting UI Components Using the Data Control Palette
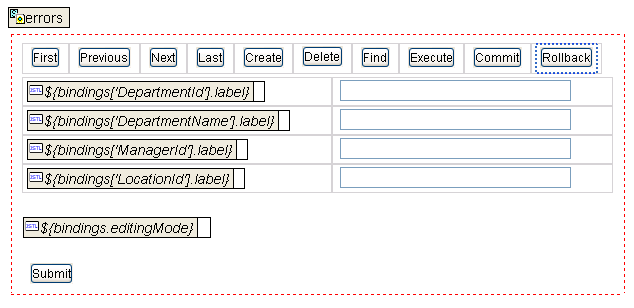
Place the cursor to the right of the Next button in the navigation button table and choose Design | Table | Insert Rows or Columns from the menu. In the Insert Rows or Columns dialog, choose:
In the Data Control Palette, open the Operations node under DepartmentsView1. Drag the following operations to the first four empty columns you created in the previous step:
These are operations specific to DepartmentsView1 and operate only on the records in this view object.
In the Data Control Palette, open the top-level Operations node. Drag the following operations to the last two empty columns in the navigation table:
These are global operations and apply to any changes made in the page. At this point the design view of the page should look like this:
This section describes how you create the detail table and its associated navigation functionality in the Visual Editor.

In the Data Control Palette, open the Operations node under EmployeesView3. Select Next Set and select Button with Form from the Drag and drop as list. Drag Next Set to the JSP page below the detail table:

You need to select Button with Form to include the form, which indicates which Struts action handles the button behavior. The following code segment shows how this looks in the Source tab:
<form method="POST" action="browseDeptEmpPage.do">
<input type="hidden" name="<c:out value='${bindings.statetokenid}'/>"
value="<c:out value='${bindings.statetoken}'/>"/>
<input type="submit" name="event_NextSet" value="NextSet" <c:out
value="${bindings.NextSet.enabledString}" />/>
</form>
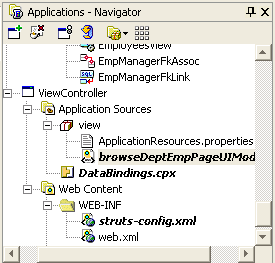
When you select the UI model file node in the Applications
Navigator, the Structure Window displays the UI Model view. This
view shows the data controls and iterators used in
browseDeptEmpPage.jsp as individual nodes.
You are ready to run the data page you created in the Struts Page Flow Diagram.
To run the application:
struts-config.xml tab above the Visual Editor.
About the Page Flow in Databound
Struts Applications
About the Page Flow in Struts Applications
About the Oracle ADF Bindings
About the Oracle ADF Data Binding Properties
About Oracle ADF Data Controls
Copyright © 1997, 2004, Oracle. All rights reserved.