|
Instant information sharing starts with
Oracle Instant Portal.
Oracle Instant Portal is a key component of Oracle Application
Server 10g Standard Edition One. Oracle Instant Portal provides an instant
out-of-the-box portal application for secure publishing and content sharing,
ideal for enterprises with a need for smaller-scale intranets or
an internal communications hub. With Oracle Instant Portal, you
can have a functioning portal in less than an hour. Consider these
benefits:
- Precreated, preconfigured pages mean no
initial development costs. Pages are ready to start loading with
content right away.
- A preconfigured home page displays news,
announcements, and newly added content. Plus, each user has an
area for favorite content, selected through simple personalization
tools.
- Point-and-click operations let you easily
manage pages, contribute and manage content, and create and manage
user accounts.
- Intuitive user interface is extremely simple
to learn and easy to use. When you click an item in Edit mode, a context sensitive toolbar presents you with the relevant actions for the item.
- In-place editing for a simple, WYSIWYG (what-you-see-is-what-you-get)
editing experience right on the page.
Perhaps the best way to begin to understand Oracle Instant Portal
and what it can do for you is to take a look at what you get once
the installation process is finished.
Back to Top
Your first Oracle instant portal is created for you automatically,
as part of the Oracle Application Server 10g Standard Edition One installation
process. When you complete that process and log in to Oracle Portal,
the home page of your first portal (My Company) opens automatically.
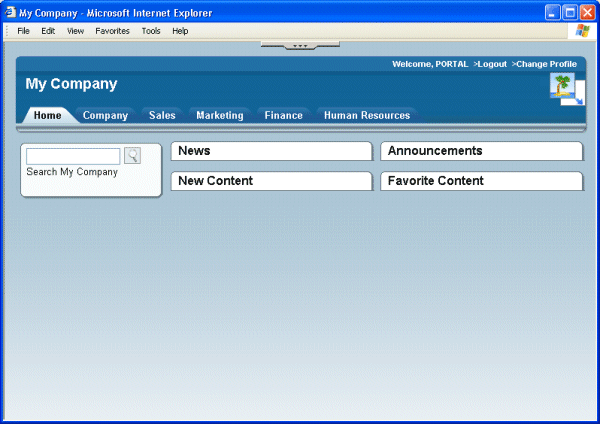
As you can see, right out of the box you're presented with a fully
functioning, albeit simple, portal, which is ready for you to start
adding content. Let's take a quick tour of the home page and talk
about some of the changes you may wish to make there.
Note: By default, the password for this portal
is whatever was entered for the ORCLADMIN user during installation.
You can use the Change Profile link to change the password.
Back to Top
Like all home pages, the Oracle Instant Portal home page is the
central access point for items of interest to all users of the portal.
To make things easier, the body of the page is divided into four
distinct areas in which those items can appear:
-
News: Items pertaining to events occuring
in your industry, for example, or at a corporate level.
-
Announcements: Items that remind or inform
people of upcoming events within your company or department.
-
New Content: Items that were added anywhere
within the portal over the last seven days. The New Content
area is automatically populated; you don't have to do a thing.
-
Favorite Content: Content unique to each user.
As users move through the portal, they can flag content they
want to see on their home page by clicking a simple icon that
appears beside each item.
Now let's see a home page that has undergone a bit of customization
at a fictitious company, Tangfish Software:
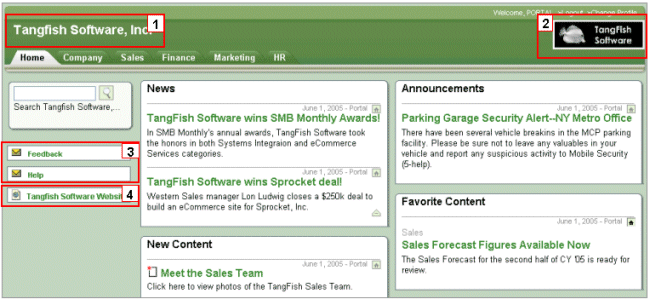
The Oracle Instant Portal administrator at Tangfish Software has
customized this page to reflect the company's identity in several
ways:
-
The name of the company appears in the banner.
-
The company's official logo also appears in the banner
-
Along the left side of the page, the administrator has added
links to email addresses for Tangfish Software's Feedback and
Support groups, so that users can access them quickly.
-
A link to the company's corporate Web site was added at the
bottom of the page.
Notice also that the color scheme has changed. The administrator
made these amendments explicitly. If you're the Oracle Instant Portal
administrator, you'll probably want to make similar kinds of customizations
to your own home page. Before you begin, however, take a moment
to read the next section to arm yourself with an understanding of
the basic principles of how Oracle Instant Portal works.
Back to Top
Let's take a look at another page from Tangfish Software's portal
to help illustrate some basic Oracle Instant Portal concepts:
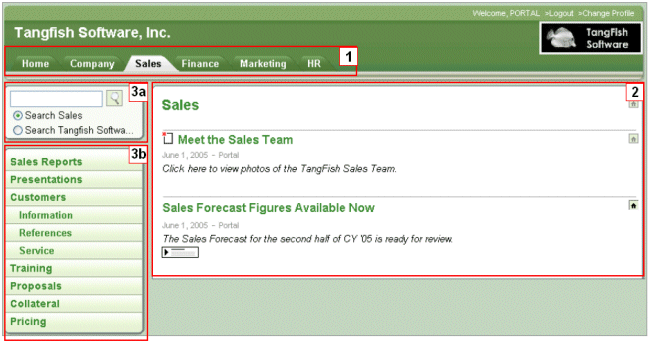
- For Tangfish Software, the default tabs along the top
(Company, Sales, Finance, and so forth) are perfectly suited to
company's goals, as they wish to create a company-wide intranet
that includes these organizations. (The administrator did rename
the Human Resources tab to HR.) This may be the case for your
group as well, or you might want to rename the tabs, reorder them,
and/or create new ones to better reflect your organization. A
travel agency, for example, might find that tabs named Hotels,
Restaurants, Air Fares, and Rental Cars are more closely aligned
with the kind of work they do.
- When you click a tab, a page called a top-level page is displayed.
In the example above, the content of the Sales top-level page
is displayed on the right side of the page, which is called the
content area . Although the Sales page is populated with
content in this example, all top-level pages are empty by default
, waiting for you and your users to load them with content.
- Notice the navigation area on the left, which
appears on every page. Every navigation area contains:
- The search box , which allows you to search the entire portal
for a given string or limit your search to a single top-level
page.
- A list of the child pages for the current page. For the Sales
top-level page, these pages are called Sales Reports, Presentations,
Customers, and so on. Child pages are pages you create below
a top-level page to organize the content associated with the
larger theme, just as you used folders and sub-folders to organize
content on your Windows desktop.
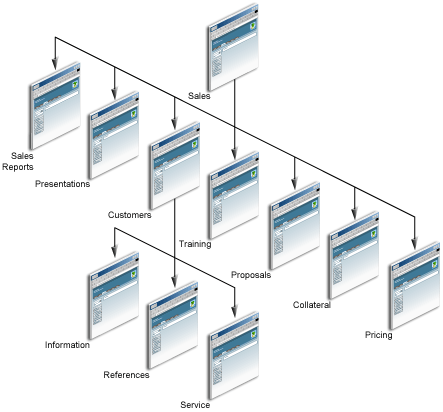
You can see how all of the Sales page's child pages clearly support
the Sales organization. In fact, every top-level page comes with
its own set of precreated pages, designed to help you organize
your work within that theme. And because each child page can have
its own child pages (the Customers page has three), you can easily
create a hierarchy to neatly organize all of your content. The Sales
hierarchy, for example, looks like this:
Now that you understand the concept of top-level and child pages,
let's return to the home page for a moment. Recall that the content
that appears there is simply a collection of content from other
places. The News and Announcements areas of the home page are actually
populated by two child pages of the Company page, as illustrated
here:
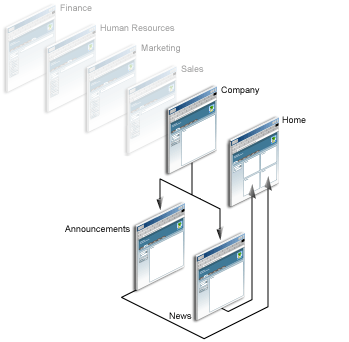
By default, the Company page comes with two child pages, News and
Announcements. Whatever you place on those pages also appears in
the News
Tip: You can change the names of the News and
Announcements pages to more closely reflect the kind of content
you want to display on your home page. Simply rename the News or
Announcements child page on the Company tab, and the name of the
corresponding area on the home page changes as well. .
Back to Top
As you begin working with Oracle Instant Portal, you'll
immediately see how quickly you can customize it to reflect your
organization. As time goes on, you'll find that it's very easy to
administer the portal, and extremely easy for your users to come
up to speed with it and to start contributing and sharing content.
Let's take a look at some of these tasks.
Here again is the sample page from the Tangfish Software portal:
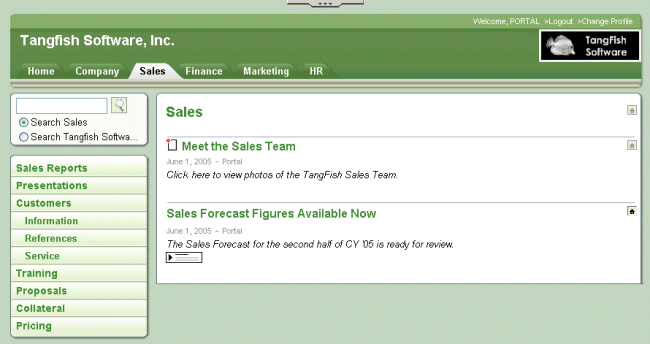
Each block of text delineated by horizontal lines is an item within
the portal. In this example, there are two items: Meet the Sales
Department and Sales
Forecast Figures Available Now. Items are the means
through which you add content to your portal. You can add items
to the portal by clicking the Edit Mode icon, which is located at
the top of every Oracle Instant Portal page. You will see the Edit
Mode icon, pictured below, only if you have the privileges to add
content to the page.

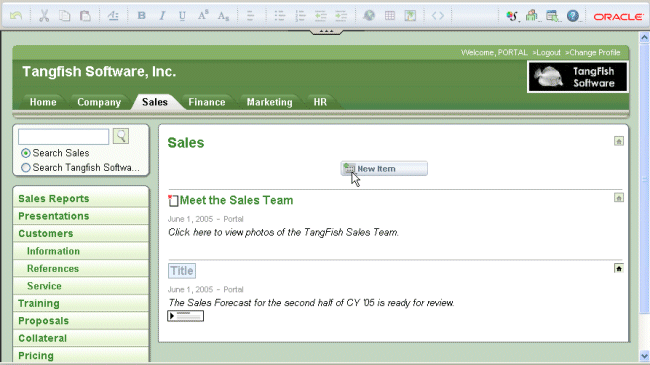
(More about privileges later.) Once you are in Edit mode, you'll
see the New Item button, located in the content area:
When you click the New Item button, a list of item types is displayed:
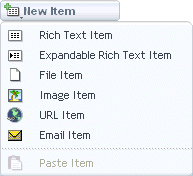
The type of item you select depends upon the kind of content you
want to add, as described below:
| Longer text |
Expandable Rich Text item. Apart from a
title and summary, the actual text of the item is not
displayed until the user reveals it by clicking an icon.
For this reason, Expandable Rich Text items are ideal
for conserving real estate on the page. |
| Shorter text, such as a news
item |
Rich Text item. A title, a summary, and
the text in its entirety is displayed directly on the
page itself. |
| Content that already exists
in a separate file, such as a .doc or html file |
File item. A title, a summary, and an icon
that looks like a file are displayed on the page. When
the user clicks the icon, the file you named opens in
a secondary browser window. The file is uploaded to the
portal repository, a central clearing house for content
stored in portals. |
| A picture or graphic image
|
Image item. The image appears on the page
itself, along with an optional title and description.
Note: The image is uploaded to the portal repository.
|
| Another location, either internal
or external to your Oracle Instant Portal |
URL item. A title, description, and an
icon that looks like a globe appears on the page. When
the user clicks the globe, the destination you named opens
in a secondary window.
The Tangfish home page, for example, has a URL item that
takes users to the Tangfish corporate Web site. |
| An email, preseeded with
an address |
Email item. A title and an icon that looks
like an envelope appears on the page. When the user clicks
the icon, an email editor displays a blank email, already
addressed to the person or organization you named. |
|
After you select the type of item you want to add, simply follow
the prompts to supply the necessary information. For example, when
you add a File item, you are prompted for the file you want to upload.
After you confirm the file name, the file is uploaded to the portal
repository. Then you can add the title and summary text to the page
so that others can understand what you just uploaded.
The first time you add a Rich Text or Expandable Rich Text item,
you'll be impressed by how Oracle Instant Portal's in-place editing
capabilities drastically simplify the task. As soon as you add an
item, it appears on the page in context, ready for you to begin
editing:
I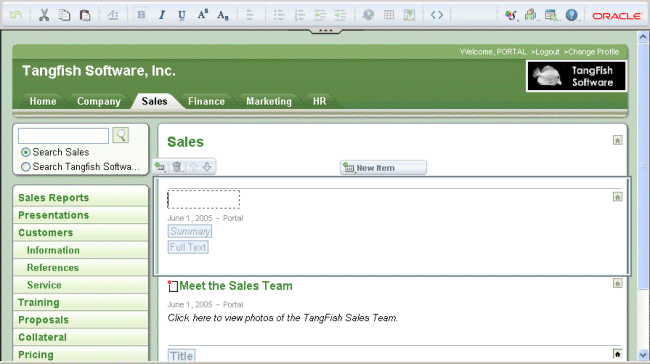
Now you can start entering the title, the summary, and the text
of the item, exactly as it will appear to your users. And while
you're writing the text, you have access to a full range of text
editing controls, including bulleted lists, numbered lists, tables,
cut and paste, indents and outdents, and so on. You can even work
directly with HTML code (by toggling Source Editing mode on), or
switch back and forth between edit modes as you need to. You can
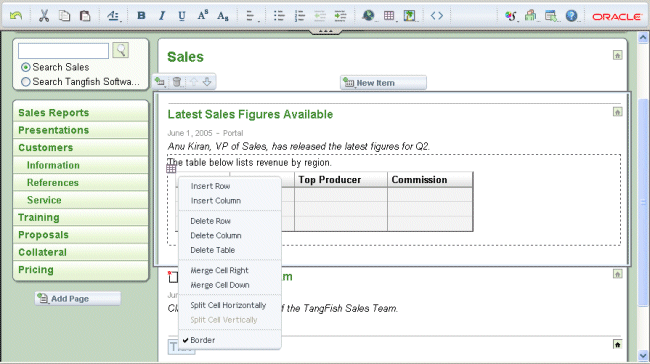
enrich your text by including images, hyperlinks, and tables. In
the example below, a table is being added, which can be populated
and/or modified using standard table editing tools:
To give you the flexibility you need, Oracle Instant Portal allows
you to cut and copy items, move items to different pages, delete
items—all the tools you need to develop content-rich portals and
allow you to manage and share the content with others. And if something
isn't quite right with what you've done, you can use the Revert
key to restore the item to the way it was before you started editing.
Tip: If you have WebDAV
enabled, you can add your Oracle Instant Portal as a Web folder
and interact with it right from your desktop. |
Back to Top
It's just as easy to add top-level pages
and child pages in Oracle Instant Portal as it is to add items.
One of the aspects of Oracle Instant Portal that makes it so easy
to use is that navigation and creation are inextricably linked.
You don't have to create an entity and then introduce that entity
later into an existing structure. Everything is done in context.
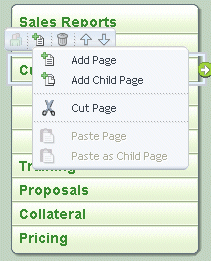
For example, you can create child pages right in the navigation
area, then use simple controls to reposition, edit, or delete that
page:
Similarly, Oracle Instant Portal administrators can add, delete,
or edit top-level pages right in context.
Back to Top
Managing an Oracle Instant Portal is far less complicated and takes
significantly less time than managing a full-scale enterprise portal.
With just a few simple steps, you can brand your portal with your
corporate identity, select a color scheme for your portal, and set
up accounts for all your users.
Tip: If you're the Oracle
Instant Portal administrator, look for the topic called "Setting
Up Oracle Instant Portal: A checklist" in the online help
for a complete list of the customization options available
to you. |
Back to Top
There are three main ways
in which to brand your portal: change its title, add a logo, and
choose an appropriate color scheme.
The banner is the top region of the page, which is constant, no
matter which tabbed page is active. Here is an example of a typical
banner:

The Welcome link at the top of the banner contains the name of
the logged in user (in this example, PORTAL), along with links to
log out of the portal and to change aspects of the user's profile.
You can add your own corporate logo to the right of the banner,
and provide a name for the portal on the left.
Selecting a style for your portal is equally easy. By clicking
the style icon in the Edit toolbar, you can display a list of ten
different styles, each centered around a professionally designed
color scheme. As you run your cursor down the list, you can instantly
see how your portal appears in each color. When you select the one
you want, the entire portal is rendered in that color scheme for
every user. In the image below, we're previewing the Blue style.

Back to Top
Creating users and managing the roles they are to play within the
portal can be an arduous task. In Oracle Instant Portal, however,
a simple security model protects your content without placing an
undue burden on you, the administrator.
A single user can have a different level of security (View, Contribute,
or Manage) for each top-level page within the portal:
-
View privileges allow the user to view content on the page.
-
Contribute privileges allow the user to add items to the page.
-
Manage privileges give the user full permissions over the page,
including the ability to add child pages.
The privileges you set for a top-level page always cascade down
to the child pages.
You create users and manage their privileges through a single,
easy-to-use dialog:
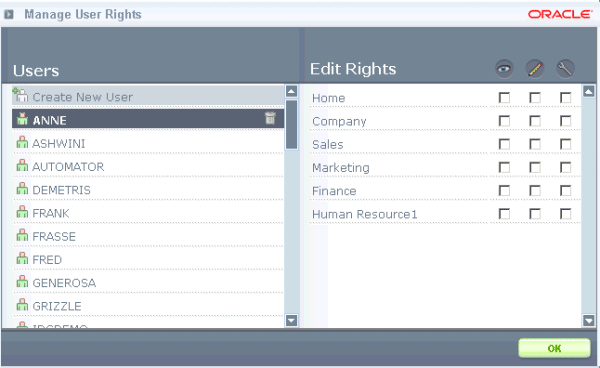
The left pane lists all registered users, while the pane on the
right lists all the pages in the portal. When you select a user
on the left, the pane on the right reflects that user's privilege
level for each page in the portal. Granting or revoking privileges
is as simple as checking or unchecking a box.
You can also control access to a page from the page itself by clicking
the Manage Page Privileges icon:

The Manage Page Privileges window looks similar to the Manage User
Rights window, but the privileges you can set there are confined
to the page from which it was launched.
When a user is granted Manage privileges on any portal's home page,
that user is considered an Oracle Instant Portal administrator and
has full privileges over that particular portal. Additionally, the
Oracle Instant Portal administrator can:
-
Create new users.
-
Delete any user in the Manage User Rights dialog, even those
he or she did not create. (For this reason, it's wise to restrict
the number of users who have Manage privileges on a home page.)
-
Create new Oracle instant portals.
Users that were created through OracleAS Portal can also have access
to Oracle instant portals, as long as you first add the users to
the OIP_AVAILABLE_USERS group. Then you can use the Manage User
Rights dialog to grant appropriate privilege levels to the users.
Back to Top
You may
find that you need more than one instance of Oracle Instant Portal
to fulfill your needs. For example, Sales, Marketing, and Development
may wish to have their own portals, or perhaps you want to set up
separate portals to exchange information with your suppliers or
customers. Generating Oracle Instant Portal instances is easy. Simply
click the Portal Builder link in the Edit Mode toolbar:

This link takes you into OracleAS Portal, through which you can
access the Oracle Instant Portal portlet:
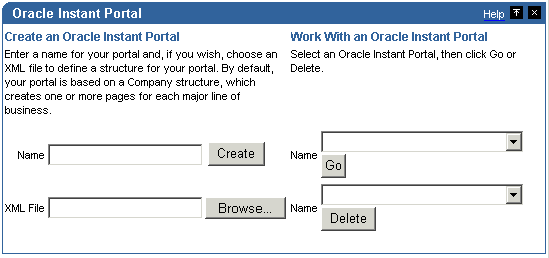
With this portlet, you can create new portals, navigate between
your portals, or delete portals you no longer need—assuming you
have the appropriate privileges. You can also generate a portal
with a custom structure (that is, tabbed pages and child pages)
based upon a predefined XML taxonomy file. Back to Top
Now that you're
familiar with the basics of Oracle Instant Portal, you're ready
to begin using it! Assuming that you're the Oracle Instant Portal
administrator, check out the online help to find out exactly how
to customize your instance of Oracle Instant Portal as described
in this document.
You'll find that most tasks within Oracle Instant Portal are completed
through steps that are quick, easy, and intuitive. You'll
find that most of your users will be independent almost immediately,
and few will have to spend valuable time experimenting or consulting
the documentation to see how to complete a given task. With Oracle
Instant Portal, you'll have a customized portal for secure publishing
and information sharing in just a few hours:

Back to Top |