
and feel. The toolbar has navigation buttons that can be hooked up to the specific data set for which the toolbar is used..
 Read more...
When building an ADF application you will no doubt come across specific cases where a
component and functionality could be reused throughout the application. For example, you might
decide data pages should have a specific toolbar so that navigation through your data is
presented and handled in a specific way. Obviously, each instance of the toolbar would be
working on a different data set and so the goal is to create a reusable toolbar that can be
parameterized to that it works with different data sets when it it used.
Before starting this tutorial you should:
-
Have access to or have installed Oracle JDeveloper 11.1.2.0.0. You can download it from Oracle Technology Network. Install it into a directory of your choice
-
Ensure you have a database installed and have the HR schema installed and the hr user unlocked
| Purpose | Duration | Application |
|---|---|---|
| This tutorial shows you how to work with Declarative Components. To see the complete application you will create, right-click the Download button to download a zip of the finished application, and unzip it to your JDeveloper mywork folder. | 45 minutes |  |
-
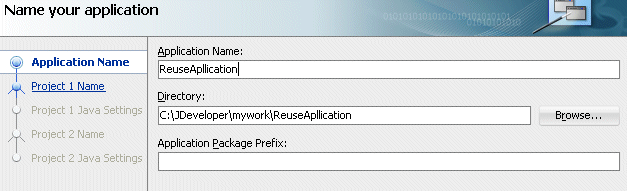
Click the New Application link.
 Create a new workspace named ReuseApplication. Base the workspace on the Fusion Web Application Template, and name the Model project ADFModel.
Read more...
Create a new workspace named ReuseApplication. Base the workspace on the Fusion Web Application Template, and name the Model project ADFModel.
Read more...
Select General | Applications category and choose Fusion Web Application.

Click OK.
Type HRApplication as the application name.
Click Next.
Type ADFModel as the project name.
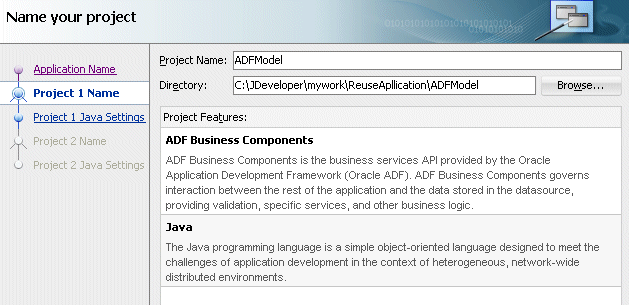
Click Next and then Finish to accept default values. -
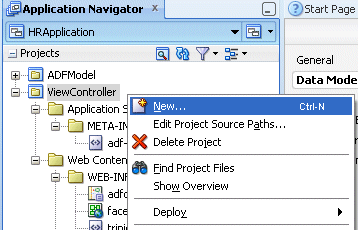
You want to create a declarative component that will implement a reusable toolbar. In the ViewController project, right click and from the context menu select New.
From the New Gallery, expand the Web Tier - JSF/Facelets nodes and select ADF Declarative Component.
-
Enter a name for the component (e.g. GeneralToolbarComponent) and define a tag library name. This tag library name will be the name of the library in which
the component will be stored and is the name you will see in the drop down of the component palette when you come to actually use the component.
Click the Add Tag Library button and accept the default name (compLib1), then click OK.
Ensure the JSP XML radio button is selected as the Document Type.
You now have to set up the parameters that will be used to customize each instance of the toolbar. In this case you are going to define that you have four "parameters" to this declarative component. Each of these parameters will be a method call to navigate the instance on which the component is used.
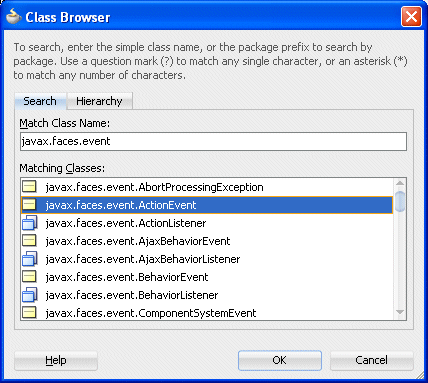
In the Create JSF Declarative Component dialog, click on the Methods tab and enter the names of the parameters with each method relating to a navigation action. You should also define the signature of the method you plan on hooking up to these parameters. For an ADF Action binding (which is what the various Next, Previous actions are) the type is:
javax.faces.event.ActionEvent
If you click on the ellipse on the right side of the Method Signature property, you can select the method from a list.
If you click in the Method Signature property, you can use the Method Signature Builder to find your Method Parameter Type.

Click on the ellipse in the Method Parameter Type property to use the Class Browser to select the method from a dynamic list.
When you've added a four methods, click OK until you've created the declarative component. -
In this case we will keep the toolbar simple, drag on a Toolbar and into the Toolbar drag and drop four Toolbar Buttons.

-
The next step is to hook up the method parameters to the specific attributes to which you want them associated. So, in the case of toolbar buttons, this is the ActionListener attribute.
To do this, select the button, and in the property palette go to ActionListener and click on the down arrow to the right and bring up the Method Expression Builder.
Then under Scoped Variable - comp you will find the method parameters defined earlier. Hook up each button to the appropriate parameter.
-
Set the Text property of each button to something more appropriate like First, Last, Next and Previous.
Save all your work.
Having built the component you now want to deploy it to a place when it can be picked up and reused, typically by other developers in your team..
-
Right click on the View Controller project and select Project Properties.
Select Deployment from the dialog and then press New. From the resulting dialog select ADF Library JAR File and add a name for the deployment like DCDeploy. JDeveloper will now package up the files of your declarative component and prepare it for deployment.
Click OK, then OK again in the Library Dependencies pane.

Back in the Project Properties pane, click OK a final time..
-
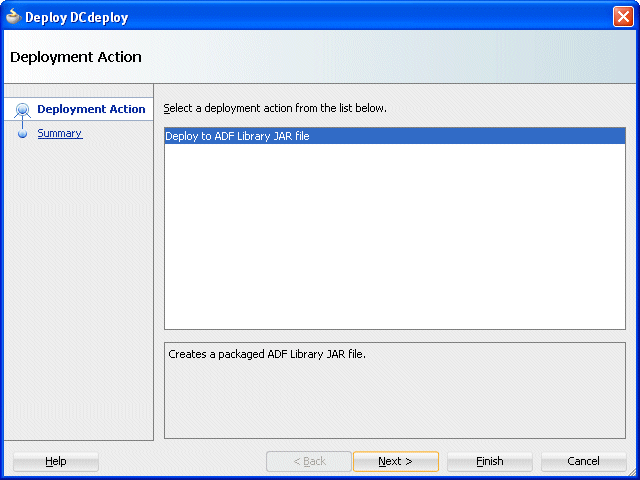
The next step is to actually deploy the JAR file. Select the View Controller project, right click and select Deploy - DCDeploy... - to ADF Library JAR.
Then select Deploy to ADF JAR file and then click Finish and your component will deploy the file to the file system.
Note that in the deployment log window you will see the location of where the JAR file is being deployed. Write this down it will be used later.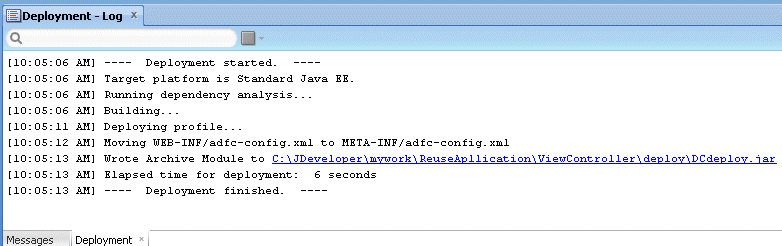
If you have another application, from a previous practice, containing at least a single table and ADF Business components, you may use it as long as you have the same components. When completed, continue on to step 10.
-
Click the New Application link.
Create a new workspace named HRApplication. Base the workspace on the Fusion Web Application Template, and name the Model project ADFModel. Read more...
Select General | Applications category and choose Fusion Web Application.

Click OK.
Type HRApplication as the application name.
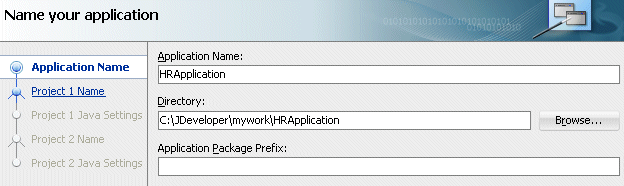
Click Next.
Type ADFModel as the project name.
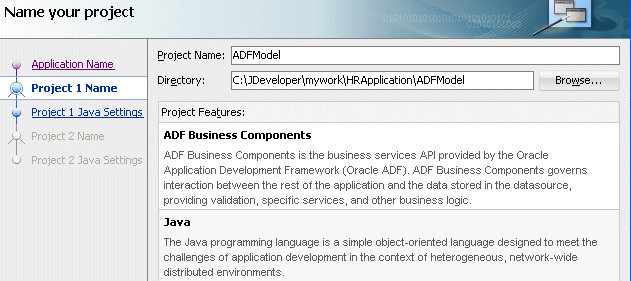
Click Next and then Finish to accept default values. -
You want to create the business components for Departments and Employees. Right-click the ADFModel project and select New from context.

-
In the Business Tier | ADF Business Components, select Business Components from Tables to create new Business Components using the wizard.

Click OK.
-
Click the Add
 icon to create a new database connection pointing to your hr schema.
Type HRConn as the connection name and provide the database connection characteristics for the hr schema.Read more...
Enter hr as username and password and specify the name of the database you are accessing. Click the Test Connection button to validate your connection.
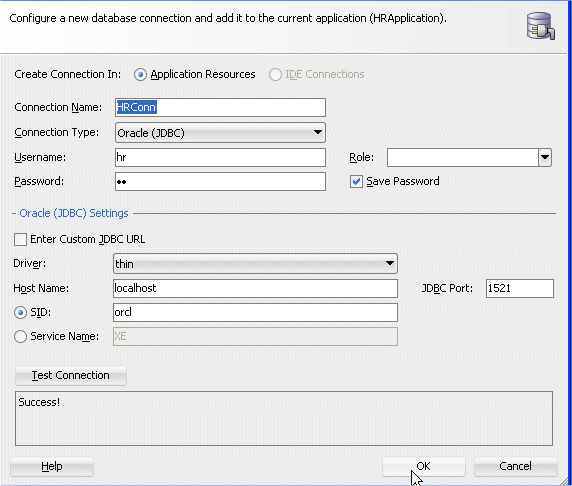
Click OK.
-
Back in the Create Business Components from Tables wizard, click the Query button to retrieve the database objects.

-
Shuffle Departments and Employees to the Selected side.

Click Next.
-
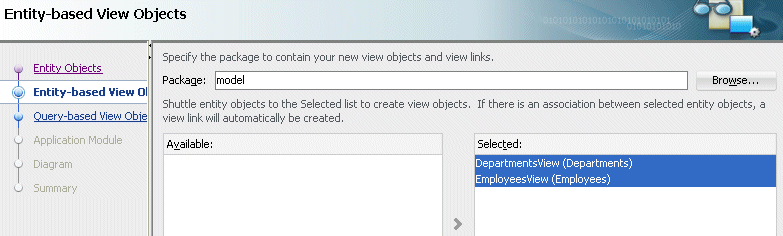
In the Entity-based View Objects step, shuttle both objects in the Selected pane.
-
Click Next. Click Next again, we don’t need to create any read-only view objects.
-
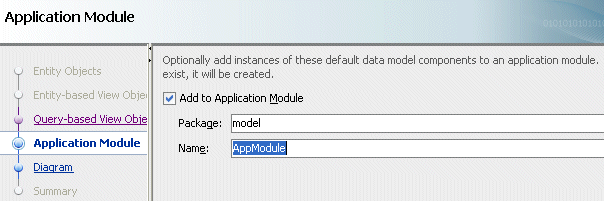
Accept the default application module name (AppModule) and click Finish.
Click Finish to create the business components.
-
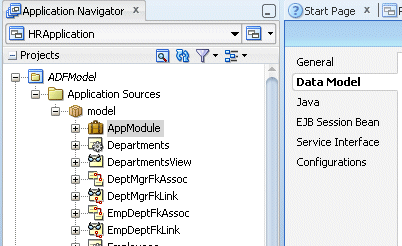
Double-click AppModule to open it in the editor. Click the Data Model tab.
-
Notice that there are several view object instances created with default names.
 In the HR schema, the Employees table has a self-referencing key for the Manager_Id, as well as a reference for the Manager’s department. Read more...
The Departments table has a master-detail relation to the Employees table for the Department_Id. The wizard picks up these relationships from the DDL of the tables and creates associations and links accordingly.
Additionally, by default, a view object instance is added to the data model for each view object and each relationship.
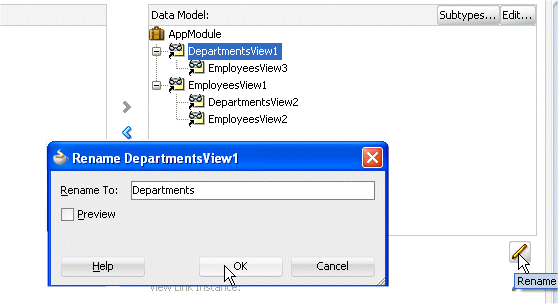
In a real application, you would rarely need every configuration of view object instances, and you’d want to rename the instances to logical names, as these are the names that will appear in the data controls palette.
-
Select the DepartmentsView1 node and pressing the Edit button, rename the view Departments.
-
Proceed the same way to rename the following objects:
- EmployeesView3 -> EmployeesbyDepartment
- EmployeesView1 -> Employees
Then remove the following objects: DepartmentsView2 and EmployeesView2
Save all your work.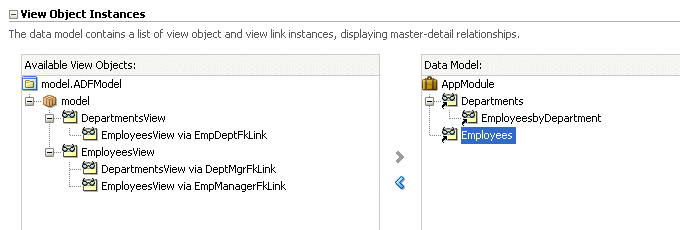
-
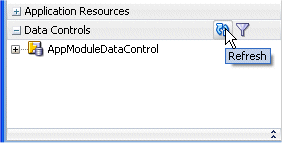
Expand the Data Controls pane and click the Refresh button.
-
In the Data Controls accordion, expand the nodes to view the controls’ naming and structure.

Notice the built-in operations to Create, Delete, Execute, and navigate among the result set, as well as the Commit and Rollback operations at the application module level. Read more...
The application module is the transactional unit (task flows aside), so real-world applications frequently contain multiple application modules to delineate functional as well as transactional use cases.
For example, it is common to include read-only view object instances for lookup functionality within a separate application module that can be pooled differently from the main application’s module.
-
Right-click in the ViewController project and select New from context.
 Create a JSF page, name it ViewDepts.jspx and base it on the Oracle Three Column layout.Read more...
In the New Gallery, select JSF/Facelets and choose Page as the Item.

Type ViewDeptEmp.jspx as the name of the page and select the Oracle Three Column Layout.

Click OK. Your page should look like the following:

Now that you have an application, model and page, add the declarative component as a resource and then use it on the page.
-
In the HRApplication go to the Resource Palette an on the yellow folder
click New Connection - File System.

Enter a name (DCconnection) for the connection and in Directory Path enter the full path to which you deployed the JAR file (do not include the name of the JAR file itself).
C:\JDeveloper\mywork\ReuseApplication\ViewController\deploy

Press OK. The ADF Library JAR you deployed earlier will now appear in this Resource palette.

-
You now want to add that to your ViewController project so you can use it in the page. Select the ViewController project, then select the DCdeploy.jar file in the resource palette right click Add to Project...
Confirm the addition of the library by clicking the Add Library button. Save your work.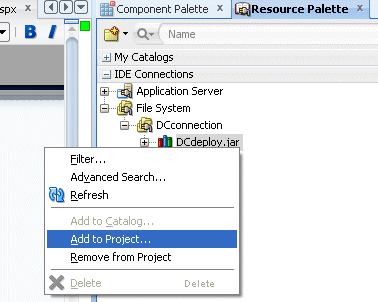
-
You are now able to start designing your new page. Go back to your ViewDeptEmp page. In the component Palette, click the drop down to see a
your library (which includes your toolbar component).
-
You are now able to start designing your new page. Build your page to contain a Read-Only Department Form , containing all four department columns.


-
In the Component Palette, select you library and drag the toolbar component onto the page, right above the panelForm. You can use the Structure navigator to find the exact center facet.
By default an af:group will be created around the table and your toolbar.


-
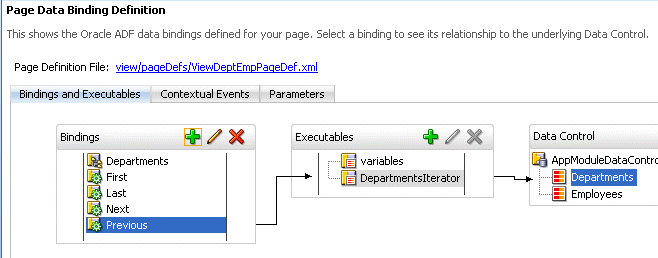
The next step is to hook up the parameters of your toolbar so that they navigate through the Dept table. To do this you must first create the bindings.
In the Bindings tab, click the green plus sign on Bindings and create an actionBinding. Create a department binding for each navigation method (First, Last, Next and Previous).

-
The final step is to hook those bindings to the method parameters of the declarative component.
In the Visual Editor, select the toolbar component in the visual editor. In the Property Inspector you will see all four methods you defined when creating the component.

For each of these methods, using expression language, assign the appropriate execute bindings.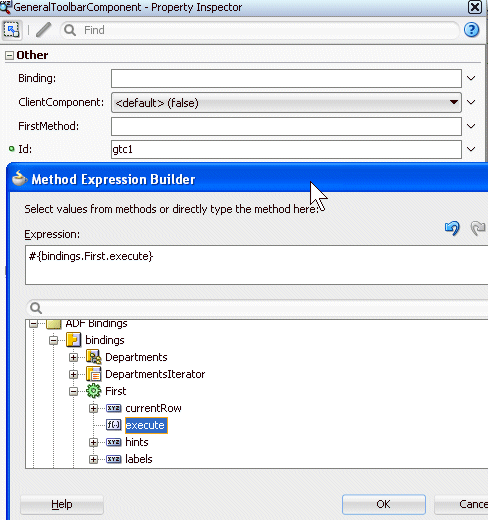
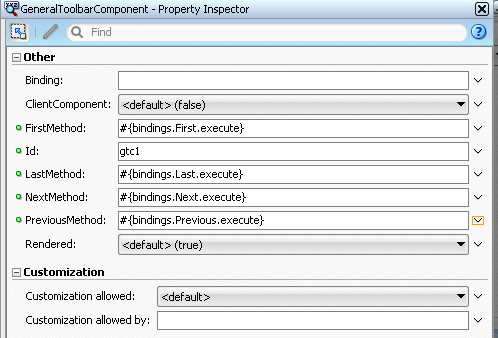
When complete, your component's properties should look like the following. Make sure to save your work.
-
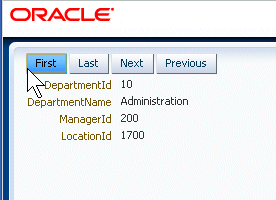
Run your page and use the declarative component to navigate around your Department records.


You've successfully performed this practice.
In this tutorial you learned how to work with Declarative Component Methods. You learned how to::
- Create Declarative Component Methods
- Deploy them to a file system
- Add them to a project using the Resource Catalog
- Use on a page and bind them to default navigation methods