 Read more...
In this practice, you’ll build two implementations of a data model, and build an ADF
Faces page bound to these different data controls. You’ll pass values from one binding
to another in order to understand bindings and they’re definitions. You’ll access bindings
declaratively using expression language, as well as programmatically in code. Finally,
you’ll gain experience debugging the most common snags when using ADF bindings.
Before starting this tutorial you should:
-
Have access to or have installed Oracle JDeveloper 11.1.2.0.0. You can download it from Oracle Technology Network. Install it into a directory of your choice, which, in this tutorial is referred to as JDEVELOPER_HOME.
-
Ensure you have a database installed and have the HR schema installed and the hr user unlocked.
-
Start JDeveloper by selecting Start > Programs > Oracle Fusion Middleware 11.1.2.0.0 > JDeveloper Studio 11.1.2.0.0

If a dialog box opens asking if you would like to import preferences from a previous JDeveloper installation, click NO.
-
In the Select Role dialog, choose Studio Developer and click OK.
 Shaping, which is based on the role of the user, allows the JDeveloper environment to tailor itself.
 Read more...
It does this by removing unneeded items from the menus, preferences, new gallery, and even individual fields on dialogs.
Shaping can even control the default values for fields on dialogs within the tool.
When you first start JDeveloper, you are prompted to choose a role that describes how you are going to use JDeveloper. If you choose a role of "Java Developer" versus "Database Developer " versus "Customization Developer " you will get a totally different experience! -
Close the Tip of the Day window. Once loaded, the JDeveloper IDE appears. The very first time you open JDeveloper, the Start Page displays. You can re-invoke the Start Page later by choosing Help > Start Page.
Notice the various options available to help you learn about JDeveloper. After exploring some of these options, close the Start Page by clicking the X on its tab (the X appears when you mouse over the tab).
-
Click the New Application link.
 Create a new workspace named HRApplication. Base the workspace on the Fusion Web Application Template, and name the Model project ADFModel.
 Read more...
Select General | Applications category and choose Fusion Web Application.

Click OK.
Type HRApplication as the application name.

Click Next.
Type ADFModel as the project name.

Click Next and then Finish to accept default values. -
You want to create the business components for Departments and Employees. Right-click the ADFModel project and select New from context.

-
In the Business Tier | ADF Business Components, select Business Components from Tables to create new Business Components using the wizard.

Click OK.
-
Click the Add
 icon to create a new database connection pointing to your hr schema.
Type HRConn as the connection name and provide the database connection characteristics for the hr schema. Read more...
Enter hr as username and password and specify the name of the database you are accessing. Click the Test Connection button to validate your connection.

Click OK.
-
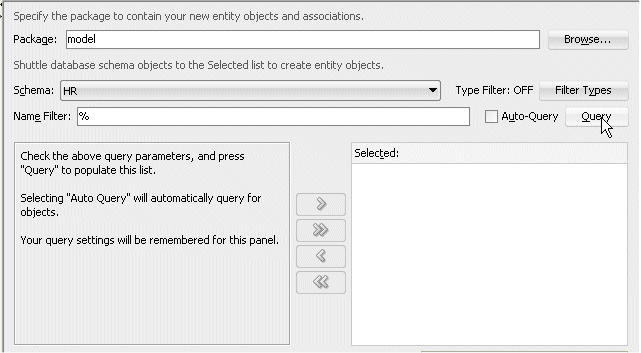
Back in the Create Business Components from Tables wizard, click the Query button to retrieve the database objects.
-
Specify a package named adfmodel.entities for the entity objects and create entities for Departments and Employees.

Click Next.
-
In the Entity-based View Objects step, type adfmodel.queries as the package name and shuttle both objects in the Selected pane.

-
Click Next. Click Next again, we don’t need to create any read-only view objects.
-
Specify a package named adfmodel.service for the Application Module. Name the module AppModule.

Click Finish to create the business components.
-
Double-click AppModule to open it in the editor. Click the Data Model tab.

-
Notice that there are several view object instances created with default names.
 In the HR schema, the Employees table has a self-referencing key for the Manager_Id, as well as a reference for the Manager’s department.
 Read more...
The Departments table has a master-detail relation to the Employees table for the Department_Id. The wizard picks up these relationships from the DDL of the tables and creates associations and links accordingly.
Additionally, by default, a view object instance is added to the data model for each view object and each relationship.
In a real application, you would rarely need every configuration of view object instances, and you’d want to rename the instances to logical names, as these are the names that will appear in the data controls palette.
-
Select the DepartmentsView1 node and pressing the Edit button, rename the view Departments.

-
Proceed the same way to rename the following objects:
- EmployeesView3 -> EmployeesbyDepartment
- EmployeesView1 -> Employees
Then remove the following objects: DepartmentsView2 and EmployeesView2

-
Expand the Data Controls pane and click the Refresh button.

-
In the Data Controls accordion, expand the nodes to view the controls’ naming and structure.

Notice the built-in operations to Create, Delete, Execute, and navigate among the result set, as well as the Commit and Rollback operations at the application module level. Read more...
The application module is the transactional unit (task flows aside), so real-world applications frequently contain multiple application modules to delineate functional as well as transactional use cases.
For example, it is common to include read-only view object instances for lookup functionality within a separate application module that can be pooled differently from the main application’s module.
You want to add a new project and create EJB based databindings for the Departments and Employees entities.
-
In HRApplication, create a new EJB project named JPAModel that uses Enterprise Java Beans 3.0 and annotations.
 Give me more details about the steps.
 Read more...
In the General | Projects, select EJB Project and click OK.

Name the project JPAModel, and click Next twice.
Make sure Enterprise JavaBeans 3.0 and Using Annotations are selected.

Click Finish.
-
To create the EJB for Departments and Employees, right-click the JPAModel node and select New from context.

-
Use the wizard to create JPA/EJB 3.0 Entities from Tables based on Departments and Employees.

-
Use the proposed persistence unit (JPAModel) and click Next. Choose the Online Database Connection and click Next.

Click Next to accept the HRConn connection that you previously created.
-
Click Query and create Entities based on Departments and Employees.

Click Next.
-
Accept the default package and class options.

Click Next then Finish to create the JPA entities.
-
In the jpamodel package, use the wizard to create a session bean. Right-click the jpamodel and select New to call the New Gallery.
 Choose the Session Bean option.
 Read more...
Expand the Business Tier | EJB to select Session Bean and click OK.

Click OK. -
Name HRFacade the stateless, container-managed session bean and generate session facade methods for JPA Entities.

Click Next then Finish.
Accept default names and generate all the provided entity methods. Read more...
Accept the default bean class name and source directory.

Click Next.
Implement both the Remote and Local interfaces.

Click Finish to create the session facade. -
Right-click HRFacadeBean.java and choose Create Data Control.

-
Choose the Local interface as you will be creating a web client.

Click OK.
-
In the Data Controls accordion, expand the HRFacadeLocal node to view the controls for the JPA-backed session bean.
 The controls in the Constructors node can be used to create new rows in the entities (though most developers will create their own methods for creating rows).
 Read more...
The FindAll collections (departmentsFindAll and employeesFindAll) correspond to the built-in FindAll named queries that are created for each entity (and the corresponding method in the session facade).
The merge, persist, and remove methods are used to update, create, and delete entity rows, respectively..
-
Click the Save All
 icon to save your work.
-
Right-click in the ViewController project and select New from context.
 Create a JSF page, name it ViewDeptEmp.jspx and base it on the Oracle Three Column layout.
 Read more...
In the New Gallery, select JSF/Facelets and choose Page as the Item.

Type ViewDeptEmp.jspx as the name of the page and select the Oracle Three Column Layout.

Click OK. Your page should look like the following:
-
Insert a ADF Faces | panelTabbed onto the Facet center.
 Have two showDetailItem’s labeled ADFModel and JPAModel.
 Read more...
Right-click the showDetailItem1 tab and select Insert Inside Panel Tabbed | Show Detail Item.

In the Property pane, change the Text field for the Show Detail Item to ADFModel for the first tab and JPAModel for the second one.

-
From the AppModuleDataControl, drag the EmployeesbyDepartment collection onto the ADFModel tab in the visual editor.

-
From the Master-Detail menu select ADF Master Form, Detail Table.

-
The page should look like the following:

-
Click the JPAModel tab in the display editor.

-
From the HRFacadeLocal data control, drag the departmentsFindAll | employeesList1 collection onto the JPAModel tab in the visual editor.

-
From the Master-Detail menu, choose ADF Master Form, Detail Table.

Notice that the same gestures are used to create the components, regardless of the underlying implementation (JPA or business components).
-
Your page should look like the following:

-
Open the Bindings tab of the ViewDeptEmp.jspx. Notice that 5 executables are created, one for each implementation’s version of departments and employees, and one to access the session facade (the iterators for the EJB-based departments and employees finder methods are actually accessor iterators that depend upon the session facade iterator). The variables node is the sixth one and is always created.
 Click on the various bindings to understand how they are related to the executables.
 Read more...
Notice that there are attribute bindings for the form elements (Departments) and tree bindings for the table elements (Employees). You can select a bindings and see how it relates to Data Control through which Executable.
Notice that the Structure pane displays a similar information in a different way with the executables components.

And also with the bindings components.

-
Click the Save All
 icon to save your work. Right-click the page and choose Run to test the functionality.
-
If prompted for, enter a password and confirm it for web logic administrator id.

Click the Next button to browse through department numbers and display the related employees.

-
Click the JPAModel tab. This will display the same info using session facade this time.

Click the Next button to browse through department numbers and display the related employees.

In this step, you’ll add functionality to enable the department id to be selected from the ADFbc-backed data control and pass the department id to a method on the session bean to return employees for that department.
-
In the JPAModel project, paste the following code to create a new named query in the Employees entity,
within the NamedQueries annotation:,
@NamedQuery(name="Employees.findByDept", query = "select o from Employees o where o.departments.departmentId = :deptId")Double-click the Employees.java node to open it in the editor. Read more...

Expand the @Entity statement and add a NamedQuery so that the code looks like the following:

Watch the syntax including a comma to separate the two named queries.
-
Click the Save All
 icon to save your work, and Make to compile the class to verify that no errors are reported.
 -
Right-click HRFacadeBean and choose Edit Session Facade... to bring up the options dialog.

-
Expose the getEmployeesFindByDept method in the facade

Click OK.
-
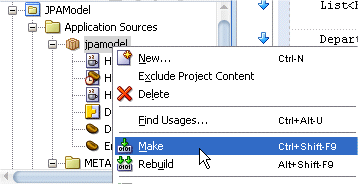
Click Make to compile your project and validate it.
-
Recreate the data control for the local interface of the HRFacadeBean.
 Select the Local interface.
 Read more...

Click OK.
The new Data Control appears in the Data Controls pane.

-
In the ViewController project, right-click and select New.
 Create a JSF page. Name the page ViewDeptEmp1.jspx and base it on the Oracle Three Column layout.
 Read more...

Name the page ViewDeptEmp1.jspx and base it on the Oracle Three Column layout.

Click OK. -
Insert a panelTabbed with two showDetailItems labeled ADFModel and JPAModel. From the ADF Faces | Layout, drag and drop a Panel Tabbed onto the Facet center.
 In the Property pane for the Show Detail Item, type ADFModel in the Text field.
 Read more...

Right-click the ADFModel tab and select Insert After Show Detail Item --> Show Detail Item.

Type JPAModel in the Text field.

-
From the AppModuleDataControl, drag Departments onto the ADFModel tab.

-
Since the tabs only have one child component (table), set the StretchChildren property for each of the showDetailItem components to first.

-
From the HRFacadeLocal data control, drag the return (Employees) of the getEmployeesFindByDept method onto the JPAModel tab as an ADF Read-only table.
 Remove the duplicated employee attributes from the table bindings.
 Read more...
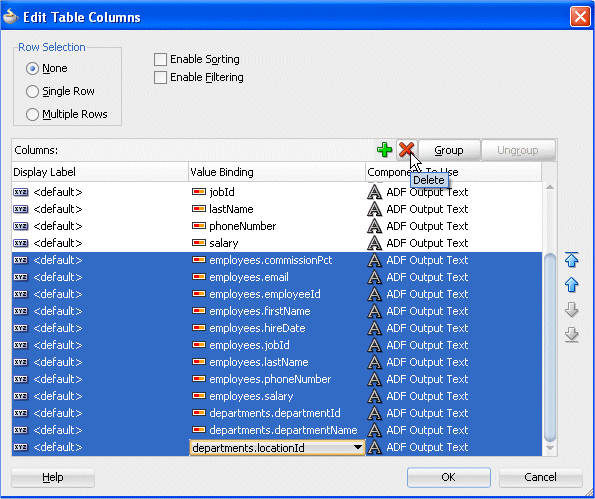
The dialog should look like the following:

Click OK. -
An Edit Action Binding dialog pops up. In the Action binding dialog, you are prompted to enter the value for the department Id argument of the getEmployeesFindByDept method. You will enter expression language for this value in the next step, but it’s always a good idea to test with a static value first. Enter 40 as the value and click OK.

Run the page to view the functionality.

-
The ADFModel tab displays all departments. By defaul department 10 should be selected. Click the JPAModel tab to check what the JPA displays.

-
You should see a table for employee(s) with department id = 40.

Close your browser window.
Now that you know that it works with a predefined department value, you can use EL to implement the functionality where the department id value is passed to the JPAModel from the selection you do when you select a department in the ADFModel pane.
There are many ways to access binding values with EL. The easiest way to ensure you are working with the correct binding value is to create a new attribute value binding and access that binding’s value.
-
Open ViewDeptEmp1 and click the Bindings tab.

-
Click the Add
 icon and create a new attributeValues binding.
Click OK.
-
Bind the attribute to the AppModuleDataControl.Departments data source and the DepartmentId attribute.

Click OK.
-
You can trace the bindings of the new attribute.

-
Select the getEmployeesFindByDept binding and click the pencil
 icon to edit.
-
Click the down-arrow to use the expression builder.

-
Set the value to #{bindings.DepartmentId.inputValue}.

Click OK. Back in the Edit Action Binding dialog, click OK.
-
Right-click within the page and select Run from context.

-
To confirm that the application works correctly, in the ADFModel table, select a row (40 for instance) then click the JPAModel tab.

-
The JPAModel displays the employee(s) related to the selected departmentId.

-
Now that you can confirm that it's working correctly, click the ADFModel tab and test with other department numbers. Click the JPAModel tab to check.
Select another row in the Departments table. Read more...

Click the JPAModel tab to display the employees.

-
Close your browser window.
In this section, you use EL to access binding components and display the selected department id and the number of corresponding employees for that department.
-
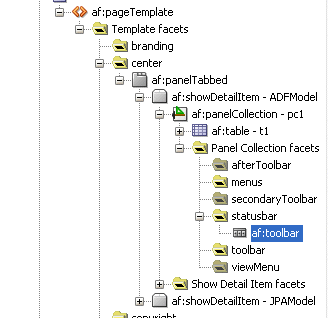
Open ViewDeptEmp1.jsf and then open the ADFModel tab in the visual editor. In the Structure window, right click af:table and select Surround With… to surround the table with a panelCollection.


-
In the panelCollection statusbar facet, insert a toolbar.
-
Add an outputText item within the toolbar.

-
Click the down arrow in the Partial Triggers property and select Edit.

-
Shuttle the table from the first tab (t1) to the selected area and click OK to add a partial trigger for the table component.

Click OK.
-
In the property inspector, click the down arrow in the Binding property and click
Edit….
Create a new managed bean named ViewDeptEmp1 and the class name ViewDeptEmp1.
Then add Property named outputText1.

-
In the ViewDeptEmp1.java bean, create a method to access the binding container.
public BindingContainer getBindings() {
return
BindingContext.getCurrent().getCurrentBindingsEntry();
}
Then import oracle.adf.model.BindingContext and
oracle.binding.BindingContainer

-
In the setOutputText1 method, add code to access the getEmployeesFindByDeptIterator from the binding container and retrieve the estimatedRowCount. Set the outputText1 value to include the text “Number of Rows” and the estimatedRowCount for the iterator. Then let JDeveloper import the appropiate packages.
public void setOutputText1(RichActiveOutputText outputText1) {
oracle.binding.BindingContainer bindings = getBindings();
DCBindingContainer bindingsImpl = (DCBindingContainer) bindings;
DCIteratorBinding dciter = bindingsImpl.findIteratorBinding("getEmployeesFindByDeptIterator" );
outputText1.setValue("Number of Rows: " + dciter.getEstimatedRowCount());
}
-
Add accessor code below for a RowCount.
public void setRowCount(String rowCount) {
this.rowCount = rowCount;
}public String getRowCount() {
BindingContainer bindings = getBindings();
DCBindingContainer bindingsImpl = (DCBindingContainer) bindings;
DCIteratorBinding dciter = bindingsImpl.findIteratorBinding("getEmployeesFindByDeptIterator" );
return ("Number of Rows: " + dciter.getEstimatedRowCount());
}
-
Back in the ViewDeptEmp1.jspx page, navigate to the outputTest and in the Property pane, clear out the Value field. Then click the down arrow and select Expression Builder from the list.

-
In the Expression Builder, select ADF Managed Beans | ViewDeptEmp1 | rowCount and click OK.

-
In the panelCollection | toolbar facet, insert a toolbar.

-
Right-click the toolbar component and select Insert Inside | ADF Faces.

-
Add a message within the toolbar.

Click OK.
-
In the Message field of message component, click the down-arrow and select Expression Builder from the list.

-
Use the expression editor to set the message property to the text Selected and the EL to #{bindings.DepartmentId.inputValue}.

Click OK.
-
Click the Save All
 icon to save your work, and Run the ViewDeptEmp1 page to test the functionality. Notice the value of the selected department being displayed.
-
Select another row in the table. Notice the changes in the department number and in the row count value.

The easiest way to add a button that calls an operation is to drag and drop it from the data control palette. In some cases, however, you will need to access an operation binding programmatically.
-
In the panelCollection | facet:menus, insert a Menu.

-
Change the text to Jump.

-
From the AppModuleDataControl, drag the Next operation from the Departments | operations onto the menu.

-
Create an ADF Menu Item.

-
Repeat the drag and drop step for the Previous operation.

Select an ADF Menu Item.

-
In the Bindings tab, note the two action bindings that were created.

-
Use the Structure window to create an additional Menu Item.

-
Set the Text property Next 3.

-
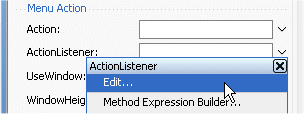
Click Edit in the ActionListener property.
-
Select the ViewDeptEmp1 managed bean click New to add a new method.

-
Create a new method named Next3Action in the ViewDeptEmp1 managed bean.

Click OK, then OK again.
-
Open the ViewDeptEmp1.java class to display the new method code.

-
In the Next3Action method, add code to access the Next operation and call it three times:
public void Next3Action(ActionEvent actionEvent) {
BindingContainer bindings = getBindings();
OperationBinding nextOp = bindings.getOperationBinding("Next");
Object result = nextOp.execute();
Object result1 = nextOp.execute(); Object result2 = nextOp.execute();
} -
Confirm the following import statement was included: import oracle.binding.OperationBinding;.

-
Re-run the page and select the Jump | Next menu option to test the new navigation functionality.

-
The next row is now highlighted.

-
Select the Jump | Next 3 menu option to test the navigation functionality.

-
The new selection is highlighted in the table.

You've successfully performed this practice.
IIn this tutorial you learned how to work with Business Components and JPA bindings. You learned how to::
- Build Business Components
- Create a JPA Data Control
- Build a data-bound UI
- Create a UI that integrates multiple bindings
- Access binding values with EL
- Access binding values programmatically


