Accelerator Objectives and Architecture
Accelerator integration architecture
Text Incident Classification Site Setup
Data Model For Incident Classifier
This documentation explains the accelerator Incident Classifier which integrates Oracle B2C Service with OCI Data science, it's features and configurations required to use. The code released is for testing and educational purposes only, and can be used as starting point to solve your use cases.
Prerequisites
Accelerator audience
This document is intended for software developers or similar technical roles interested in implementing Incident Classifier experiences that leverage the Oracle B2C Service and OCI Data Science.
Incident classifier customisation requires an experience level of technical know-how in order to implement them. At a minimum, individuals leveraging this material should have the following experience in order to understand topics discussed in this guide.
|
Toolkit |
Skill |
Skill Level |
Comment |
|
Python |
Intermediate/Advanced |
OCI jobs for fetching, training and deploying model is developed in python. |
|
|
Java |
Intermediate/Advanced |
OCI fn is based on Java language. |
|
|
Php |
Intermediate/Advanced |
CPM scrips used in B2C Service side is developed in PHP |
|
|
Terraform |
Intermediate/Advanced |
Automation of creating OCI resources and OCI jobs is achieved using Terraform |
|
|
Type Script |
Intermediate/Advanced |
Agent Insight customisation is done using Type Script |
|
|
All |
Intermediate |
Required for configuration of Incident classifier. |
|
|
All |
Intermediate |
Option for providing Service Request (SR) functionality to the Incident classifier. |
Software requirements
This accelerator uses different software, cloud applications, and native applications to implement the end-to-end solution. To obtain/procure the various licenses or environments for Oracle software, you must work with the applicable Oracle applications team supporting your organisation.
Note: If you want to change or compile the example Incident classifier accelerator, you must be proficient in the following programming languages: machine learning, python, java, php, typescript, and shell script.
The following table describes the software required for the Oracle Incident classifier accelerator for CX applications.
|
Software |
Source |
|
Contact Oracle Sales |
|
|
Contact Oracle Sales |
Accelerator Objectives and Architecture
Accelerator objectives
Incident Classifier
Many B2C customers use agent queuing to automate the chat and incident routing, using the product/category/disposition fields to improve resolution time. However, the end user (customers of the B2C customer) might not always fill in the details when raised via channels like Customer Portal Webform, Service Emails, and Live Chat. Some channels like, service email, may not even have the provision to collect values for such fields, that can be later used to automate the routing. Some of the B2C customers use keywords for automating in such cases, but the accuracy and efficiency tends to be very low. With this accelerator, we are providing an alternative solution, where the customers can integrate their B2C service with OCI Data science services, and use the ML capability to predict product or category or disposition fields.
It leverages CPM scripts and extension features to integrate the Incident Classifier capabilities of the ML model for the incidents created via webform (Customer Portal - Ask a Question) and service email.
What is Accelerators?
The base code is developed and passed along with documentation to the customers for solving their problems by integrating to other services using B2C' Service’s capabilities under UPL License
(For more details on UPL, see- https://oss.oracle.com/licenses/upl/). This base code can be customised as per the customer’s use case to solve their issues specific to them, and hence customers can use this as it is or as a starting point to solve their problems using this integration. This code is intended for education or testing purpose for the B2C Service customers.
What does Incident Classifier do?
It predicts the product, category and disposition field of new incidents based on the text of the subject and body of the Incident using OCI data science service. It works on a deployed model which is trained using past data of the first thread of closed incidents. The model can be re-trained as frequently as the customer wishes. However, for a model to be effective, the model needs constant training and this is made configurable in the solution provided.
Business Impact:
- Optimizes routing and Reduce transfers time across channels with a reliable product and category labels on every new incident
- Increases agent efficiency with context-specific automation such as standard text suggestion,
- Minimizes human error by improving on customer selections from complex hierarchies
- Improves resolution time by reducing the time to re-queue the incidents to the right agent
- Enables new processes and automation
Accelerator B2C User flow
This section explains the user flow of agents working on the incidents in B2C Service, and the reports available in B2C for admins to evaluate the accelerator efficiency.
Pre-requisite
Configuration to predict one or more fields among Product/Category/Disposition hereby will be mentioned as field(s) for this section.
User Flow
When an end-user raises an incident using email/Customer Portal webform (Email channels), the prediction flow is initiated. As of now this accelerator does not support the real-time live conversation, as it uses asynchronous CPM updates for the prediction flow, which means, the user can expect a slight delay of few seconds to a couple of minutes to see the prediction results to be updated to the incident. The flow has two major events, prediction and updation, a prediction is initiated when an incident is created, which will have a confidence score, which explains how confident the model is about the accuracy of the prediction. And updation is condition based, and it has two flows for agent:
- When the end users raise an incident without populating Product or Category or Disposition Field(s) (Direct update through Async CPM)
- Prediction flow will get initiated and the results will be stored in prediction log, which can be exposed to the agents with configurations explained in later sections
- If the Confidence Score of the predicted field(s) is greater than the threshold set for the field(s)
- The field(s) updated with predicted value
- A record will be added to the prediction log table with the above details
- Confidence Score of the predicted field(s) is less than the threshold set for the field(s)
- A record will be added to the prediction log table with the above details
- When the end users raise an incident with value populated in Product or Category Field(s) (Insights Panel to Agents)
- Prediction flow will get initiated and the results will be stored in prediction log, which can be exposed to the agents with configurations explained in later sections
- If the Confidence Score of the predicted field(s) is greater than the threshold set for the field(s)
- The field(s) will have the end-user supplied value
- If the predicted value is different from the existing value, Insights panel will show a suggestion to update the corresponding field(s) with the predicted value, which an agent can accept/reject
- The corresponding field(s) are updated with the predicted value if agent accepts the insight or prediction is ignored if the agent rejects the insight
- A record will be added to the prediction log table with the above details
- Confidence Score of the predicted field(s) is less than the threshold set for the field(s)
- A record will be added to the prediction log table with the above details
Here, if the predicted values are used for routing (rules are not packaged with this accelerator, but admin can configure or use the existing rules for the same), for the first flow the incidents will be routed based on rules set using predicted value and the agent can update the value if found incorrect and re-route or continue with resolution if found correct, thereby saving the overall resolution time. And for the second flow, the incident will be routed based on the end user supplied value, and agent will receive an insight when the incident is opened if the predicted value is different from the existing value. Now the agent is aware about the possible re-routing and can accept or reject the suggestion which saves the overall resolution time. The accelerator is not directly updating the end user supplied value, but again the code is customizable, and the admin can change this condition if needed.
Reports for Admin provided along with the package
The accelerator has a report packaged along with the sample code, the
- Prediction log Report with the following details for all the configured field(s) (This report can be embedded to the workspace if the admin wants to expose the log to the agent)
i. Created Date : Date and Time stamp when the prediction entry was created
ii. Source: Source of the prediction entry (CPM or Insights indicating the flow which the prediction was initiated)
iii. Current <Field Name>: The value the corresponding field had when the prediction was invoked
iv. Predicted <Field Name>: The value predicted for the corresponding field
v. Predicted <Field Name> Confidence Score: The confidence score of the prediction
vi. Threshold Confidence for <Field Name>: The threshold confidence score limit set for the corresponding field
- ROI Metrics Report (Incident Classifier Insights Dashboard) with the following details for all the configured field(s)
i. Total Incidents: Total number of closed incidents called for predictions
ii. # of Accurately Updated: Number of incidents which closed with correct prediction value updated.
iii. # of Manually Corrected: Number of Incorrectly updated values by the incident classifier
iv. Average Resolution Time: For overall closed incidents for the date range selected
v. Accurately Updated percentage: Percentage of incidents which closed with correct prediction value updated among the Updated Incidents
vi. Manually Corrected percentage: Percentage of Incorrectly updated values among the Updated incidents (predicted with confidence score greater than threshold set)
vii. Prediction Calls per incident: Average number of prediction calls made to the OCI per incidents
The above ROI Metrics report only considers the closed incidents, and the report will not consider the incidents for which the prediction flow is skipped due to the customizations (configured by the admin) or the incidents before the accelerator is configured. In later sections, the fields available for reporting is explained, which can be used to write similar extensions to create reports if required.
Flow Diagram:
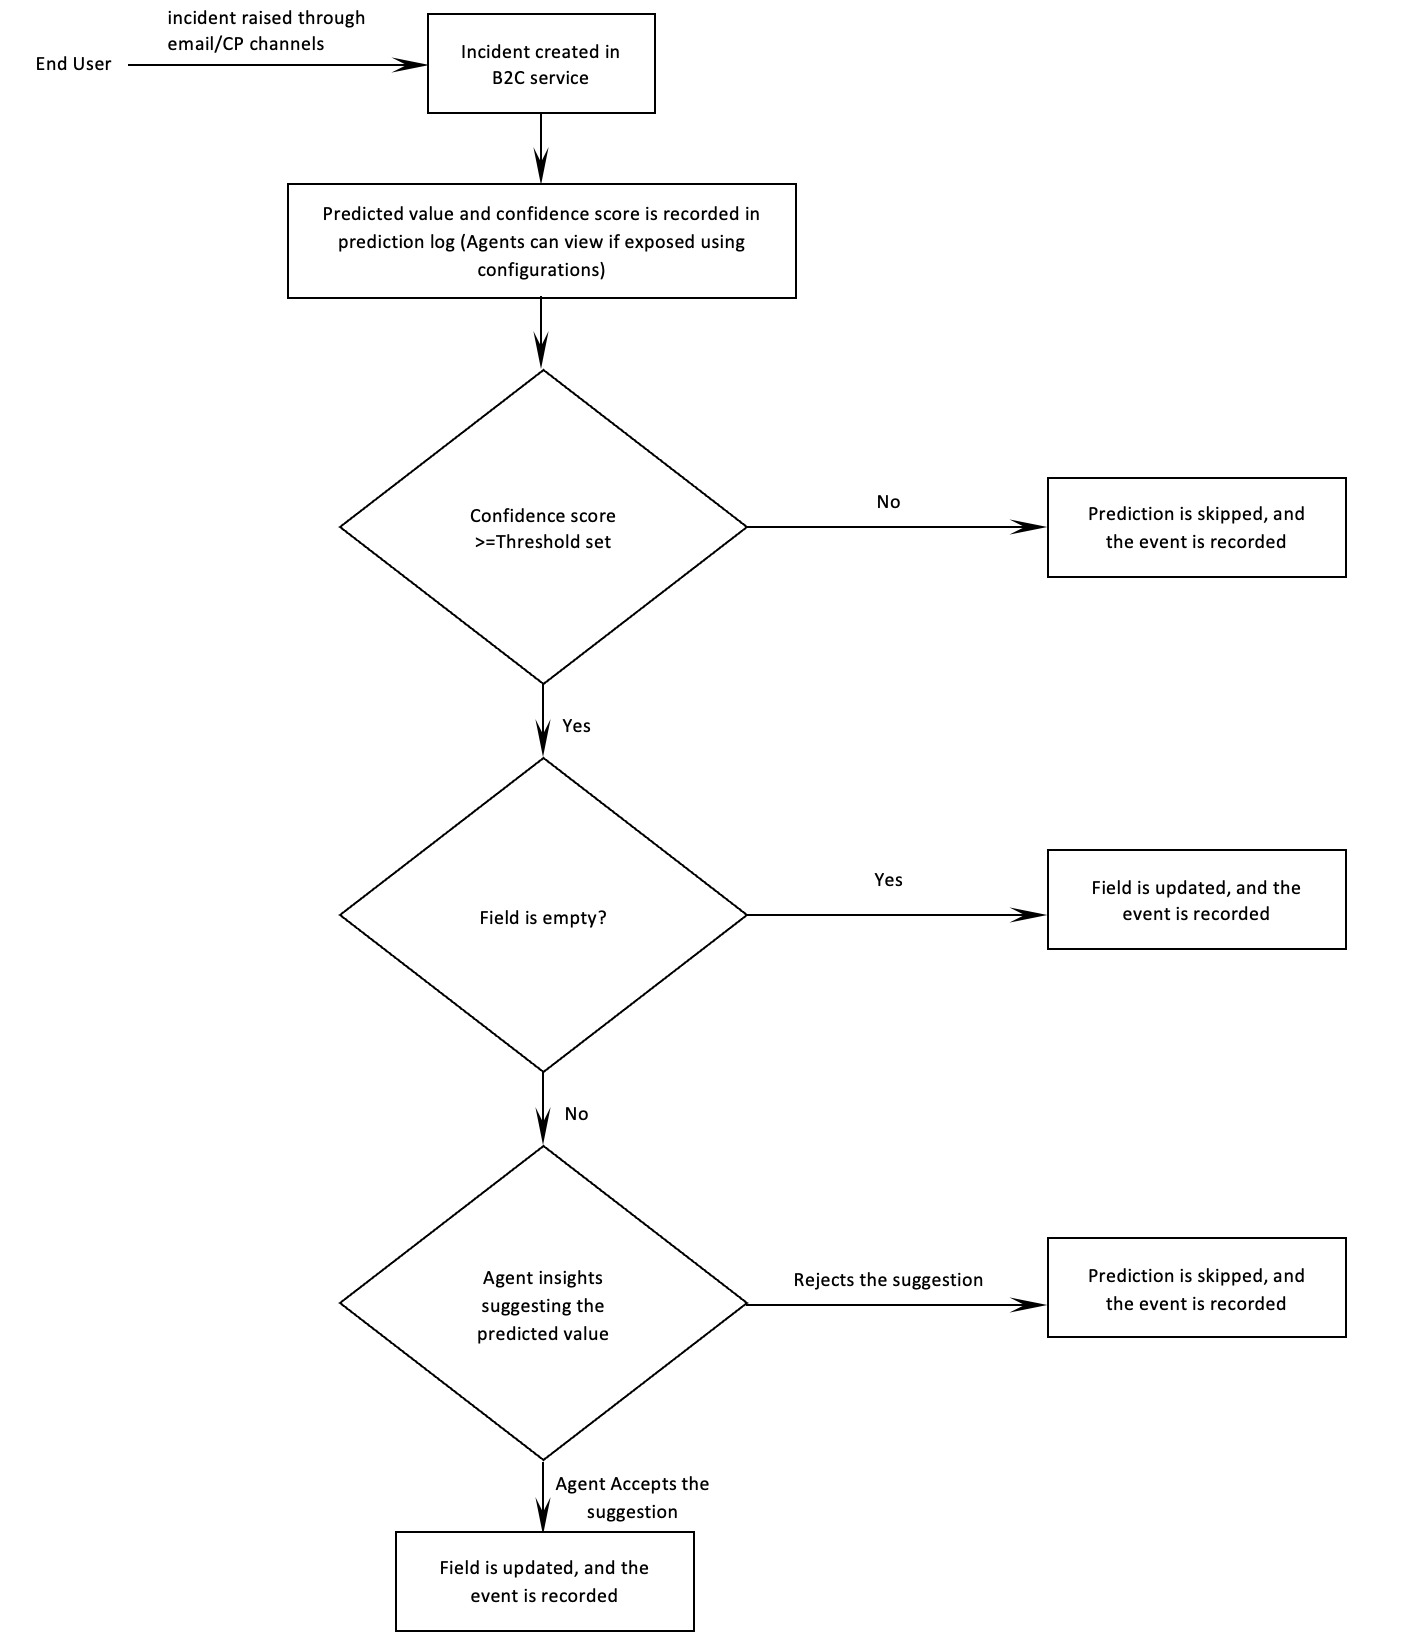
Workflow Highlights:
- Async CPM Prediction : CPM scripts will call for prediction when an incident created
- In case the intended field is empty when the incident is created, the CPM script will predict the field, updates the corresponding field and updates the prediction log
- In case the intended field is populated when the incident is created, the CPM script will predict the field, and updates the prediction log
- Once the incident is closed CPM scripts updates the status for calculating model accuracy
- Insights Prediction: Insights panel will call for a prediction when agent opens the incident
- In case if the predicted field is different from value of the intended field, agents will see an insight in insights panel to accept or reject the prediction, the corresponding details are logged under ML tab for reference.
- when agent accepts the prediction, the predicted value is updated in the intended field
- when the agent rejects the prediction, the insights panel will stop flashing the prediction.
Accelerator integration architecture
Incident classification feature is built to demonstrate the incident routing capability by predicting product, category and disposition fields for any incident based on the subject and first thread posted by customer. All the predictions are logged into custom objects for reporting purpose.
The solution does needs a mechanism to update the incident post incident creation so that the incident reaches the right set of agents. In order to achieve the invocation of classification model post incident creation, async CPM is used. Due to the nature of async CPM, the logic to update the incident may have a delay after incident creation. Async CPM sends subject and first thread of the incident to the model endpoint and incident field update happen based on the returned accuracy percentage and threshold set. From CPM, the model endpoint is only invoked when either of product, category or disposition fields are not set.
Below flow diagram depicts the invocation flow from CPM:
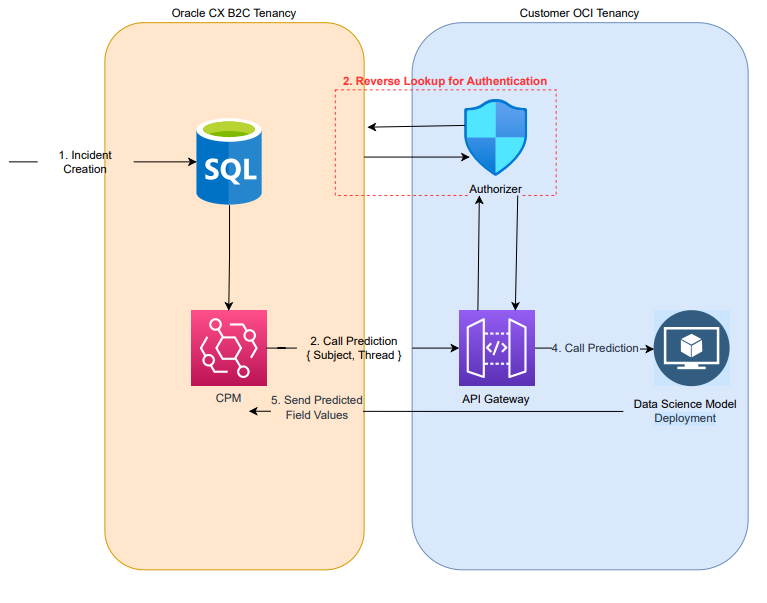
Custom model used for predicting product, category and disposition is deployed in OCI as function and is protected using API Gateway. The authentication layer in API gateway is overridden using authoriser which itself is an Oracle Function that does reverse lookup with user provided credentials to B2C Serice to authenticate the user.
When the customer populates the product, category and disposition in web form ( customer portal page), then CPM will not override those values. Instead, when agent opens such incident in BUI, suggested product, category and disposition is shown in the agent insight side panel if the suggested values differ from that of the populated value.
Below is the flow diagram of such customisation in BUI where extension tries to push

For BUI, the model endpoint is invoked by agent insight feature, while extensions are used to create transform request and response to and from the model. For the insights to call the model endpoint, the request is routed via Agent Service which in-turn pass the request to XO service. XO service call the API gateway which has an authentication function between model deployment and insight feature.
Model Deployment & Training
For the model to be deployed, we can classify the overall process into 3 stages:
- Data Ingestion
- Build Model
- Deploy Model
For Data Ingestion, we are using OCI Jobs to pull the data using ROQL from Oracle B2C Service and store the same into object storage.
Build Model stage will take the data from object storage and perform cleaning of data before it can be used for creating and training the model. Once the model is built, the same is pushed to model artifact.
Deploy model stage will pull the model from model artifact and create a function and deploy the same in private subnet. The route to this Oracle function is defined in the API gateway.

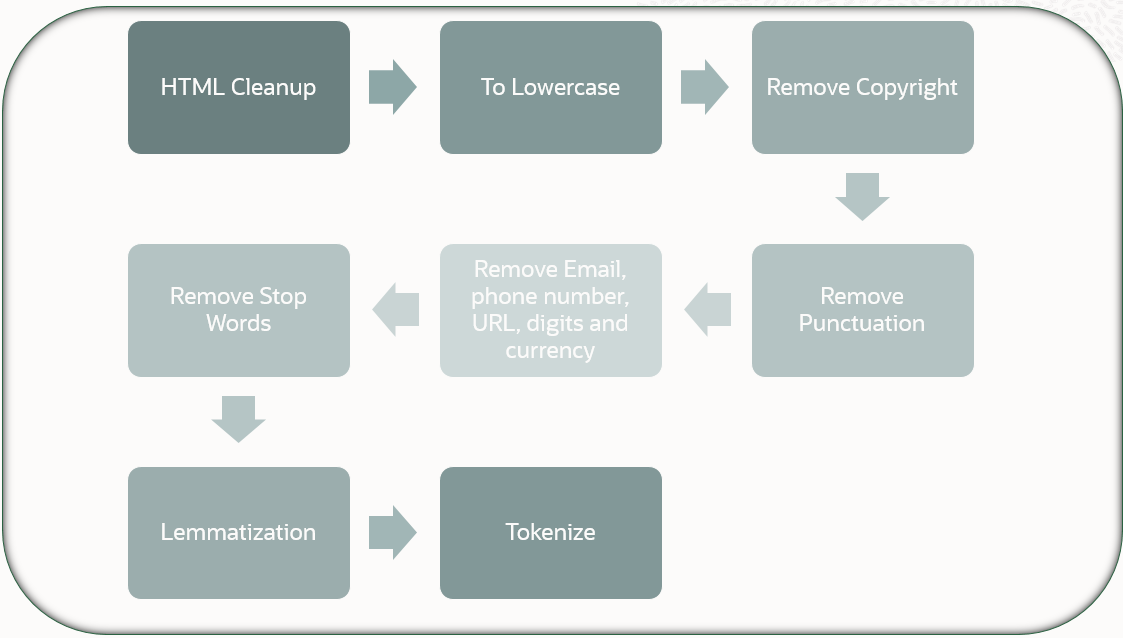
The data pre-processing steps are given below.
- HTML Clean-up: Removes HTML tags from the textual content
- To Lowercase: converting all the text in to lowercase form. Ex: Alex Bob → alex bob
- Remove Copyright: Removing the copyright texts given in app.config
- Remove Stop words: Removing stop words such as "am", "to", "in" etc
- Remove Email, Phone, URL and Digits: Based on the Regex, removing sensitive data
- Remove Punctuation: Removing use of spacing, conventional signs, and certain typographical devices as aids to the understanding and correct reading of written text
- Lemmatization: Process of reducing the different forms of a word to one single form, for example, reducing "builds", "building", or "built" to the lemma "build"
- Tokenize: Breaking the sentence into individual word tokens. Ex: Brown dog jumps → ["brown", "dog", "jumps"]
Below diagram depicts the flow of data pre-processing done before the model is been trained:
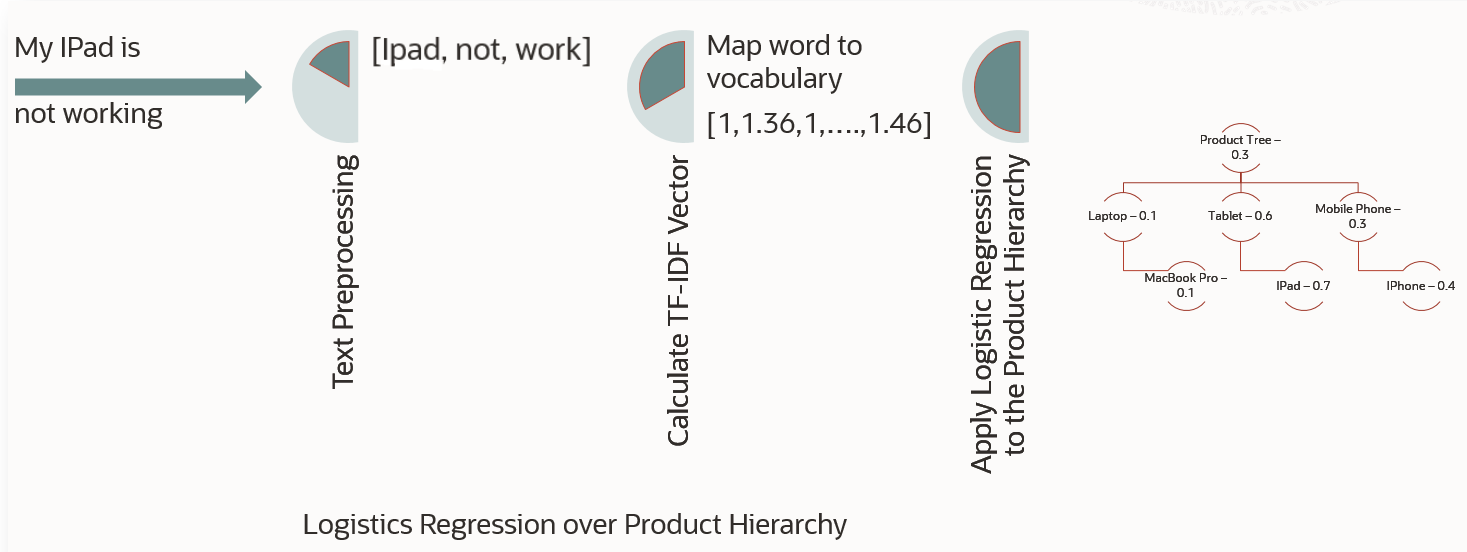
Once the data is cleaned, the data is been trained using Logistics Regression over Product Hierarchy. While choosing the model, it was evaluated against other similar models like XGBoost. The finding is that, XGBoost is indeed slightly better in accuracy but slower in inference time in comparison. Hence, logistic regression proves itself to be more optimal both in terms of prediction speed and accuracy.
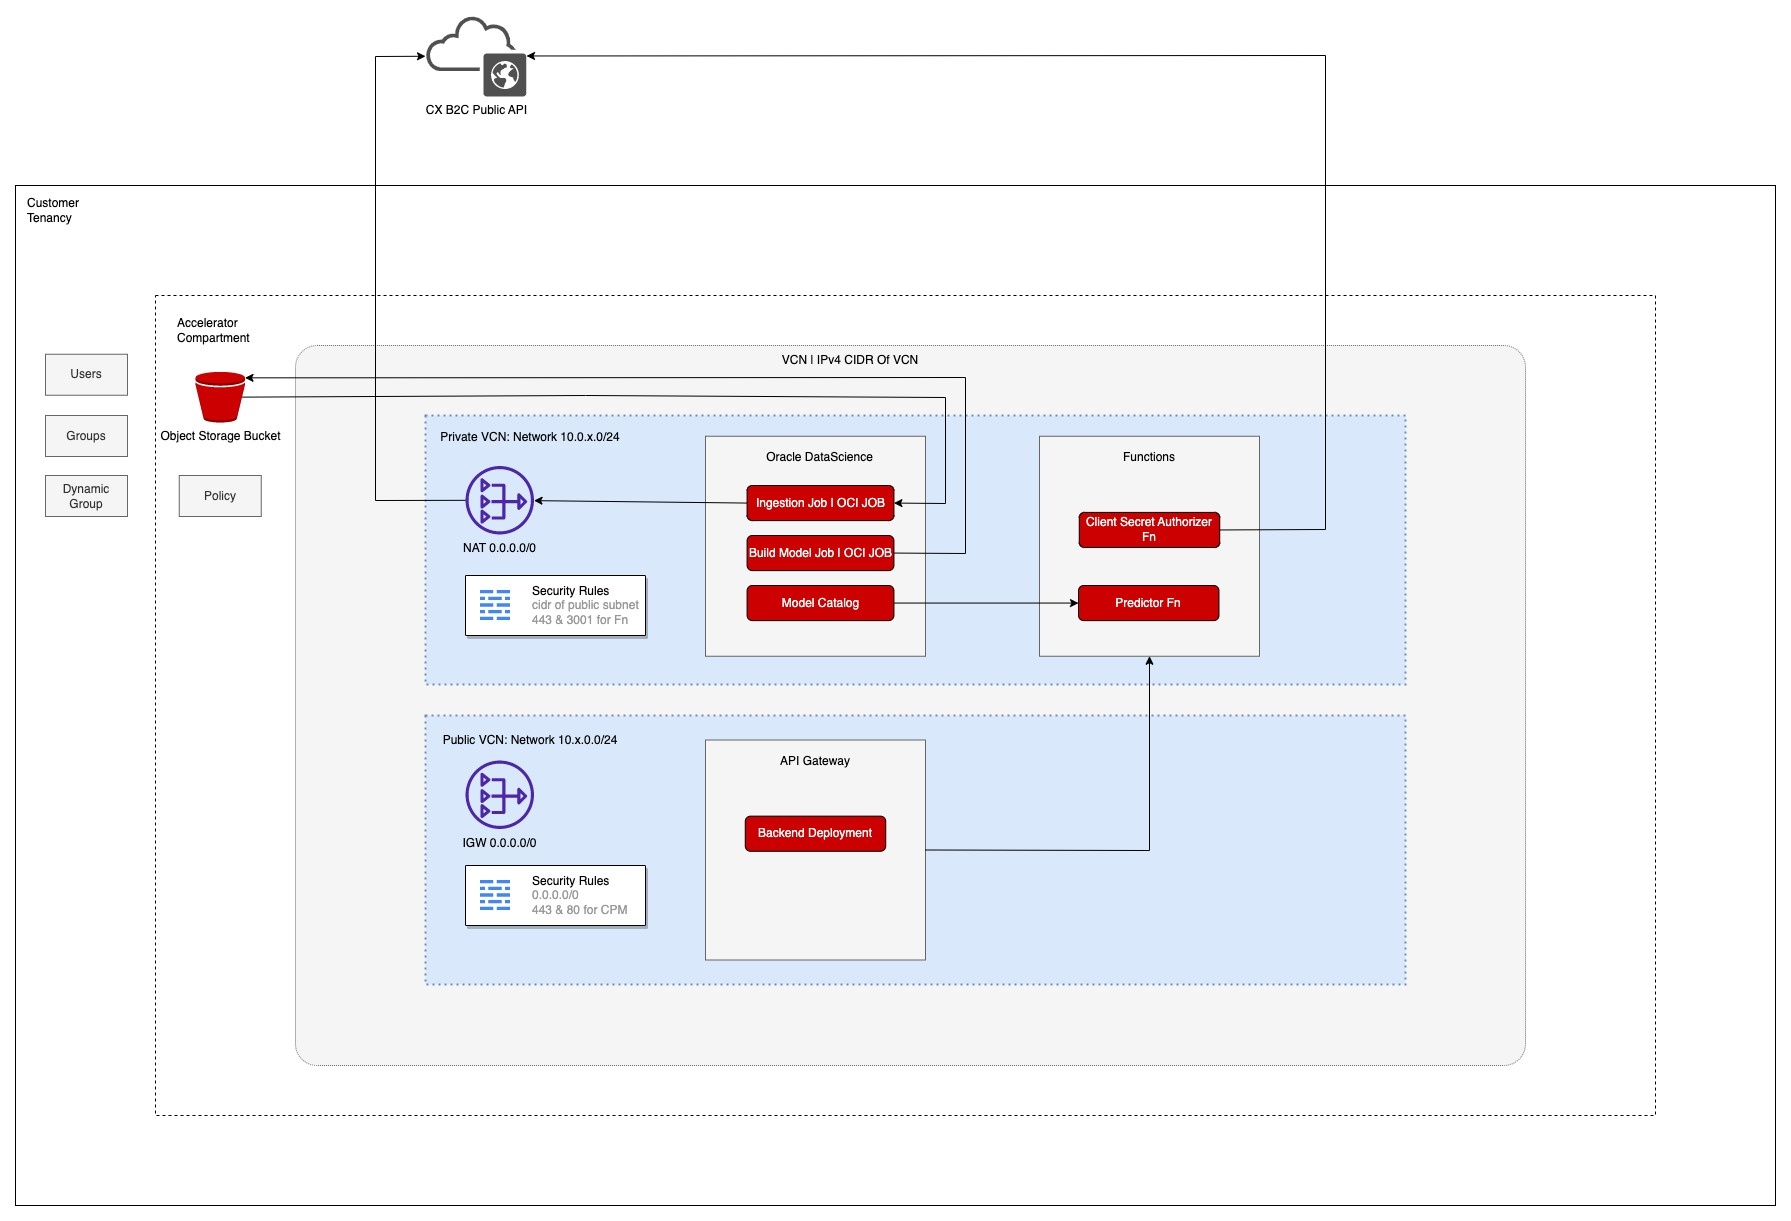
OCI Deployment Architecture
Below is the network architecture diagram of OCI data science model deployed in customer tenancy. The data used to train the model is stored in object storage and the access to the object storage to the OCI data science job is regulated via resource principal. The custom model is deployed in private subnet and the access to the model is exposed via API gateway which resides in public subnet. There are security rules defined on private VCN which allows specific IP access for port 443 and 3001 to the API gateway. NAT gateway is also configured, so that the ingestion Job can fetch the data from the B2C Service and store it in OCI object storage.
Note: Specific IPv4 CIDR Block could be found under the details page of VCN and subnets.
Install and Use the App
Install and deploy using OCI
Overview
Incident Classification model is built on OCI Data science platform, and is a fully managed platform which helps teams of data scientists to build, train, deploy, and manage machine learning models using Python and open-source tools.
The following are the implementation steps to configure OCI incident classification model. Each step is explained in detail below.
- Create a OCI vault in root tenancy
- Configure SSO for site
- Enable SSO login for a user
- Add Custom Configuration for Ingestion Job
- Create a stack from Zip File
- Once all the resources and model set up is complete, follow the steps in Text Incident Classification Site Setup
1. Create OCI vault in root compartment
i. Log in to your OCI tenancy
ii. Search for vault under Identity and Security
iii. Create a new vault in root compartment by clicking create vault as shown in the below image
iv. Give a unique name and click 'create vault' button

RSA Certificate is needed for configure SSO user for Ingestion job. This job will pull data from the B2C Service and store data in object storage for training ML model.
The steps needed to set up SSO can be found here https://documentation.custhelp.com/euf/assets/devdocs/cloud22c/olh/CoreFeatures/topicrefs/t_Configure_OSvC_for_Oauth.html
3. Enable SSO login for a user
i. login to .net console
ii. Create a two accounts one for REST API basic auth and other for SSO login
iii. SSO enabled profile(SSO ) should be mapped to the SSO account
iv. Open Single Sign-On Configurations inside Navigation
v. Move to OAUTH tab Add a new Identity Provider
o EntityID: <<entityProviderId>> (e.g. rnowPublicApi)
o Active Checkbox: Checked
o Enforce Audience Restriction: Checked
o Custom Audience URL: <<audienceUrl>> (e.g. /rnowToken)
o Label: <<ProviderLabel>> (e.g. rnowPublicApi)
o Import Certificate: Upload public certificate
4. Add Custom Configuration for Ingestion Job
Create a new configuration setting to create site specific custom setting for ROQL Queries for data ingestion .
i. Log in to .net console of your site
ii. Click Configuration on the navigation pane.
iii. Expand Site Configuration, and then double-click Configuration Settings.
iv. Select the custom Folder
v. Click New on the ribbon and select the data type: Text
vi. A new configuration setting opens on the content pane.
vii. Enter below field information (REPORT LIST)

|
Field |
Custom Configuration Setting Value |
|
Key |
CUSTOM_CFG_REPORT_LIST |
|
Data Type |
Text |
|
Default |
[{ |
|
Maximum Length |
3000 |
viii. Click on Save
The aia_incidents roql in above table can be updated according to the need as what kind of incidents the job should fetch for the training of model. The fields should not. be changed but where conditions is customisable.
5. Create a Stack from Zip File
A Stack is a terraform configuration that you can use to provision and manage your OCI resources
i. Login to OCI tenancy
ii. Open the navigation menu and click Developer Services. Under Resource Manager, click Stacks.
iii. Select the compartment as root (on the left side of the page).
iv. Click Create stack
a. The Create stack page opens, with the Stack information tab selected.
v. In the Create stack page, under Choose the origin of the Terraform configuration, select My configuration.
vi. Create a zip of source code
a. Download the source code from /incident_classifier/oci
b. Review the configurations for OCI jobs in file /incident_classifier/oci/classifier/src/app.config
c. The file contain the below configurations
|
Configurations |
Values |
VERSION |
Version of model |
REPORT_LIST |
List of report fetched using ROQL from B2C rest API |
SIGNATURES |
The substrings which will get removed in pre-processing |
MODEL_TRAINING_INTERVAL |
Time interval in hours to train and create a new. model |
INCIDENT_REPORT_NAME |
Unique identifier for Incident data fetch |
INGESTION_JOB_REPEAT_INTERVAL_IN_HOUR |
Time interval to fetch new feedback data |
ROQL_AI_INCIDENT_LIMIT |
Number of Incident fetch in one API call |
ROQL_AI_INCIDENT_OFFSET |
Offset of Incident fetch in one API call |
AIA_HIERARCHY_DATA_FROM_ROQL |
Flag for fetching data using ROQL or report |
JWT_TIME_EXPIRY_IN_MINUTE |
Time to invalidate JWT token created |
CLEANUP_SCOPE |
Scope of clean up |
STOP_WORDS |
Hardcoded words to be removed from text used for prediction |
d. Zip all folders inside above repo
vii. Under Stack configuration:
a. .Zip file: Drag and drop the .zip file onto the dialog's control or click Browse and navigate to the location of the .zip file you want.
viii. Fill the next fields as suggested in the below table
|
Field |
Values |
|
Use custom providers |
Not selected |
|
Name |
Stack name. You can accept the default name provided. Avoid entering confidential information. |
|
Description |
Stack description (optional). |
|
Create in compartment |
A compartment from the list scope is set by default.(Root compartment) |
|
Terraform version |
1.1x |
|
Tags |
No need to update |
ix.
Click Next.
a. The Configure variables panel lists variables
from the Terraform configuration.
x. Update the fields in Configure variables panel as suggested in below table
|
Field |
Description |
|
authorization_type |
The type of authorization needs to use while ingesting the data. (BASIC | OAUTH) |
|
b2c_auth |
base64 encoded basic auth of API user. Required only if the authorization_type is BASIC |
|
bucket_name |
Object storage name, you can accept the default name provided. |
|
build_model_shape |
VM Shape for modal training job, you can accept the default if data size is below 20k or change it to VM.Standard2.4 or above |
|
compartment |
Compartment name, you can accept the default name |
|
cx_rest_api_key |
base64 encoded private key pair of the public certificate added in .net console for SSO user |
|
domain |
cx b2c site domain |
|
dynamic_group |
dynamic group name, you can accept the default name When you create a dynamic group, rather than adding members explicitly to the group, you instead define a set of matching rules to define the group members |
|
environment_yaml_path |
Please provide raw git URL contains YAML file. Ex: https://raw.githubusercontent.com/.../environment.yml |
|
group |
group name, you can accept the default name When creating a group, you must provide a unique, unchangeable name for the group. The name must be unique across all groups within your tenancy |
|
ingestion_job_shape |
VM Shape for data ingestion job, you can accept the default |
|
oauth_entity |
OAUTH entity which is a unique id given in .net console as Entity ID in OAUTH tab of SSO configuration. |
|
oauth_path |
OAUTH path is URL path in .net console as Custom Audience URL in OAUTH tab of SSO configuration |
|
oauth_user |
Username of user with a profile having SSO login enabled. |
|
private_subnet_cidr_block |
10.0.1.0/24 |
|
public_subnet_cidr_block |
10.0.0.0/24 |
|
region |
Tenancy home region |
|
tenancy_ocid |
Tenancy OCID |
|
vault_id |
vault id created in step "Create OCI vault in root compartment" |
|
user_private_key |
Base64 encoded user's oct private key (Also make sure that public key is uploaded under the tenancy's api key) |
|
user_ocid |
User's cloud oracle id |
|
user_fingerprint |
Fingerprint of created oct config |
|
user_auth_token |
Base64 encoded user auth token of OCI which can be created in Oracle Cloud under user profile and then auth token |
xi. Review the variables and change as needed
xii. Click Next.
xiii. In the Review panel, verify your stack configuration.
xiv. Click Create to create your stack.
xv. The stack is created, and its Stack details page opens.
Run job in Resource Manager
A Job is created when you run a Terraform action on a stack. Use these Terraform actions to plan, apply and destroy your OCI resources according to your configuration
After creating stack, you can run job in Resource Manager, Such as Plan, Apply, Destroy
Running a plan job parses your Terraform configuration and converts it into an execution plan for the associated stack. The execution plan lists the sequence of specific actions planned to provision your Oracle Cloud Infrastructure resources, including actions that are expected after running an apply job.
- Navigate to Stack details page
- Click Plan. The plan job is created. The new job is listed under Jobs.
Running an apply job for a stack, terraform provisions the resources and executes the actions defined in your Terraform configuration, applying the execution plan to the associated stack to create (or modify) your Oracle Cloud Infrastructure resources
- Navigate to Stack details page
- Click Apply. The Apply job is created. The new job is listed under Jobs.
The Apply job might take hours to complete depending on the size of Incident data which the Ingestion job has to pull.
Running a destroy job in Resource Manager to release (tear down) resources associated with a stack and clean up the tenancy. Released resources are not deleted.
- Navigate to Stack details page
- Click Destroy. The Destroy job is created. The new job is listed under Jobs.
Note : Object storage bucket consists of customer data fetched using ingestion job which should be manually deleted before running destroy job
: Vault secrets will be deleted only after a day and Master Encryption Keys will be deleted only after a week. (System defined minimum timeframe)
: Compartments should be manually deleted after deleting all the resources inside the compartment.
For Debugging Terraform Creation Please refer Debug : Terraform Deployment Logs
Site Configuration
Text Incident Classification Site Setup
Overview
Requirements
- Admin access to B2C Service site
- Two user accounts should be created, one for basic auth for rest API call from CPM and other for OAUTH call from OCI.
- IDCS Id / OCI Region / Account Name / Account Id
- Site enabled for Agent Insights and External Objects.
- Access to the Identity Provider editor
If above settings are not enabled. Please submit a service request or contact your Oracle account manager to have your site enabled for Agent Insights, External Objects, and Identity Provider editor for SSO.
Incident Classification uses Machine learning to predict product, category, and disposition labels from the subject and body text of new incidents to improve automation, routing, and reporting.
The following are the implementation steps to setup Incident Classification in B2C
- Create Custom objects.
- Add Custom Configuration
- Install CPM File
- Configure the CPM routing.
- Configure Agent Insights
- Add Extensions
- Add Reports
1. Create Custom objects
Prediction Log Custom object allow you to store information related to prediction history from the Incident Classification model.
IncidentIntentDetail object store the summery of prediction for an incident.
Source menu object store the source label values for source of prediction.
1. Log in to .net on console on your site.
2. Click Configuration on the navigation pane.
3. Expand Database, and then double-click Object Designer
4. Click Import
5. Download File: /incident_classifier/imports/prediction_data_model.zip
6. Enter the path and file name of the file downloaded in above step.
7. Click Next till import is successful.
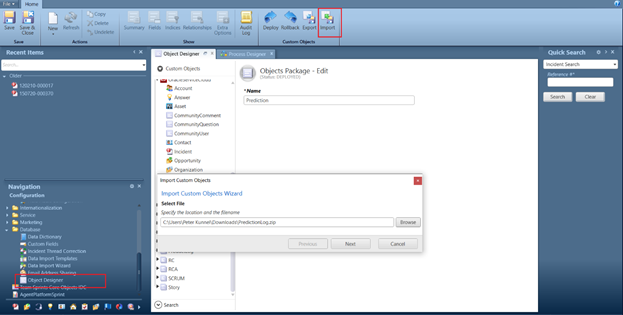
8. Click on Save
9. To deploy the imported objects on your site, click Deploy.
10. Select Deploy immediately check box.
11. After Successful deployment, Select Prediction Log
12. Click Extra Options and Select All for Prediction Log Permissions.

13. Select IncidentIntentDetail
14. Click Extra Options and Select All for Incident Intent Detail Permissions.
15. Click on Save.
16. To deploy the permission changes, click Deploy.
2. Add Custom Configuration
Create a new configuration setting to create site specific custom setting for ROQL Queries for data ingestion and CPM configs for invoking machine learning predictions.
1. Log in to .net console of your site.
2. Click Configuration on the navigation pane.
3. Expand Site Configuration, and then double-click on the Configuration Settings.
4. Select the custom Folder.
5. Click New on the ribbon and select the data type: Text
6. Enter field information (CPM Configs)
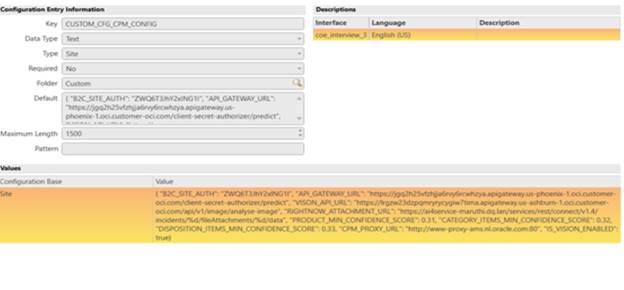
|
Field |
Custom Configuration Setting Value |
|
Key |
CUSTOM_CFG_CPM_CONFIG |
|
Data Type |
Text |
|
Default |
{ |
|
Maximum Length |
2000 |
7. Click on Save
8. Click New on the ribbon and select the data type: Text
9. Enter field information. (Log Configs)
|
Field |
Custom Configuration Setting Value |
|
Key |
CUSTOM_CFG_LOG_CONFIG |
|
Data Type |
Text |
|
Default |
INFO |
|
Site |
INFO |
|
Maximum Length |
50 |
10. Default and Site value can be any of these values : INFO/DEBUG/ERROR/WARN
11. Click on Save
3. Install CPM File
CPM script allows you to consume machine learning predictions. Update the test contact id in CPM file.
1. Log in to .netconsole of your site
2. Click Configuration on the navigation pane.
3. Expand Site Configuration, and then double-click on the Process Designer
4. Select New
5. Download file : /incident_classifier/cpm/cpm_generic_with_text_classifier.php
6. Update the Contact.id value in downloaded file to any available contact id in the site.
7. Browse PHP Code File downloaded in the above step.
8. Select execute asynchronously and Save
9. Click Test
10. To deploy the CPM file, click on Deploy.

4. Configure the CPM routing
The CPM configured in step 3 should be invoked for each Incident creation in scope. Please add relevant rules or handler which will do this routing according to current site set up.
5. Configure Agent Insights
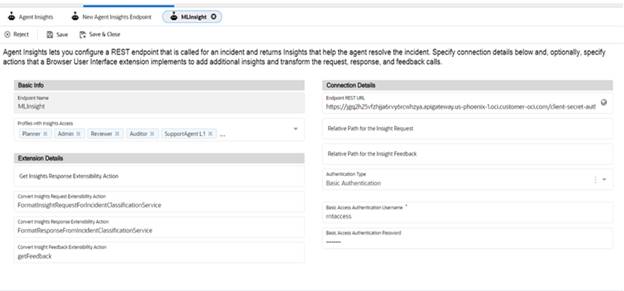
Agent Insights allows you to prominently displays suggested action tiles in a modern, easy-to-navigate panel, making it easy for agents to simply click and select the next-best action to address a service issue.
1. Login to BUI and Navigate to Agent Insights.
2. Click Add New icon in the toolbar
3. Configure the below details
- Basic info (Endpoint Name, Profile Access)
- Add Method Names specified in the Extension file to the below fields in the Extension details.
- Convert Insights Request Extensibility Action: Add FormatInsightRequestForIncidentClassificationService
- Convert Insights Response Extensibility Action: Add FormatResponseFromIncidentClassificationService
- Convert Insight Feedback Extensibility Action: Add getFeedback
- Connection Details (Endpoint Rest URL: AI/ML endpoint which is configured in OCI . Login to OCI tenancy and find Gateways under Developer Services>API Management created in the compartment which we configured in terraform. The Deployments inside Gateway Details will have the base URL with label endpoint. Append /predict to this value before updating here, Authentication Type <Basic Authentication, provide username/password for the API user>)
4. Click on Save
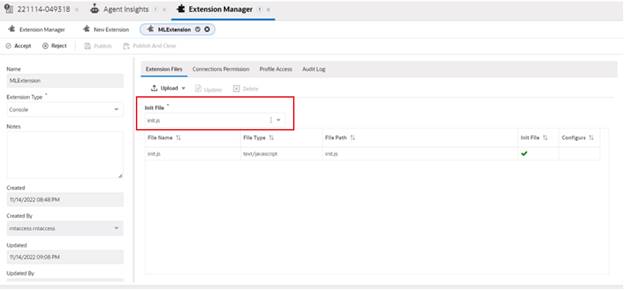
6. Add Extensions
You can import Agent Browser UI Extensibility into Oracle B2C Service to create extensions using the Extension Manager
1. Login to BUI.
2. Click Extension Manager in Site Configuration
3. Click Add New icon in the toolbar.
4. A new Extension opens on the content pane.
5. Enter a name for the extension in the Name field.
6. From the Extension Type drop-down menu, select Console.
7. Download file /incident_classifier/bui-extension
8. Upload the extension file downloaded in above step.
9. From the Init File drop-down Select the file you want to be the initialization file, getInsights.js
10. Click on Connection Permission tab and select the Agent insight.
11. Click on Profile
Access tab and Grand permissions for the Interface
and External Connections

11. Click Accept
12. Click Publish
7. Add Reports
You can use Reports to view the data in predictionLog custom object and also get the ROI of this feature. We are giving two report definitions as part of this feature and also you can create new reports using .net console.
I.
ROI Metrics report : This report give use the ROI details of this
feature by analysing the predicted data which get stored in the DB.
Report definition : /incident_classifier/imports/ROI
Metrics 100066.xml
II.
PredictionLog By Incident : Report used to visualise each predictions
which was done by the Incident classifier model. This report can be embedded as
workspace report in a workspace tab. An agent will get a snapshot of the
prediction made for that incident.
Report definition :/incident_classifier/imports/
Do the below steps to import a Report definition
- Log in to .net console of your site.
- Click Analytics on the navigation pane.
- Select Report Explorer
- Click on New Report and Import Existing Report Definition
- Browse and select the file from in local system
Data Model For Incident Classifier
List of Custom Objects
Prediction Log Custom object allow you to store information related to prediction history from the Incident Classification model
Source menu object store the source label values for source of prediction
IncidentIntentDetail object stores the summery of prediction for an incident. It is added to capture the incident prediction summery details. However, the fields of this custom object should not be edited in workspace (If it is added), since these values are used to evaluate the prediction done by model. And the IncidentIntentDetail will have the following fields:
- IsAcceptedProdML: yes/no field which indicate if product prediction was accepted by agent from agent insight suggestion.
- IsAcceptedCatML: yes/no field which indicate if category prediction was accepted by agent from agent insight suggestion.
- IsAcceptedDispML: yes/no field which indicate if disposition prediction was accepted by agent from agent insight suggestion.
- InsightMLTriggered: yes/no field which indicate agent insight flow was triggered.
- AutoMLTriggered: yes/no field which indicate CPM flow was triggered.
- CommentML: text field which can be used by Supervisor/Admin to add comment about prediction.
- PredictedProduct: menu field which will be updated with Product predicted.
- PredictedCategory: menu field which will be updated with Category predicted.
- PredictedDisposition: menu field which will be updated with Disposition predicted.
NOTE: IncidentIntentDetail Object is responsible for controlling the insights and also been used in reporting. So, customer may need to handle copy scenario with a rule which clears the IncidentIntentDetail on the newly created Incident.
Troubleshooting Incident Classifier Accelerator
- Debug API Gateway Logs: API Gateway is the entry point to oci resources. API Gateway logs can be used to track the traffic through API Gateway.
- Debug : CPM Logs: CPM is custom script used in B2C Service and ML model invocation happen from this code. This log has all the debug information of CPM execution.
- Debug Extension Logs: Extensions are add on capability in BUI which we are using to show insights to Agent. We can check this log to see if there is error in Extension execution.
- Debug Ingestion Job Logs: Ingestion jobs are used to fetch Incidents for model feedback. Job run logs can be viewed here.
- Debug ML Model Logs: Model is created using model creation job. Any issues in this job can be found in this log.
- Debug : Terraform Deployment Logs: Deployment log is used to debug any error during the terraform run. Terraform is used to create the oci resources needed for this accelerator.
Debug : API Gateway Logs
API Gateway logs will have the details on requests from client which was made to the gateway.
Step 1: Go to API Gateway Resource Page
- Click on https://cloud.oracle.com/api-gateway/gateways?region={region_name}
Step 2: Click on gateway named as a "accelerator_gateway"
Step 3: Select "Deployments"
Step 4: Select the deployment that you want to debug.
Step 5: Click on the "Logs" from left hand side menu
Step 6: Enable Logs (If not enabled)
Step 7: Click on Log Name. It will redirect you to the new page.
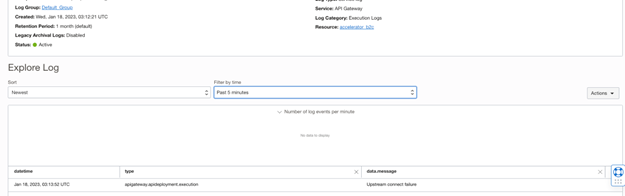
Note: By Default, We can maximum view last 14 days logs only.
Debug : CPM Logs
The Process Designer / Custom Process Models (CPM) feature allows associating PHP script with object events. We are using CPM to call the ML model from B2C Service and process the response.
We can view the logs generated during this process using the below steps.
- Add a custom script in /cgi-bin/<<>>.cfg/scripts/custom/src/see_log.php which will access log present in /tmp folder
- File : /incident_classifier/script/see_log.php
- Access the url https://<<hostname>>/cgi-bin/<<>>.cfg/php/custom/src/see_log.php
- Enter agent credentials

- Logs will be displayed on the same page for the current log file
- If we need file for a different date use the URL https://<<hostname>>/cgi-bin/<<>>.cfg/php/custom/src/see_log.php?filename=cpm_prediction_20230119.log
Note:
- File name format → cpm_prediction_YYMMDD without space as given in point 6 if we need to fetch on a specific date. If file name is not passed as param latest file log will be fetched.
- CUSTOM_CFG_LOG_CONFIG is used to handle the debug level.
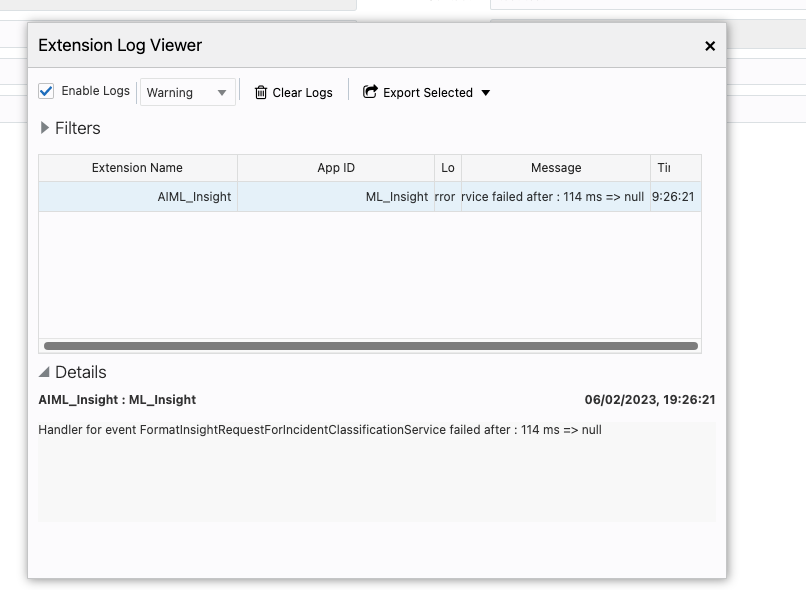
Debug : Extension Logs
Extension log will have the extension invocation logs with any failure in handler if present in message column.
Step 1: Go to your site with agent login (site)/AgentWeb
Step 2: Click on top right side profile icon

Step 3: Click on "Extension Log Viewer" and it will open a Pop Up Window like below where you can see the all the extension related log.
Make sure you have Checked the "Enable Logs" Checkbox.
Debug : Ingestion Job Logs
Ingestion has two set of jobs :
- One time Ingestion Job Run
- Daily Schedule Job Run
The scope of "One time Ingestion Job Run" is to execute bulk ingestion for n number of days configured in app.config and stop after ingesting the data.
However on the other side for "Schedule Job Run", It executes daily once to fetch the feedback data used for training.
Both the jobs can be seen at:
Data Science > Projects > Project details > Jobs
This space will list the jobs as shown below:

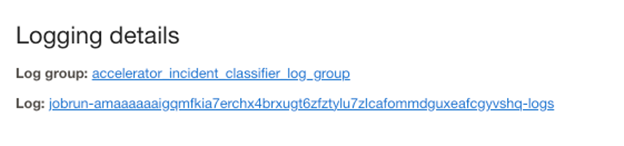
Select Ingestion Job or Scheduled Ingestion Job and click on currently active job run to see logging details. Below screenshot shows the sample log screen:
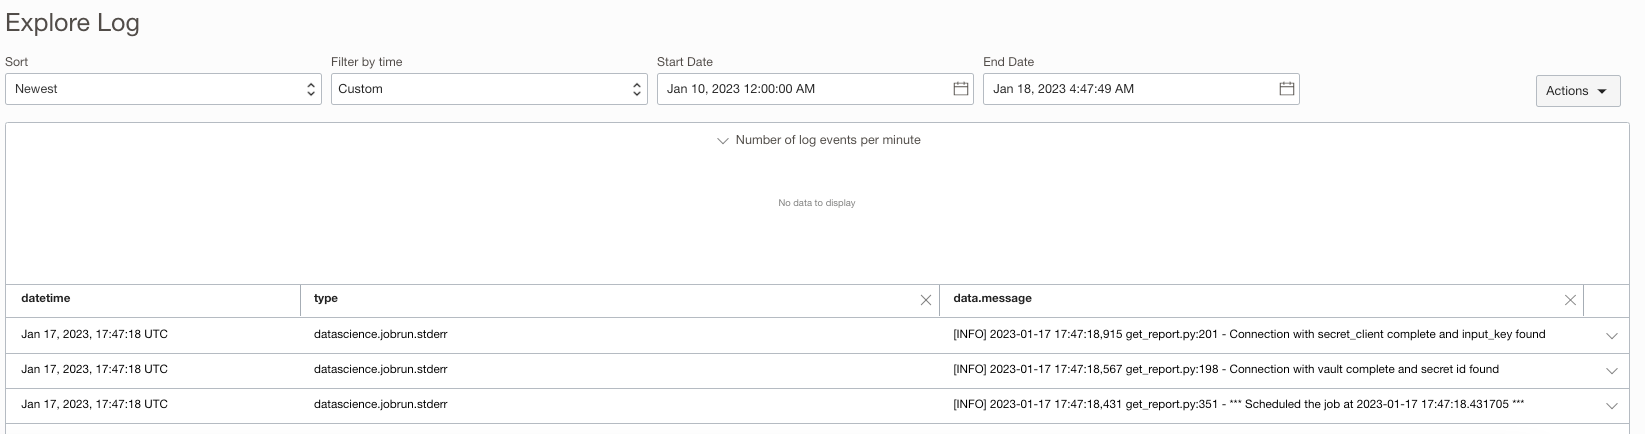
Once you have above details go to Log and see if any errors came up in last 14 days duration.

Debug : ML Model Logs
Model building
is critical component of the overall solution. Model can fail to be created due
to multiple reasons. Some of those reasons could be inappropriate data columns,
insufficient data, wrong mapping of target class and etc. so To identify the
reason of failure one need to check the log of the job named "Scheduled
Build Model Job".
Another point of failure could be the model response. So once the model is
built, to check the reasons for failure in model rest endpoint, one need to
look into the function named "predictor" under the Function
Application.
ML model could be debugged using either of the below stated ways:
- Using
Build Model Job Logs
Model failure could happen due to missing columns in the configuration step or data specific issue.
To confirm on this, one needs to check following path
Data Science > Projects > Project details > Jobs
Below screen will be presented:
From the job listed, click on "Scheduled Build
Model Job" and click on currently active job
run and one can see logging details as shown below.
From Above "Log" link, you can easily find out the root cause of the
issue due to which model building the model on given ingestion.
2. Using Function Logs
If "Schedule Build Model Job" is success and still one is unable to
get prediction from endpoint, then it could be possibly bad configuration of
API Gateway or misconfigured functions from terraform step.
To check API Gateway, follow the debug instruction given at API Gateway Debugging.
Next step to follow if the problem still persist would be to check function
logs:
Step 1: Please go to this path: Functions
> Applications > accelerator_fn
Step 2: Make sure there two functions are listed like below
a. predictor
b. client-secret-authorizer
Step 3: On the left side there would be resource menu where you have to select "Logs"
Step 4: If Function Logs are not enabled by default then enable it and click on "accelerator_function_invoke".

Debug : Terraform Deployment Logs
Terraform module for OCI Logging is used to create logs and log groups for OCI services and custom logs. This log will help to identify and debug the failures or error occurred during the terraform run.
Step 1: Go to Terraform Stack
- https://cloud.oracle.com/resourcemanager/stacks
- Select the compartment name where you created the stack from left side selector menu
- Click on the created stack
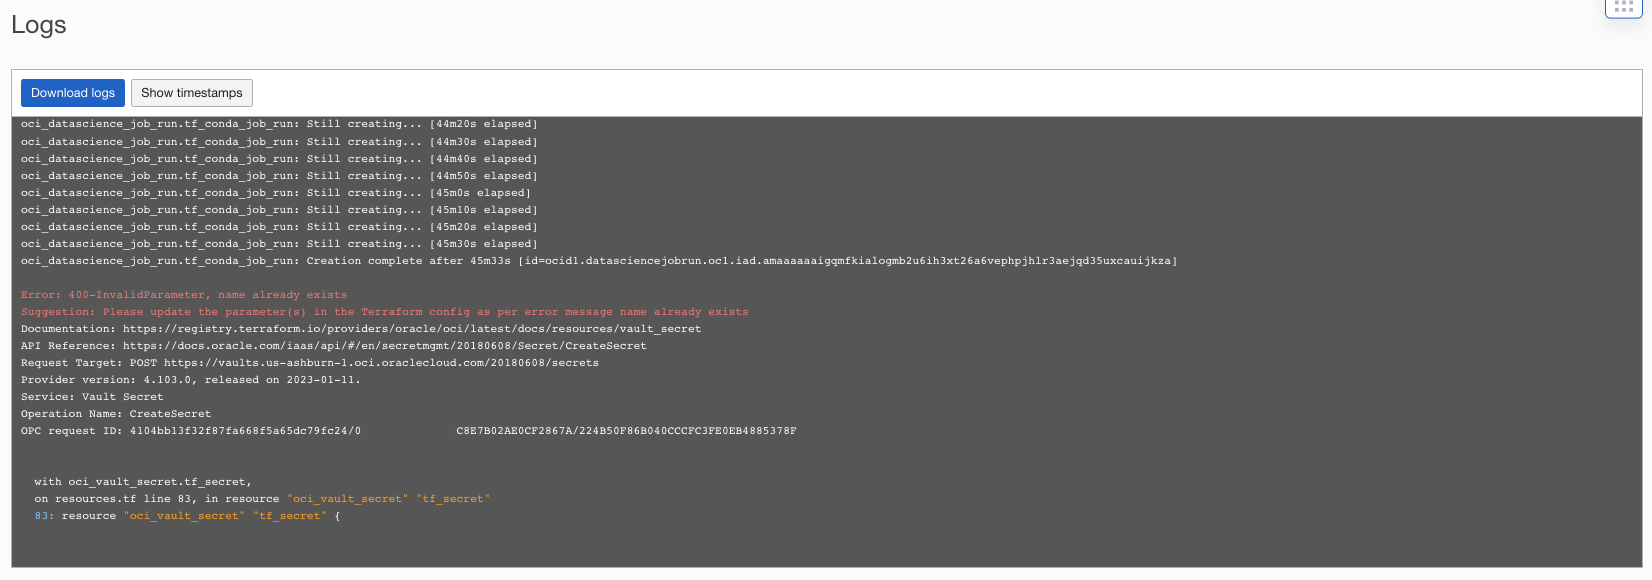
- Click on the recent job which got failed
- Scroll down to bottom to check the error which has caused the failure.
Recommended Practices
There are some constrains while creating Terraform. Please consider the following points for successful completion of the resource creation using terraform.
- Create a new stack, if the existing stack run failed at Conda creation job
- Terraform has dependency on selenium and google web driver version for crating Conda environment in OCI.
- b2c_auth and cx_rest_api_key in stack configuration page should be base64 encoded.
- Minimum amount of data in the Object storage bucket is required for successful completion of modal building.
- Modals build with small data set will fail at check_for_deployed_model step. Since modal created so quick before terraform identifies the modal for deployment.
- Object storage should be manually deleted. destroy flow will fail at first run and we need to delete the bucket and rerun the destroy job.
- Vault secrets will be deleted only after a day and Master Encryption Keys will be deleted only after a week; hence compartment won't be deleted in stack destroy flow.
- User should manually delete the vault secrets and Master Encryption Keys
- Avoid giving long names for Artifact repository.
- group-name, compartment-name, policy name and bucket name should be unique in tenancy.
Appendices
Appendix 1 - Library dependencies
|
Library |
version |
|
python |
3.8.15 |
|
pyjwt |
2.4.0 |
|
spacy-model-en_core_web_lg |
3.4.1 |
|
oracle-ads |
2.6.3 |
|
pandas |
1.3.5 |
|
beautifulsoup4 |
4.11.1 |
|
python-dateutil |
2.8.2 |
|
html5lib |
1.1 |
|
cloudpickle |
2.1.0 |
|
scikit-learn |
1.0.2 |
|
numpy |
1.22.2 |
|
joblib |
1.1.0 |
|
oci |
2.70.1 |
|
requests |
2.28.1 |
|
scipy |
1.9.0 |
|
ipython |
8.4.0 |
|
schedule |
1.1.0 |
|
lxml |
4.7.1 |
|
spacy |
3.4.1 |
|
talon |
1.4.4 |
|
jwt |
1.3.1 |
|
com.fnproject.fn.api |
1.0.150 |
|
Selenium |
4.6.0 |
|
conda |
22.11.1 |
Note: Oracle authoriser functions for this accelerator are developed in Java language and its internally using Java 17-1.0.150