| Oracle® TimesTen Application-Tier Database Cache User's Guide 11g Release 2 (11.2.2) E21634-12 |
|
|
View PDF |
| Oracle® TimesTen Application-Tier Database Cache User's Guide 11g Release 2 (11.2.2) E21634-12 |
|
|
View PDF |
This chapter illustrates the creation and use of cache groups by demonstrating how to create an explicitly loaded read-only local cache group and a dynamic updatable global cache group. In addition, this chapter demonstrates how to create a grid, since this example creates a global cache group. It also describes how to populate the cache tables, and how to observe the transfer of updates between the cache tables in the TimesTen database and the cached tables in the Oracle database.
Before you can create a cache grid or a cache group, you must first install TimesTen and then configure the Oracle Database and TimesTen systems. See Oracle TimesTen In-Memory Database Installation Guide for information about installing TimesTen.
Complete the following tasks:
Before you can use TimesTen Application-Tier Database Cache, you must create the following users on the Oracle Database:
A user timesten owns Oracle Database tables that store information about the cache environment.
One or more schema users own the Oracle Database tables to be cached in a TimesTen database. These may be existing users or new users.
A cache administration user creates and maintains Oracle Database objects that store information used to manage the cache environment and enforce predefined behaviors of particular cache group types.
Start SQL*Plus on the Oracle Database system from an operating system shell or command prompt, and connect to the Oracle database instance as the sys user:
% cd TimesTen_install_dir/oraclescripts
% sqlplus sys as sysdba
Enter password: password
Use SQL*Plus to create a default tablespace to be used for storing TimesTen Application-Tier Database Cache management objects that should not be shared with other applications. While you may also store Oracle base tables that are cached in TimesTen, we strongly recommend that this tablespace be used solely by TimesTen for cache management.
Use SQL*Plus to run the SQL*Plus script TimesTen_install_dir/oraclescripts/initCacheGlobalSchema.sql to create the following elements:
The timesten user
The Oracle Database tables owned by the timesten user to store information about the cache environment, including a cache grid if one is configured
The TT_CACHE_ADMIN_ROLE role that defines privileges on these Oracle Database tables
Pass the default tablespace as an argument to the initCacheGlobalSchema.sql script. In the following example, the name of the default tablespace is cachetblsp:
SQL> CREATE TABLESPACE cachetblsp DATAFILE 'datfttuser.dbf' SIZE 100M;
SQL> @initCacheGlobalSchema "cachetblsp"
Next, use SQL*Plus to create a schema user. Grant this user the minimum set of privileges required to create tables in the Oracle database to be cached in a TimesTen database. In the following example, the schema user is oratt:
SQL> CREATE USER oratt IDENTIFIED BY oracle;
SQL> GRANT CREATE SESSION, RESOURCE TO oratt;
Then use SQL*Plus to perform the following operations:
Create a cache administration user.
Run the SQL*Plus script TimesTen_install_dir/oraclescripts/grantCacheAdminPrivileges.sql to grant the cache administration user the minimum set of privileges required to perform cache grid and cache group operations.
Pass the cache administration user name as an argument to the grantCacheAdminPrivileges.sql script. In the following example, the cache administration user name is cacheuser and the name of its default tablespace is cachetblsp:
Note:
See the comments in thegrantCacheAdminPrivileges.sql script for the required privileges by the user who executes this script and the privileges that this user grants to the cache administration user.SQL> CREATE USER cacheuser IDENTIFIED BY oracle 2 DEFAULT TABLESPACE cachetblsp QUOTA UNLIMITED ON cachetblsp; SQL> @grantCacheAdminPrivileges "cacheuser" SQL> exit
The privileges that the cache administration user requires depend on the types of cache groups you create and the operations that you perform on the cache groups.
See "Create the Oracle database users" for more information about the timesten user, the schema users, and the cache administration user.
SQL> SELECT value FROM nls_database_parameters WHERE parameter='NLS_CHARACTERSET';
On UNIX, in the .odbc.ini file that resides in your home directory or the TimesTen_install_dir/info/sys.odbc.ini file, create a TimesTen DSN cachealone1 and set the following connection attributes:
[cachealone1]
DataStore=/users/OracleCache/alone1
PermSize=64
OracleNetServiceName=oracledb
DatabaseCharacterSet=AL32UTF8
CacheGridEnable=1
On Windows, create a TimesTen user DSN or system DSN cachealone1 and set the following connection attributes:
Data Store Path + Name: c:\temp\alone1
Permanent Data Size: 64
Oracle Net Service Name: oracledb
Database Character Set: AL32UTF8
Cache grid is enabled so we can create a cache grid
Use the default settings for all the other connection attributes.
See "Define a DSN for the TimesTen database" for more information about defining a DSN for a TimesTen database that caches data from an Oracle database.
See "Managing TimesTen Databases" in Oracle TimesTen In-Memory Database Operations Guide for more information about TimesTen DSNs.
Note:
The term "data store" is used interchangeably with "TimesTen database".In addition to the Oracle Database users, you must create the following TimesTen users before you can use TimesTen Application-Tier Database Cache:
A cache manager user performs cache grid and cache group operations. The TimesTen cache manager user must have the same name as a companion Oracle Database user that can access the cached Oracle Database tables. The companion Oracle Database user can be the cache administration user, a schema user, or some other existing user. For ease of use, making the cache administration user the companion Oracle Database user of the cache manager user is preferable. The password of the cache manager user can be different than the password of the companion Oracle Database user with the same name.
Note:
See "Create the TimesTen users" for more details on the cache manager user and its companion Oracle Database user.The cache manager user is responsible for creating and configuring the cache grid (if one has been configured) and creating the cache groups. This user can also monitor the grid itself and various operations that are performed on the cache groups.
One or more cache table users own the cache tables. You must create a TimesTen cache table user with the same name as an Oracle Database schema user for each schema user who owns or will own Oracle Database tables to be cached in the TimesTen database. The password of a cache table user can be different than the password of the Oracle Database schema user with the same name.
The owner and name of a TimesTen cache table is the same as the owner and name of the corresponding cached Oracle Database table.
Start the ttIsql utility on the TimesTen system from an operating system shell or command prompt as the instance administrator, and connect to the cachealone1 DSN to create the TimesTen database that is to be used to cache data from an Oracle database:
% ttIsql cachealone1
Use ttIsql to create a cache manager user. Grant this user the minimum set of privileges required to create a cache grid (if one is configured), to create cache groups, and to perform operations on the cache groups. In the following example, the cache manager user name is cacheuser, which is the same name as the cache administration user that was created earlier:
Command> CREATE USER cacheuser IDENTIFIED BY timesten;
Command> GRANT CREATE SESSION, CACHE_MANAGER, CREATE ANY TABLE TO cacheuser;
Then, use ttIsql to create a cache table user. In the following example, the cache table user name is oratt, which is the same name as the Oracle Database schema user that was created earlier:
Command> CREATE USER oratt IDENTIFIED BY timesten;
Command> exit
The privileges that the cache manager user requires depend on the types of cache groups you create and the operations that you perform on the cache groups. See "Create the TimesTen users" for more information about the cache manager user and the cache table users.
See "Managing Access Control" in Oracle TimesTen In-Memory Database Operations Guide for more information about TimesTen users and privileges.
Start the ttIsql utility and connect to the cachealone1 DSN as the cache manager user. In the connection string, specify the cache manager user name in the UID connection attribute. Specify the cache manager user's password in the PWD connection attribute. Specify the password of its companion Oracle user (created with the same name to be the companion user to the cache manager) in the OraclePWD connection attribute within the connection string. In this example, the cache administration user is the companion user to the cache manager user and so its password is provided.
% ttIsql "DSN=cachealone1;UID=cacheuser;PWD=timesten;OraclePWD=oracle"
Use ttIsql to call the ttCacheUidPwdSet built-in procedure to set the cache administration user name and password:
Command> call ttCacheUidPwdSet('cacheuser','oracle');
The cache administration user name and password need to be set only once in a TimesTen database. See "Set the cache administration user name and password" for information on how to use this setting by the TimesTen database.
Since this example uses a global cache group, you need to create a cache grid to define the framework used to manage global cache data within TimesTen databases that cache data from an Oracle database. You create the cache grid after you have created the Oracle Database users, the TimesTen database, and the TimesTen users, and set the cache administration user name and password in the TimesTen database.
As the cache manager user, use the ttIsql utility to call the ttGridCreate built-in procedure to create a cache grid myGrid:
Command> call ttGridCreate('myGrid');
Then use ttIsql to call the ttGridNameSet built-in procedure to associate the TimesTen database with the myGrid cache grid:
Command> call ttGridNameSet('myGrid');
See "Configuring a cache grid" for more information about the contents and functionality of a cache grid.
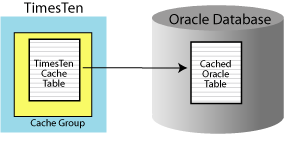
This section creates a read-only cache group (as shown in Figure 2-1) and an asynchronous writethrough (AWT) cache group (as shown in Figure 2-2).
Figure 2-1 Single-table read-only cache group
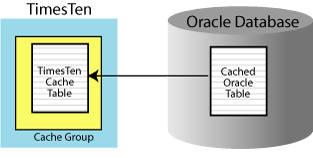
Figure 2-2 Single-table writethrough cache group
Complete the following tasks to create a read-only cache group and an AWT cache group:
Start SQL*Plus and connect to the Oracle database as the schema user:
% sqlplus oratt/oracle
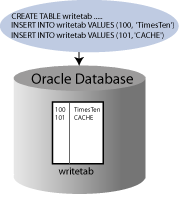
Use SQL*Plus to create a table readtab as shown in Figure 2-3, and a table writetab as shown in Figure 2-4:
SQL> CREATE TABLE readtab (keyval NUMBER NOT NULL PRIMARY KEY, str VARCHAR2(32));
SQL> CREATE TABLE writetab (pk NUMBER NOT NULL PRIMARY KEY, attr VARCHAR2(40));
Figure 2-3 Creating an Oracle Database table to be cached in a read-only cache group
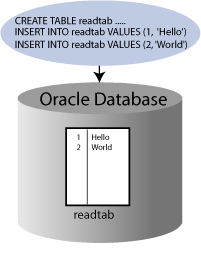
Figure 2-4 Creating an Oracle Database table to be cached in an AWT cache group
Then use SQL*Plus to insert some rows into the readtab and writetab tables, and commit the changes:
SQL> INSERT INTO readtab VALUES (1, 'Hello');
SQL> INSERT INTO readtab VALUES (2, 'World');

SQL> INSERT INTO writetab VALUES (100, 'TimesTen');
SQL> INSERT INTO writetab VALUES (101, 'CACHE');
SQL> COMMIT;
Next use SQL*Plus to grant the SELECT privilege on the readtab table, and the SELECT, INSERT, UPDATE and DELETE privileges on the writetab table to the cache administration user:
SQL> GRANT SELECT ON readtab TO cacheuser;

SQL> GRANT SELECT ON writetab TO cacheuser;
SQL> GRANT INSERT ON writetab TO cacheuser;
SQL> GRANT UPDATE ON writetab TO cacheuser;
SQL> GRANT DELETE ON writetab TO cacheuser;
The SELECT privilege on the readtab table is required to create a read-only cache group that caches this table and to perform autorefresh operations from the cached Oracle Database table to the TimesTen cache table.
The SELECT privilege on the writetab table is required to create an AWT cache group that caches this table. The INSERT, UPDATE, and DELETE privileges on the writetab table are required to perform writethrough operations from the TimesTen cache table to the cached Oracle Database table.
See "Grant privileges to the Oracle database users" for more information about the privileges required for the cache administration user to create and perform operations on a read-only cache group and an AWT cache group.
As the cache manager user, use the ttIsql utility to call the ttCacheStart built-in procedure to start the cache agent on the TimesTen database:
Command> call ttCacheStart;
See "Managing the cache agent" for more information about starting the cache agent.
As the cache manager user, use the ttIsql utility to create a read-only cache group readcache that caches the Oracle Database oratt.readtab table and a dynamic AWT global cache group writecache that caches the Oracle Database oratt.writetab table:
Command> CREATE READONLY CACHE GROUP readcache
       > AUTOREFRESH INTERVAL 5 SECONDS
       > FROM oratt.readtab
       > (keyval NUMBER NOT NULL PRIMARY KEY, str VARCHAR2(32));

Command> CREATE DYNAMIC ASYNCHRONOUS WRITETHROUGH GLOBAL CACHE GROUP writecache
       > FROM oratt.writetab
       > (pk NUMBER NOT NULL PRIMARY KEY, attr VARCHAR2(40));
The cache groups readcache and writecache, and their respective cache tables oratt.readtab and oratt.writetab, whose owners and names are identical to the cached Oracle Database tables, are created in the TimesTen database. Figure 2-5 shows that the writecache cache group caches the oratt.writetab table.
Figure 2-5 Creating an asynchronous writethrough cache group

Use the ttIsql cachegroups command to view the definition of the readcache and writecache cache groups:
Command> cachegroups;

Cache Group CACHEUSER.READCACHE:

  Cache Group Type: Read Only
  Autorefresh: Yes
  Autorefresh Mode: Incremental
  Autorefresh State: Paused
  Autorefresh Interval: 5 Seconds
  Autorefresh Status: ok
  Aging: No aging defined

  Root Table: ORATT.READTAB
  Table Type: Read Only

Cache Group CACHEUSER.WRITECACHE:

  Cache Group Type: Asynchronous Writethrough global (Dynamic)
  Autorefresh: No
  Aging: LRU on

  Root Table: ORATT.WRITETAB
  Table Type: Propagate

2 cache groups found.
See "Read-only cache group" for more information about read-only cache groups.
See "Asynchronous writethrough (AWT) cache group" for more information about AWT cache groups.
See "Dynamic cache groups" for more information about dynamic cache groups.
See "Global cache groups" for more information about global cache groups.
As the cache manager user, use the ttIsql utility to call the ttRepStart built-in procedure to start the replication agent on the TimesTen database:
Command> call ttRepStart;
The replication agent propagates committed updates on TimesTen cache tables in AWT cache groups to the cached Oracle Database tables.
See "Managing the replication agent" for more information about starting the replication agent.
If you are only creating local cache groups, you do not need to attach the TimesTen database to the cache grid. However, before you can perform operations on a global cache group or on its cache tables, you must attach the TimesTen database to the cache grid that it is associated with.
As the cache manager user, use the ttIsql utility to call the ttGridAttach built-in procedure to attach the TimesTen database to the myGrid cache grid:
Command> call ttGridAttach(1,'alone1','mysys',5001);
In this example, alone1 is a name that uniquely identifies the grid member, mysys is the host name of the TimesTen system, and 5001 is the TCP/IP port for the cache agent.Calling the ttGridAttach built-in procedure automatically starts the cache agent if it is not already running.
Although the example in this chapter contains only one standalone TimesTen database as the sole grid member, it can be extended to include additional grid members such as active standby pairs and other standalone TimesTen databases. See Chapter 6, "Creating Other Cache Grid Members", for details on how to create and add other members to an existing cache grid, and how data in a global cache group is shared among the grid members.
This section shows how to manually load the read-only cache group. Then it shows the TimesTen cache table being automatically refreshed with committed updates on the cached Oracle Database table.
Complete the following tasks to perform operations on the read-only cache group:
As the cache manager user, use the ttIsql utility to load the contents of the Oracle Database oratt.readtab table into the TimesTen oratt.readtab cache table in the readcache cache group:
Command> LOAD CACHE GROUP readcache COMMIT EVERY 256 ROWS;
2 cache instances affected.
Command> exit
Figure 2-6 shows that the Oracle Database data is loaded into the oratt.readtab cache table.
Figure 2-6 Loading a read-only cache group

Start the ttIsql utility and connect to the cachealone1 DSN as the instance administrator. Use ttIsql to grant the SELECT privilege on the oratt.readtab cache table to the cache manager user so that this user can issue a SELECT query on this table.
% ttIsql cachealone1
Command> GRANT SELECT ON oratt.readtab TO cacheuser;
Command> exit
Start the ttIsql utility and connect to the cachealone1 DSN as the cache manager user, including the cache manager user password and the password of its companion Oracle user. Use ttIsql to query the contents of oratt.readtab cache table.
% ttIsql "DSN=cachealone1;UID=cacheuser;PWD=timesten;OraclePWD=oracle"
Command> SELECT * FROM oratt.readtab;
< 1, Hello >
< 2, World >
2 rows found.
See "Loading and refreshing a cache group" for more information about manually loading a cache group.
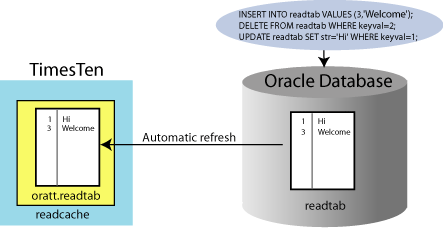
Use SQL*Plus, as the Oracle Database schema user, to insert a new row, delete an existing row, and update an existing row in the Oracle Database readtab table, and commit the changes:
SQL> INSERT INTO readtab VALUES (3, 'Welcome');
SQL> DELETE FROM readtab WHERE keyval=2;
SQL> UPDATE readtab SET str='Hi' WHERE keyval=1;
SQL> COMMIT;
Since the read-only cache group was created specifying autorefresh with an interval of 5 seconds, the oratt.readtab cache table in the readcache cache group is automatically refreshed after 5 seconds with the committed updates on the cached Oracle Database oratt.readtab table as shown in Figure 2-7.
Figure 2-7 Automatically refresh the TimesTen cache table with Oracle Database updates
As the cache manager user, use the ttIsql utility to query the contents of the oratt.readtab cache table after the readcache cache group has been automatically refreshed with the committed updates on the cached Oracle Database table:
Command> SELECT * FROM oratt.readtab;
< 1, Hi >
< 3, Welcome >
2 rows found.
Command> exit
See "AUTOREFRESH cache group attribute" for more information about automatically refreshing cache groups.
This section shows how to dynamically load the AWT cache group. Then it shows committed updates on the TimesTen cache table being automatically propagated to the cached Oracle Database table.
Complete the following tasks to perform operations on the AWT cache group:
Start the ttIsql utility and connect to the cachealone1 DSN as the instance administrator. Use ttIsql to grant the SELECT privilege on the oratt.writetab cache table to the cache manager user so that this user can issue a dynamic load SELECT statement on this table.
% ttIsql cachealone1
Command> GRANT SELECT ON oratt.writetab TO cacheuser;
Command> exit
Start the ttIsql utility and connect to the cachealone1 DSN as the cache manager user, including the cache manager user password and the password of its companion Oracle user. Use ttIsql to load a cache instance on demand from the Oracle Database oratt.writetab table to the TimesTen oratt.writetab cache table in the writecache cache group.
% ttIsql "DSN=cachealone1;UID=cacheuser;PWD=timesten;OraclePWD=oracle"
Command> SELECT * FROM oratt.writetab WHERE pk=100;
< 100, TimesTen >
1 row found.
Command> exit
In a dynamic cache group, a cache instance can be loaded into its cache tables on demand with a dynamic load statement. A SELECT, UPDATE, DELETE or INSERT statement issued on a TimesTen cache table that uniquely identifies a cache instance results in the cache instance being automatically loaded from the cached Oracle Database table if the data is not found in the cache table. A dynamically loaded cache instance consists of a single row in the root table of the cache group, and all the related rows in the child tables.
See "Dynamically loading a cache instance" for more information about a dynamic load operation.
Data can also be manually loaded into the cache tables of a dynamic cache group using a LOAD CACHE GROUP statement.
Start the ttIsql utility and connect to the cachealone1 DSN as the instance administrator. Use ttIsql to grant the INSERT, DELETE, and UPDATE privileges on the oratt.writetab cache table to the cache manager user so that this user can perform updates on this table.
% ttIsql cachealone1
Command> GRANT INSERT ON oratt.writetab TO cacheuser;
Command> GRANT DELETE ON oratt.writetab TO cacheuser;
Command> GRANT UPDATE ON oratt.writetab TO cacheuser;
Command> exit
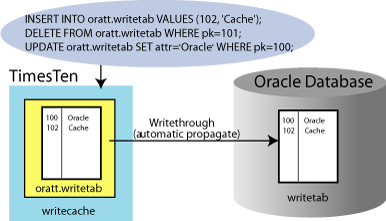
Start the ttIsql utility and connect to the cachealone1 DSN as the cache manager user. Use ttIsql to insert a new row, delete an existing row, and update an existing row in the oratt.writetab cache table, and commit the changes.
% ttIsql "DSN=cachealone1;UID=cacheuser;PWD=timesten;OraclePWD=oracle"
Command> INSERT INTO oratt.writetab VALUES (102, 'Cache');
Command> DELETE FROM oratt.writetab WHERE pk=101;
Command> UPDATE oratt.writetab SET attr='Oracle' WHERE pk=100;
Command> COMMIT;
Command> exit
The committed updates on the oratt.writetab cache table in the writecache cache group are automatically propagated to the Oracle Database oratt.writetab table as shown in Figure 2-8.
Figure 2-8 Automatically propagate TimesTen cache table updates to Oracle Database
As the Oracle Database schema user, use SQL*Plus to query the contents of the writetab table:
SQL> SELECT * FROM writetab;

        PK ATTR
---------- -------------------------------
       100 Oracle
       102 Cache

SQL> exit
Complete the following tasks to restore the TimesTen and Oracle Database systems to their original state before creating a cache grid and cache groups:
Start the ttIsql utility and connect to the cachealone1 DSN as the cache manager user. Since we attached to a grid, use ttIsql to call the ttGridDetach built-in procedure to detach the TimesTen database from the myGrid cache grid.
% ttIsql "DSN=cachealone1;UID=cacheuser;PWD=timesten;OraclePWD=oracle"
Command> call ttGridDetach;
See "Detaching a TimesTen database from a cache grid" for information about the effects of detaching a TimesTen database from a cache grid.
As the cache manager user, use the ttIsql utility to call the ttRepStop built-in procedure to stop the replication agent on the TimesTen database:
Command> call ttRepStop;
Command> exit
See "Managing the replication agent" for more information about stopping the replication agent.
Start the ttIsql utility and connect to the cachealone1 DSN as the instance administrator. Use ttIsql to grant the DROP ANY TABLE privilege to the cache manager user so that this user can drop the underlying cache tables when dropping the cache groups.
% ttIsql cachealone1
Command> GRANT DROP ANY TABLE TO cacheuser;
Command> exit
Start the ttIsql utility and connect to the cachealone1 DSN as the cache manager user. Use ttIsql to drop the readcache read-only cache group and the writecache AWT cache group.
% ttIsql "DSN=cachealone1;UID=cacheuser;PWD=timesten;OraclePWD=oracle"
Command> DROP CACHE GROUP readcache;
Command> DROP CACHE GROUP writecache;
The cache groups readcache and writecache, and their respective cache tables oratt.readtab and oratt.writetab, are dropped from the TimesTen database.
See "Dropping a cache group" for more information about dropping cache groups.
As the cache manager user, use the ttIsql utility to call the ttGridDestroy built-in procedure to destroy the myGrid cache grid:
Command> call ttGridDestroy('myGrid');
See "Destroying a cache grid" for more information about destroying a cache grid.
As the cache manager user, use the ttIsql utility to call the ttCacheStop built-in procedure to stop the cache agent on the TimesTen database:
Command> call ttCacheStop;
Command> exit
See "Managing the cache agent" for more information about stopping the cache agent.
Then use the ttDestroy utility to connect to the cachealone1 DSN and destroy the TimesTen database:
% ttDestroy cachealone1
Start SQL*Plus and connect to the Oracle database as the sys user. Use SQL*Plus to drop the timesten user, the schema user oratt, and the cache administration user cacheuser.
% sqlplus sys as sysdba
Enter password: password
SQL> DROP USER timesten CASCADE;
SQL> DROP USER oratt CASCADE;
SQL> DROP USER cacheuser CASCADE;
Specifying CASCADE in a DROP USER statement drops all objects such as tables and triggers owned by the user before dropping the user itself.
Next use SQL*Plus to drop the TT_CACHE_ADMIN_ROLE role:
SQL> DROP ROLE TT_CACHE_ADMIN_ROLE;
Then use SQL*Plus to drop the default tablespace cachetblsp used by the timesten user and cache administration user including the contents of the tablespace and its data file:
SQL> DROP TABLESPACE cachetblsp INCLUDING CONTENTS AND DATAFILES;
SQL> exit