Step 5: Compiling and Running the Application
Previous
Next
Step 5: Compiling and Running the Application |
Previous |
Next |
Now that you have finished debugging your application you can compile and run the application, observe any error messages that are displayed, and review the results of your work.
To compile and run the application:
Frame1 and choose Make
<projectname> from the context menu. Or, you can click
The Log window automatically appears at the bottom of the screen. Any errors encountered during the compilation process are listed there.
If any errors appear listed, be sure to resolve them before attempting to deploy the application. To resolve errors, double-click the error message in the Log window to navigate directly to the correct line in the referenced source file.
Before you can successfully deploy the application, the following text should appear in the status line:
Successful compilation: 0 errors, 0 warnings.
Application1 and choose Run
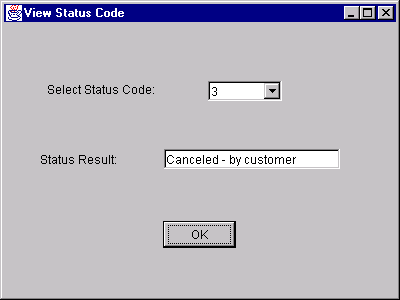
Application1.java from the context menu. Or, you can click Your application is run and the user interface you have created is displayed.
That user interface should look similar to this:
Note: Anytime you want to ensure that your entire project is up-to-date, choose Rebuild <projectname>, which compiles every file in the project including any imported files. Once you have done your initial compilation, choosing Make is faster than Rebuild.
Congratulations!
The next topic, Summary of the Building a Basic Java Application Tutorial, tells you where to go next to continue exploring JDeveloper's functionality.