The tree component is designed to view tree-structured data. Its purpose is to allow users to quickly browse through complex sets of hierarchical objects and access detailed information for a record by highlighting it in the tree. The objects are visually displayed via child/leaf nodes and parent nodes that are either expanded or collapsed.
Tree data is set with the nodes attribute on the tree component. Each node in the tree is a DataObject containing key-value pairs. Each DataObject may contain any set of key-value pairs.The following describes the key-value pairs expected in each node:
The attributes you can set for tree are:
nodes - Specifies the hierarchical tree of data. This
DataObjectList indicates all of the "root", or top level nodes. This
attribute must be databound.
formSubmitted - Specifies a boolean value that determines
whether form submission will be used in the expand/collapse links.
formName - Specifies the form name to submit to.
proxy - Specifies the proxy that sits between the tree
nodes and the expanded state, selection state, and the children of
those nodes. This attribute must be databound. A tree without a proxy
is not interactive. The proxy keeps track of the expand/collapse state
of the tree nodes by setting up the expand and collapse destinations,
and optionally the selection on the tree in the client and over the
server on a per render basis. The proxy must be of type
oracle.cabo.ui.data.tree.TreeDataProxy. See
oracle.cabo.ui.data.tree.ClientStateTreeProxy for an instance of such
a proxy.
unvalidated - Specifies a boolean value that determines
whether or not to validate before any form submits generated by the
tree proxy. The default is to perform no validation. This attribute is
only applicable when the tree is used in formSubmitted mode.
id - Specifies the page-wide tree identity in
client-to-client or client-to-server events. This attribute is
automatically set when you use the Data Control palette to create your
tree.
This tree example uses inline data.
<page xmlns="http://xmlns.oracle.com/uix/ui"
xmlns:data="http://xmlns.oracle.com/uix/ui"
expressionLanguage="el" >
<content>
<dataScope>
<contents>
<form name="myForm" >
<contents>
<tree nodes="${data:data().Nodes.nodes}" />
</contents>
</form>
</contents>
<provider>
<data name="data:Nodes">
<inline>
<nodes text="Shop"
destination="http://www.oracle.com"
expandable="expanded">
<nodes text="Books"
destination="http://www.oracle.com"
expandable="collapsed">
<nodes text="Sale"
destination="http://www.oracle.com"
expandable="collapsed">
<nodes text="Paperbacks"
expandable="no"
destination="http://www.oracle.com" />
</nodes>
<nodes text="Fiction"
destination="http://www.oracle.com"
expandable="no"/>
<nodes text="Nonfiction"
destination="http://www.oracle.com"
expandable="no"/>
</nodes>
<nodes text="Hardware"
expandable="collapsed">
<nodes text="Desktops"
destination="http://www.oracle.com"
expandable="no"/>
<nodes text="Notebooks"
destination="http://www.oracle.com"/>
</nodes>
</nodes>
</inline>
</data>
</provider>
</dataScope>
</content>
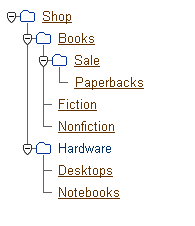
</page> The value returned by the 'text' key is displayed as the text for the node. The nodes "Shop" and "Books" are links because a value is set for the 'destination' key. The value returned by the 'expandable' key determines whether or not the children are visible. Thus the children of "Shop" are visible while those for "Books" are not. The above code produces this tree in a browser:
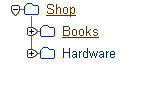
By default expandable is "no". This means you can exclude this key-value pair for nodes that are leaves. If you exclude it for non-leaf items or put "no" as the value, then the icon indicating +/- is not displayed.
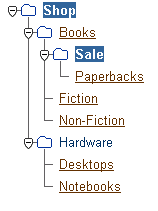
To specify nodes to look selected (i.e., highlighted with a blue background and white text), set the 'selected' key to true, as shown in the following illustration and code snippet:
...
<nodes text="Shop"
destination="http://www.oracle.com"
expandable="expanded"
selected="true">
<nodes text="Books"
destination="http://www.oracle.com"
expandable="expanded">
<nodes text="Sale"
destination="http://www.oracle.com"
expandable="expanded"
selected="true">
<nodes text="Paperbacks"
destination="http://www.oracle.com" />
</nodes>
...
</nodes>
...
</nodes>
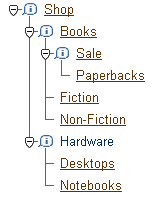
... By default nodes with children will render with a folder icon. You can add icons to leaves or replace the folder icon by setting the value for the 'icon' key to the URI of another image, as shown in the following illustration and code snippet:
...
<nodes text="Shop"
       destination="http://www.oracle.com"
       expandable="expanded"
       icon="/docs/devguide/images/data_trees/info.gif">
  <nodes text="Books"
         destination="http://www.oracle.com"
         expandable="expanded"
         icon="/docs/devguide/images/data_trees/info.gif">
    <nodes text="Sale"
           destination="http://www.oracle.com"
           expandable="expanded"
           icon="/docs/devguide/images/data_trees/info.gif">
      <nodes text="Paperbacks"
             destination="http://www.oracle.com" />
    </nodes>
    ...
  </nodes>
  ...
</nodes>
...
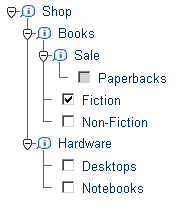
The tree component supports the nodeStamp named child,
which is used to specify a node that renders once for each tree node.
This means each node looks similar, but can have different data through
data binding. The following example uses a nodeStamp. Note that you can
add arbitrary key-value pairs into the DataObjects in the tree and then
use data binding to extract these values.
Example in UIX XML:

<page xmlns="http://xmlns.oracle.com/uix/ui"
      xmlns:data="http://xmlns.oracle.com/uix/ui"
      expressionLanguage="el" >
  <content>
    <dataScope>
      <contents>
        <!-- UIX Components -->
        <form name="myForm" >
          <contents>
            <tree nodes="${data:data().Nodes.nodes}">
              <nodeStamp>
                <flowLayout>
                  <contents>
                    <checkBox rendered="${uix.current.rendered}"
                              disabled="${uix.current.disabled}"
                              checked="${uix.current.checked}"/>
                    <styledText text="${uix.current.text}" />
                  </contents>
                </flowLayout>
              </nodeStamp>
            </tree>
          </contents>
        </form>
      </contents>
      <!-- Data -->
      <provider>
        <data name="data:Nodes">
          <inline>
            <nodes text="Shop"
                   destination="http://www.oracle.com"
                   expandable="expanded"
                   rendered="false"
                   icon="/docs/devguide/images/data_trees/info.gif">
              <nodes text="Books"
                     destination="http://www.oracle.com"
                     expandable="expanded"
                     rendered="false"
                     icon="/docs/devguide/images/data_trees/info.gif">
                <nodes text="Sale"
                       destination="http://www.oracle.com"
                       expandable="expanded"
                       rendered="false"
                       icon="/docs/devguide/images/data_trees/info.gif">
                  <nodes text="Paperbacks"
                         destination="http://www.oracle.com"
                         disabled="true" />
                </nodes>
                <nodes text="Fiction"
                       destination="http://www.oracle.com"
                       checked="true"/>
                <nodes text="Nonfiction"
                       destination="http://www.oracle.com"/>
              </nodes>
              <nodes text="Hardware"
                     expandable="expanded"
                     rendered="false"
                     icon="/docs/devguide/images/data_trees/info.gif">
                <nodes text="Desktops"
                       destination="http://www.oracle.com"/>
                <nodes text="Notebooks"
                       destination="http://www.oracle.com"/>
              </nodes>
            </nodes>
          </inline>
        </data>
      </provider>
    </dataScope>
  </content>
</page>
Note that the height of the nodes cannot be arbitrarily large. Currently each node is about 45 pixels high.
To create tree data in Java, you can write a class that extends oracle.cabo.ui.data.DataObject and recognizes the keys listed in the section Tree data presented earlier. UIX provides a simple implementation of this class called oracle.cabo.ui.data.tree.SimpleTreeData, which implements a single tree node. The following method creates a single tree node:
Example:

/**
 * @param text the text label of the tree node
 * @param expandable one of UIConstants.EXPANDABLE_NO,
 * UIConstants.EXPANDABLE_EXPANDED, UIConstants.EXPANDABLE_COLLAPSED.
 * @param isSelected true if this node is initially selected.
 */
private static SimpleTreeData createNode(String text, String expandable
                                         boolean isSelected)
{
  SimpleTreeData data = new SimpleTreeData();
  data.setText(text);
  data.setDestination( "http://www.oracle.com");
  data.setExpandable(expandable);
  data.setSelected(isSelected);
  return data;
}
Example:

public static DataObject getTreeData(RenderingContext context,
                                     String namespace, String name)
{
  SimpleTreeData shop = createNode("Shop", UIConstants.EXPANDABLE_EXPANDED,
                                   true);
  SimpleTreeData books = createNode("Books", UIConstants.EXPANDABLE_EXPANDED,
                                    false);
  SimpleTreeData sale = createNode("Sale", UIConstants.EXPANDABLE_EXPANDED,
                                   true);
  SimpleTreeData pbacks = createNode("Paperbacks", UIConstants.EXPANDABLE_NO,
                                     false);
  sale.addChild(pbacks);
  books.addChild(sale);
  SimpleTreeData fic = createNode("Fiction", UIConstants.EXPANDABLE_NO,
                                  false);
  books.addChild(fic);
  SimpleTreeData nonfic = createNode("Nonfiction", UIConstants.EXPANDABLE_NO,
                                     false);
  books.addChild(nonfic);
  shop.addChild(books);
  SimpleTreeData hw = createNode("Hardware", UIConstants.EXPANDABLE_EXPANDED,
                                 false);
  SimpleTreeData desktops = createNode("Desktops", UIConstants.EXPANDABLE_NO,
                                       false);
  hw.addChild(desktops);
  SimpleTreeData nbks = createNode("Notebooks", UIConstants.EXPANDABLE_NO,
                                   false);
  hw.addChild(nbks);
  shop.addChild(hw);
  return shop;
}
...
<dataScope>
  <contents>
  ...
    <!-- Since our data provider returns the root of the tree,
         we do not need the 'nodes' parameter in front of
         the 'demo:Nodes' -->
    <tree data:nodes="@data:Nodes" ../>
    ...
  </contents>
  <provider>
    <data name="data:Nodes">
      <method class="MyDemoClass" method="getTreeData"/>
    </data>
  </provider>
</dataScope>
...
For more details, see the JavaDoc for the SimpleTreeData class.
About TreeProxy
About Tree and Frame
About HGrid
and its Named Children
About BrowseMenu
Creating a Tree
Working with Navigation Components
Copyright © 1997, 2004, Oracle. All rights reserved.