Working with Find Mode in ADF-Enabled Web Pages
When you create an ADF-enabled web pages for a business service project,
you can support parameterized queries by using an Input Form and Find
mode enabled for the ADF iterator binding. Find mode lets users enter
search criteria through the ADF iterator binding against the bound
collection.
Note: It is not possible to initiate Find mode for ADF
Business Component attributes that are Object types, Array types, and
LOB domain types.
To enable Find mode for a query form:
-
You can enable Find mode different ways depending on your
application:
In a Struts-based application, you can drop the
Find operation from Data Control Palette onto the data page
or data action in your page flow. When you run the application from
the action with a Find operation, the action executes the operation
on the binding container and places the page in Find mode.
OR
-
In a non-Struts (Model 1) web application, you can drop the
Find operation as a button from the Data Control Palette onto the Input
Form. When you run the page and click the Find button, the operation
is invoked on the binding container and Find mode is enabled.
OR
-
You can set the Find mode property directly on the binding container
at design time. In the Structure window, select the UI Model tab for
the page. Select the UIModel node in the
binding list and choose True for
Find Mode in the Property Inspector.
To create an input form for a Struts web page that operates in Find mode:
-
Open the Data Control
Palette for the ADF-enabled web page that you want to design.
This assumes you have created a Struts page flow with a single data
page to run the web page.
-
In the Data Control Palette, select the desired data collection that
contains the data objects you want to be able to query.
-
To create the input form, drag the data collection as Input
Form into the open web page.
The Visual Editor displays the form represented by a dashed box.
Note that it is not possible to initiate Find mode for ADF Business
Component attributes that are Object types, Array types and LOB
domain types. If your input form displays attributes of those types,
remove the attribute's corresponding text field from the form.
-
In the Visual Editor, click the Submit button and press Delete to
remove it from the web page.
-
When you are working with a Struts-based web application, select
Execute from the Operations node folder
under the previously selected data collection and choose
Button from the dropdown list.
-
Add the button into the existing HTML form so it appears inside the
form.
The form will not be placed into Find mode until the action with
find is executed. The Execute button submits a named event "Execute"
to the Struts page flow, which will handle the event by executing
the Find operation.
-
Return to the Struts Page Flow Diagram and, in the Data Control
Palette, select Find from the
Operations node under the same data collection you previously selected.
-
Drag the Find node from the top portion
of the Data Control Palette on to the data action or data page icon
in the page flow that corresponds to your web page.
-
Insert another data page into the page flow for the results page,
and draw a forward transition between the two actions. Click the
forward and rename it to Execute to match the named
event specified in the input form. The named event is case sensitive.
-
Create the web page for the second data page and drop the same data
collection as a Read-Only Table from the
Data Control Palette.
The above procedure yields a simple page flow that will not return the
web page to input mode (does not take the page out of Find mode). When
you want to work with a page flow that will allow the user to intiate a
query, display the results, and then finally, return to a page that
displays the query results in an input form for editing, you can use the
following more complex page flow.
To create a Struts page flow that will return the query page to input
mode:
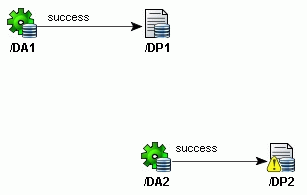
-
Open the Page Flow Diagram and insert a data action (DA1) and a data
page (DP1), and draw a forward transition between the two.

-
Create the the ADF-enabled web page for the data page and drop a
data collection as an Input Form from
the Data Control Palette.
-
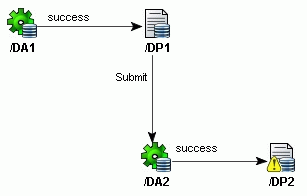
Return to the page flow diagram, insert a new data action (DA2) and
data page (DP2), and draw a forward transition between these two
items.
-
Click the Source tab for the page flow and locate the
modelReference property for the new data action (DA2) and
change the value to the first web page's UI model (DP1UIModel
):
	<action path="/DA2" className="oracle.adf.controller.struts.actions.DataActionMapping"

                        type="oracle.adf.controller.struts.actions.DataAction" name="DataForm">

          <set-property property="modelReference" value="DP1UIModel"/>

          <forward name="success" path="/DP2.do"/>

     </action>
This step allows the web pages to continue to reference the same
binding container and operate on the same databound controls.
-
Draw a third forward transition from the first data page (DP1) to
the new data action (DA2) and change the name to
Submit.
-
Drop a Find operation for the same data
collection on the first data action (DA1).
-
Drop an Execute operation for the same
data collection on the second data action (DA2).
-
Create the web page for the second data page (DP2) and drop the same
data collection as a Read-Only Table
from the Data Control Palette.
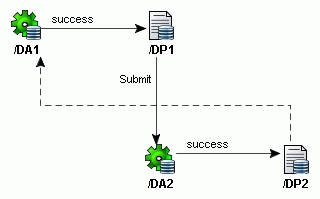
-
Return to the page flow diagram and draw a Page
Link from the second data page (DP2) to the original data
action (DA1).
Related topics
About Find Mode in ADF Web Clients
About Find Mode in JClient Controls
Copyright © 1997, 2004, Oracle.
All rights reserved.