Working with Named Events in Oracle ADF
Oracle ADF provides an easy way to build commands and event handlers for
working with events in your web applications. This topic contains the
following sections:
Calling a Named Event from a Web Page
The code that you add to a web page to call a named event is the same
for both model-layer actions and named events that do not go to the
model layer. However, Oracle ADF provides a shortcut for adding
model-layer operations to a web page. This section describes both the
shortcut and the code used.
To execute action binding model operations:
-
Open the web page for editing by
double-clicking on the data page or page icon in the Page Flow Diagram
.
-
Drag the operation from
the data control palette and insert it into the design view of the
associated web page.
To call a custom event from a web page:
-
Open the web page for editing by
double-clicking on the data page, page forward, or page icon in the
Page Flow Diagram.
-
In the Visual Editor, switch to the code view of the web page by
clicking the Source tab.
-
Enter the code that calls the event:
-
For a button, enter:
<input type="submit" name="event_eventName"
            value="buttonName"/>
where eventName is the name of the event and
buttonName is the text for the button.
-
For a link, enter:
<a href="pageName.do?event=EventName">Link Text</a>
where eventName is the name of the event and
Link Text is the text for the link.
Once you have written the command that calls the event in the web page,
you can also customize a pre-existing operation or create a new named
event.
Customizing and Creating Events
When you create and register business services for an application, the
Data Control Palette displays the available operations (action
bindings). You can override the behavior of these operations by creating
an event handler in the data action or data forward action associated
with the web page where you use the operations. You can also create new
events that do not use the action bindings.
To override an existing operation in the action bindings:
-
In the Page Flow Diagram, right-click the data action or data page
associated with the page that calls the method. Choose
Go to Code to open the Create Struts Data Action dialog.
In the Create Struts Data Action dialog, the
Extends field identifies the super class
oracle.adf.controller.struts.actions.DataAction or
oracle.adf.controller.struts.actions.DataForwardAction
Accept the default values and click OK.
-
In the code editor, press daev + Ctrl +
Enter to add the code template for an event handler.
This adds the following code segment:
public void on|[Enter event name here
          ](DataActionContext actionContext)
{
 // Code before executing
          the default action
 if (ctx.getEventActionBinding() != null)
          ctx.getEventActionBinding().doIt();
 // Code after executing the
          default action
}
Add the event name at the cursor (|). For example, if you are
overriding the Next operation, the signature would be:
public void onNext (DataActionContext actionContext)
The comments in the code template indicate where to enter the code
for work that you want to take place before and after calling the
method. For more information on code templates, see
Using Code Templates.
To create a named event handler for a new event:
-
In the Page Flow Diagram, right-click the data action or data page to
which you want to add the named event handler and choose
Go to Code.
-
In the Create Struts Data Action dialog, the
Extends field identifies the super class. Accept the default
values and click OK.
-
In the code editor, add the code for the event handler. The
signature of the event handler looks like this:
public void onEventName(DataActionContext actionContext)
{

 //Your implementation here
}
Using an Event to Define an Action Forward
You can use a named event to define the forward for a data action or
data forward action in a web page by making the the value of the forward
name attribute for the action identical to the name of the associated
event in the web page. When data actions and data pages encounter an
event that is defined neither in the action subclass nor in the action
bindings, they assume that the event is the name of a forward.
To associate an event with an action forward:
-
Enter the command for the event in the web page:
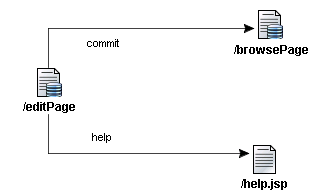
For example, the editPage web page provides a button
and a link that call two events, commit and help
respectively. The first event, commit, is a typical operation
for a data collection that can be dragged from the Data Control
Palette. In this example, clicking the Commit button commits the
edit operation and takes the user back to the Browse page. The
second event, help, provides a custom navigation option
that takes the user to the appropriate help page for the current
page.
The following code shows the HTML for the button (inside a Struts
form) that calls the commit event:
<form method="POST" action="editPage.do">

<input type="submit" name="event_Commit" value="Commit"/>

</form>
The following code shows the HTML for the link that calls the help
event:
<a href="editPage.do?event=Help">Help</a>
-
Set the name attribute of the action forward with the
correct path to be identical to the event name in the web page:
In the example described, the forward that goes to the browse page
would be defined like this:
<forward name="commit" path="/browsePage.do">
The forward that goes to the help page would be defined like this:
<forward name="help" path="/help.jsp">
The following diagram shows how the example page flow would look in
the page flow diagram:

Oracle ADF handles this setup in a way that avoids the need to subclass
the associated data action or data forward action
Related topics
About Supported Data Collection
Operations
Inserting Business Service Actions Using the Data Control Palette
Executing Business Service Methods with a Data Action
Copyright © 1997, 2004, Oracle.
All rights reserved.
